 Skip to content
FOR CLINICIANS AND PHYSIOTHERAPISTS
Dual-mobility total hip arthroplasty — accelerated rehabilitation protocol
Protection, movement and a gradual return to daily activity. Select the stage appropriate to the actual procedure and current clearance.
Using and loading the limb
This less restrictive pathway is for selected patients. Loading still follows implant stability, tissue status and the orthopaedic surgeon’s instructions.
Full guidance ↓Brace or immobilisation
A dual-mobility cup alone does not prescribe routine bracing. Additional protection after reconstruction is set by the surgeon.
Full guidance ↓Permitted movement
Selected patients do not automatically require a 90° limit; move gently and with control. Dual mobility does not override repaired-muscle precautions or permit unrestricted extremes.
Full guidance ↓Permitted movement, loading and removal of a brace are separate decisions. Additional repairs may require a more protective programme.
Rehabilitation at a glance
Progression follows healing and functional criteria, not dates alone.
Rehabilitation boards
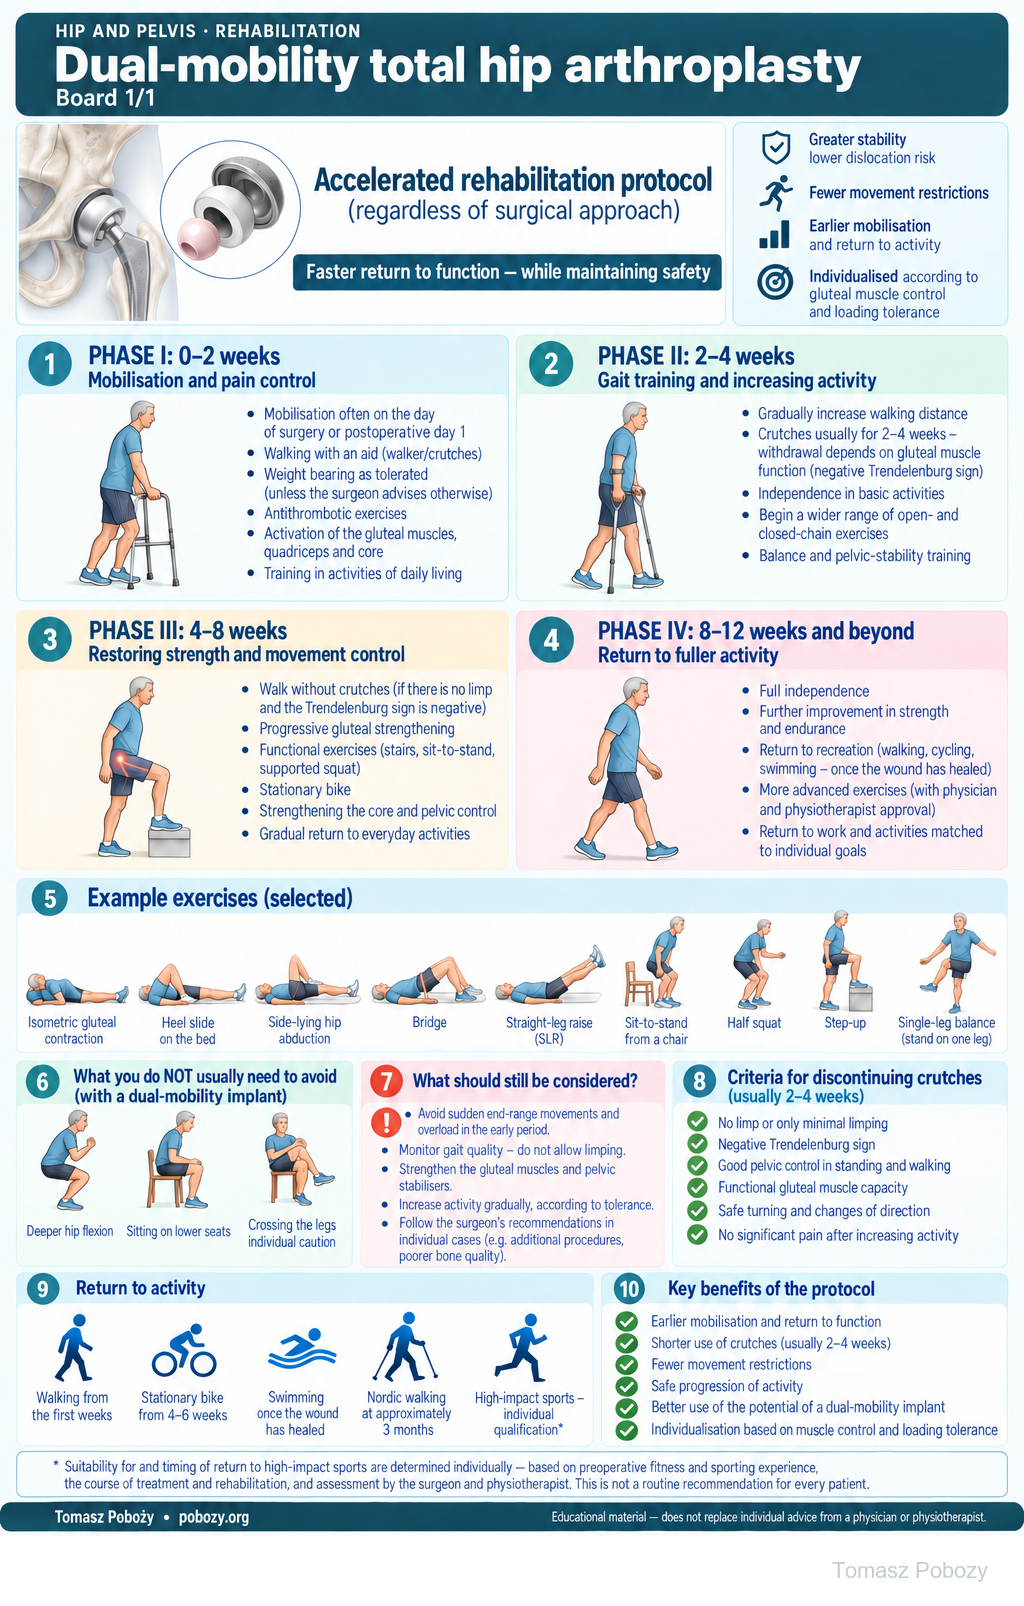
Four rehabilitation phases, example exercises and progression criteria. The programme should be tailored to the specific procedure and the patient’s functional recovery.
Exercises — a closer look
Use the complete boards above together with the instructions for the chosen stage. An exercise shown for a later stage is not permitted early.
Open the relevant complete board and zoom in. The viewer retains all stages and captions.
Exercise instructions and progression are contained in the stage descriptions linked above.
Scope and protection
Scope, surgical approach and weight bearing
Who is this variant for?
For an adult after primary elective total hip arthroplasty with a dual-mobility cup, provided the components are stably fixed and the clinical course permits early weight bearing. The surgeon should confirm that a less restrictive programme may be used. Absence of information about restrictions does not automatically mean there are none.
The framework may be used after an anterior, anterolateral, lateral or posterior approach. However, newly repaired abductors and muscles whose attachments were preserved should not automatically receive the same loading. Independence from the name of the approach does not mean independence from what was actually repaired.2
Revision surgery, a recent fracture, osteotomy, intraoperative fracture, extensive bone or tendon reconstruction, or lack of permission for full weight bearing require a separate plan. Major balance impairment, neurological disease and a high risk of instability require individual assessment, even when these factors were the reason for using a dual-mobility cup.
Weight bearing is a separate decision
Weight bearing as tolerated is used only when authorised. An uncemented construct alone does not require routine partial weight bearing, but intraoperative events may justify it. A dual-mobility cup does not remove restrictions arising from fixation stability, fracture or muscle repair. This programme does not override different discharge instructions.6
What do fewer movement restrictions mean?
In a suitable patient, we do not automatically impose a 90° flexion limit or prohibit every isolated rotational movement for six weeks. Gentle active and assisted movement needed for sitting, dressing, hygiene and walking is permitted. High seats, a raised toilet or sleeping only on the back do not have to be introduced routinely if the patient manages safely without them and has no specific instructions. Supports and pillows may be used for comfort.1
The deeper flexion, lower sitting position and crossing of the legs shown on the poster are not mandatory exercises from the first day. They illustrate the absence of automatic prohibitions in this variant; whether a specific activity is appropriate depends on individual instructions, movement control and tolerance.
This does not permit sudden twisting on the weight-bearing leg, forcing combined end-range positions, a deep squat with rotation, forceful passive stretching or heavy loading. During the early period, change direction with small steps. Do not test implant stability by provoking end-range positions.
Increase range of motion according to the patient’s needs and response, without a rigid angular target for each week. Therapist-assisted passive movement may supplement the programme, but it is not intended to force through pain or resistance. Muscle loading should be matched to tissue condition and movement quality, not solely to the number of weeks since surgery.5
Exercises shown on the poster and the home programme
The poster shows selected examples: isometric gluteal contraction, heel slide, side-lying hip abduction, bridge, straight-leg raise, sit-to-stand, half squat, step-up and balance exercises. This is not a set to be performed in full from the first day. Introduce each exercise after teaching the technique and confirming that tissue condition, movement control and postoperative instructions allow it.
Abduction and single-leg loading must not outpace protection of an abductor repair. The bridge and straight-leg raise require adequate control; do not add resistance to painful hip flexion. Use support for sit-to-stand, half squats and step-ups when needed.
The physiotherapist records the selected exercises, range, number of repetitions and frequency. Daily rehabilitation includes walking and appropriately selected movement work; it does not mean heavy training of the same muscles every day. When increasing difficulty, change one element at a time and assess the response after the session and the next day.
High-impact sports — individual assessment
Sports involving high loading or injury risk, including running, jumping and contact sports, are not a routinely recommended part of the programme. In this author’s protocol variant, suitability and timing for return are considered individually, taking account of preoperative fitness and sporting experience, the course of treatment and rehabilitation, current strength and movement control, and the demands of the specific sport.
The decision requires assessment by the surgeon and physiotherapist and discussion of risk with the patient. The passage of 3–6 months alone, and the use of a dual-mobility cup, do not constitute permission to return to these activities. Returning to a previously practised sport and starting a new demanding sport are not the same situation.8
Stages and progression criteria
Crutches for 2–4 weeks — discontinuation criteria
Initially use two crutches or a walker. The patient may then progress to one crutch or a cane on the side opposite the operated hip, followed by unaided walking. Progress depends on function, not the date alone.5
The 2–4-week window is an assumption of this author’s protocol variant, not a validated mandatory timeline after every dual-mobility arthroplasty. Before discontinuing walking aids completely, assess all of the following:
- permission for full weight bearing and no continuing requirement to protect repaired structures with crutches;
- a negative Trendelenburg sign and maintained pelvic control without compensatory trunk lean;
- gait without marked limping, shortened stance time or loss of control after repeated walking trials;
- safe standing up, stopping and changing direction, with balance sufficient for the home environment;
- no meaningful increase in pain or swelling, and no deterioration in gait after reducing support.
A negative Trendelenburg sign is important, but it is not the only criterion. Combine static assessment with observation of movement and exercise tolerance. If needed, retain an aid for longer walks or uneven ground despite good gait in the clinic.5
How do we define a negative Trendelenburg sign?
When standing on the operated limb, the pelvis does not drop on the side of the raised leg. The result is not considered normal if the patient keeps the pelvis level by clearly leaning the trunk over the stance leg or unloading it through the arms. The test is performed with guarding, after single-leg support has been permitted. It is not used to test the strength of a recent repair or implant stability.
If the criteria are not met after four weeks, retain the appropriate support and identify the cause. Do not reinforce a limp simply to meet the proposed timeline.
Phase I · 0–2 weeks — mobilisation and pain control
Day of surgery to discharge
Begin rehabilitation on the day of surgery if the patient’s general condition permits, usually within the first 24 hours. The first mobilisation is supervised; assess recovery of limb control after anaesthesia and tolerance of positional changes.4
Teach standing up, sitting down, bed-to-chair transfers and walking with an appropriate aid. Weight bearing as tolerated is used only when authorised. Exercise examples include ankle pumps, gentle quadriceps and gluteal contractions, small heel slides and controlled weight shifts. Selection must reflect the structures actually repaired.
Before discharge, the patient should be able to perform basic activities safely with assistance, understand the home programme and stair technique if required, and know how to contact the team.4
First days at home
Introduce several short walking bouts during the day, interspersed with rest. Practise the movement needed for self-care without forcing it. Rhythm, pelvic control and the absence of increasing limping matter more than distance.
Continue heel slides, knee extension and gentle muscle contractions. After checking technique, add active hip movements in a non-weight-bearing position or supported standing. Abduction and single-leg exercises require approval when surgery included abductor repair. Do not intensify painful hip flexion by adding resistance.
End-of-phase goal: basic independence with an assistive device and correct performance of selected exercises. Unaided walking is not required by the end of week two.
Phase II · 2–4 weeks — gait training and increasing activity
This is the planned window for assessing readiness to discontinue crutches. Apply the criteria described above rather than relying on pain relief alone. Initial unaided trials are short and supervised. Gradually increase walking distance while maintaining pelvic control.
Progress sit-to-stand, a shallow squat with stable support, stepping onto a low step and pelvic control. Match the range of open- and closed-chain exercises to the patient’s ability. A small resistance may be added when unresisted movement is performed correctly, the tissues can be loaded and there is no clear overload response. Strengthening does not mean maximal-effort testing.
End-of-phase goal: progressively less support while maintaining good gait and greater independence. Discontinuing crutches is not permission for heavy lifting, rapid turns or sport.
Phase III · 4–8 weeks — restoring strength and movement control
Increase walking endurance and the difficulty of functional tasks. Add repetitions, step height or a small resistance gradually — not all at once. Practise controlled ascending and descending, balance, and gluteal muscle work without pelvic drop. Include trunk-stability training.
A patient who meets the criteria may walk without crutches; use support when fatigued, on difficult ground or if limping returns. A daily home programme should be complemented by the physiotherapist’s assessment and correction of technique.
A stationary bike, shown on the poster from approximately weeks 4–6, may be introduced after approval when the patient can mount safely and pedal smoothly. Start with low resistance. Adjust saddle height to the patient’s movement capacity, not to a rigid flexion limit based on the name of the surgical approach.
End-of-phase goal: more efficient gait and daily activities, and tolerance of progressive strengthening. Absence of routine movement restrictions is not permission for aggressive stretching.
Phase IV · 8–12 weeks and beyond — return to fuller activity
Develop the strength, endurance and coordination needed for work and recreation. Single-leg tasks and greater loading require maintained control even when fatigued. Increase longer walks and cycling; begin swimming and aquatic exercise after the wound has healed and approval has been given. Nordic walking, shown on the poster from around the third month, requires safe gait and command of the technique.8
Do not set a mandatory full range of motion or the same return-to-work date for everyone. More advanced exercises require assessment by the physician and physiotherapist. “Return to fuller activity” describes the goal of this phase, not a guaranteed result at week eight.
Goal: return to agreed activities with safe technique, without increasing pain or swelling and without deterioration in gait. Further progression depends on individual needs and the course of rehabilitation.
Warning signs
Pain management and warning signs
The patient should take regularly prescribed pain medicines according to the schedule; rescue medicines remain for as-needed use. Do not increase doses to force greater movement. Early walking and ankle exercises do not replace prescribed thromboprophylaxis.4, 7
Urgent assessment: sudden severe pain, deformity, inability to bear weight, suspected dislocation, new wound discharge, fever, or calf pain and swelling. Sudden shortness of breath, chest pain or fainting require immediate emergency help. Do not attempt to reduce the hip yourself. Inform the treating team that a dual-mobility implant has been used.
Further guidance
HIP AND PELVIS · FOR DOCTORS AND PHYSIOTHERAPISTS
Earlier return to independent walking and activities of daily living, with fewer routine movement restrictions. A shared framework for different surgical approaches, once the patient has been deemed suitable by the surgeon. Faster progression means making use of recovering function, not forcing the tissues.
A variant for patients deemed suitable for accelerated rehabilitation. Crutches are generally used for 2–4 weeks; discontinuation depends on gluteal muscle capacity, a negative Trendelenburg sign, gait quality and balance. A dual-mobility cup does not remove the need to protect repaired tissues or override specific weight-bearing instructions. The timelines on the poster are indicative, and return to high-impact sports requires individual assessment.1, 2, 5
Protocol poster
Click or tap the poster to enlarge it. Details and explanations are provided in the expandable sections below.
Four rehabilitation phases
The phases correspond to the poster: 0–2 weeks, 2–4 weeks, 4–8 weeks, and 8–12 weeks and beyond. These periods are indicative. Progression requires meeting functional goals while accounting for healing; it is not an instruction to perform every exercise from the first day of a given phase.
Watch or listen
Conversations with Tomasz Poboży on Radio Rekord Mazowsze (in Polish). General background on treatment; follow this protocol for procedure-specific restrictions.
References
References
Gibian et al. reported 580 hips treated through a mini-posterior approach using a monoblock dual-mobility construct without traditional posterior precautions. One dislocation was recorded. This was a retrospective single-surgeon series with a mean follow-up of 5.9 months — not evidence that every implant and every repair permit identical management.1
The review by Butler et al. found a low dislocation rate after dual-mobility arthroplasty across different approaches, but it did not validate a single accelerated programme. A 2026 meta-analysis likewise supports a lower dislocation risk compared with fixed-bearing constructs, but it concerns implant outcomes rather than discontinuing crutches after 2–4 weeks.2, 3
The timetable and crutch-discontinuation window presented here are the author’s proposal for appropriately selected patients. They are not a separately validated protocol for all dual-mobility arthroplasties. General rehabilitation programmes informed the principles of gait training, functional assessment and progressive loading.
- Gibian JT, Hong TS, Nunley RM. Posterior Approach Total Hip Arthroplasty Utilizing a Monoblock Dual-Mobility Construct Without Posterior Hip Precautions: A Series of 580 Hips With One Dislocation J Arthroplasty. 2023;38(7S):S131–S135. doi:10.1016/j.arth.2023.03.027.
- Butler JT, Stegelmann SD, Butler JL, Bullock M, Miller RM. Comparing dislocation rates by approach following elective primary dual mobility total hip arthroplasty: a systematic review J Orthop Surg Res. 2023;18(1):226. doi:10.1186/s13018-023-03724-6.
- Manohar M, Senthil V, Selvaraj P, Desouza C. Dual mobility versus fixed bearings in complex primary total hip arthroplasty: A systematic review and meta-analysis J Clin Orthop Trauma. 2026;80:103538. Discussion based on the abstract. doi:10.1016/j.jcot.2026.103538.
- Wainwright TW, Gill M, McDonald DA, Middleton RG, Reed M, Sahota O, Yates P, Ljungqvist O. Consensus statement for perioperative care in total hip replacement and total knee replacement surgery: Enhanced Recovery After Surgery (ERAS®) Society recommendations Acta Orthop. 2020;91(1):3–19. doi:10.1080/17453674.2019.1683790.
- Sara LK, Lewis CL. Rehabilitation Phases, Precautions, and Mobility Goals Following Total Hip Arthroplasty HSS J. 2023;19(4):494–500. doi:10.1177/15563316231192980.
- Huang L, Han W, Qi W, Zhang X, Lv Z, Lu Y, Zou D. Early unrestricted vs. partial weight bearing after uncemented total hip arthroplasty: a systematic review and meta-analysis Front Surg. 2023;10:1225649. doi:10.3389/fsurg.2023.1225649.
- Anger M, Valovska T, Beloeil H, et al. PROSPECT guideline for total hip arthroplasty: a systematic review and procedure-specific postoperative pain management recommendations Anaesthesia. 2021;76(8):1082–1097. doi:10.1111/anae.15498.
- Sowers CB, Carrero AC, Cyrus JW, Ross JA, Golladay GJ, Patel NK. Return to Sports After Total Hip Arthroplasty: An Umbrella Review for Consensus Guidelines Am J Sports Med. 2023;51(1):271–278. doi:10.1177/03635465211045698.
Clinical commentary and terms of use
Commentary
Recover function faster, not simply progress through the weeks faster
After a properly performed primary arthroplasty with a dual-mobility cup, I propose a less restrictive rehabilitation programme. I do not want to maintain crutches or restrictions solely because they appear in a general protocol for a particular approach. My shared starting points are the stability achieved during surgery and the tissues’ actual capacity for loading.
I use 2–4 weeks of crutch use as a general guide. Discontinuation, however, is determined by gluteal capacity, a negative Trendelenburg sign and good gait without compensation. Absence of pelvic drop during one short test is not enough if the patient begins to limp clearly after several walking trials. In that situation, I prefer to retain support rather than reinforce an abnormal pattern.
Fewer restrictions do not mean that the cup has accelerated biological healing. If I repaired muscles, or fixation stability requires additional protection, I record this as an exception. Shared principles across different approaches are possible, but a specific repair cannot be ignored. Nor do I automatically rule out a discussion about returning to sports involving high loading or injury risk. I consider this individually: the patient’s preoperative fitness and experience, the course of treatment and rehabilitation, and the movement control and capacity that have been regained. This is not a promise of clearance for every sport. Returning to a previously practised sport and starting a new demanding activity are not the same situation; I determine suitability, timing and conditions for return after assessing the patient and discussing risk.
The physiotherapist helps shape the plan
The physiotherapist selects exercises and observes pelvic control, exercise tolerance and the response to changes in dose. The surgeon provides information about the procedure. Progress and problems should be communicated in both directions so that the plan can be adjusted jointly. The patient should receive a clear answer about what can be done now and what determines the next step.
A specific case, a specific patient, a specific surgeon. Acceleration should support recovery of function, not pursuit of an ambitious timetable despite warning signs.