 Skip to content
FOR CLINICIANS AND PHYSIOTHERAPISTS
Total ankle arthroplasty — cementless Trabecular Metal — rehabilitation protocol
From wound and fibular osteotomy protection to walking, stairs and recreation. Two illustrated charts summarise the pathway; the detailed sections also cover simultaneous subtalar fusion and other associated procedures.
Using and loading the limb
This protective pathway starts without weight bearing. The surgeon selects continued NWB or limited PWB in a boot; progression considers fibular osteotomy and imaging.
Full guidance ↓Brace or immobilisation
Use the prescribed initial splint, then boot. Apply the boot before loading; removal for movement, hygiene and sleep follows instructions.
Full guidance ↓Permitted movement
After clearance, use gentle dorsiflexion and plantarflexion without forcing or twisting. Do not mobilise a joint included in an additional fusion.
Full guidance ↓Permitted movement, loading and removal of a brace are separate decisions. Additional repairs may require a more protective programme.
Rehabilitation at a glance
Progression follows healing and functional criteria, not dates alone.
Rehabilitation boards
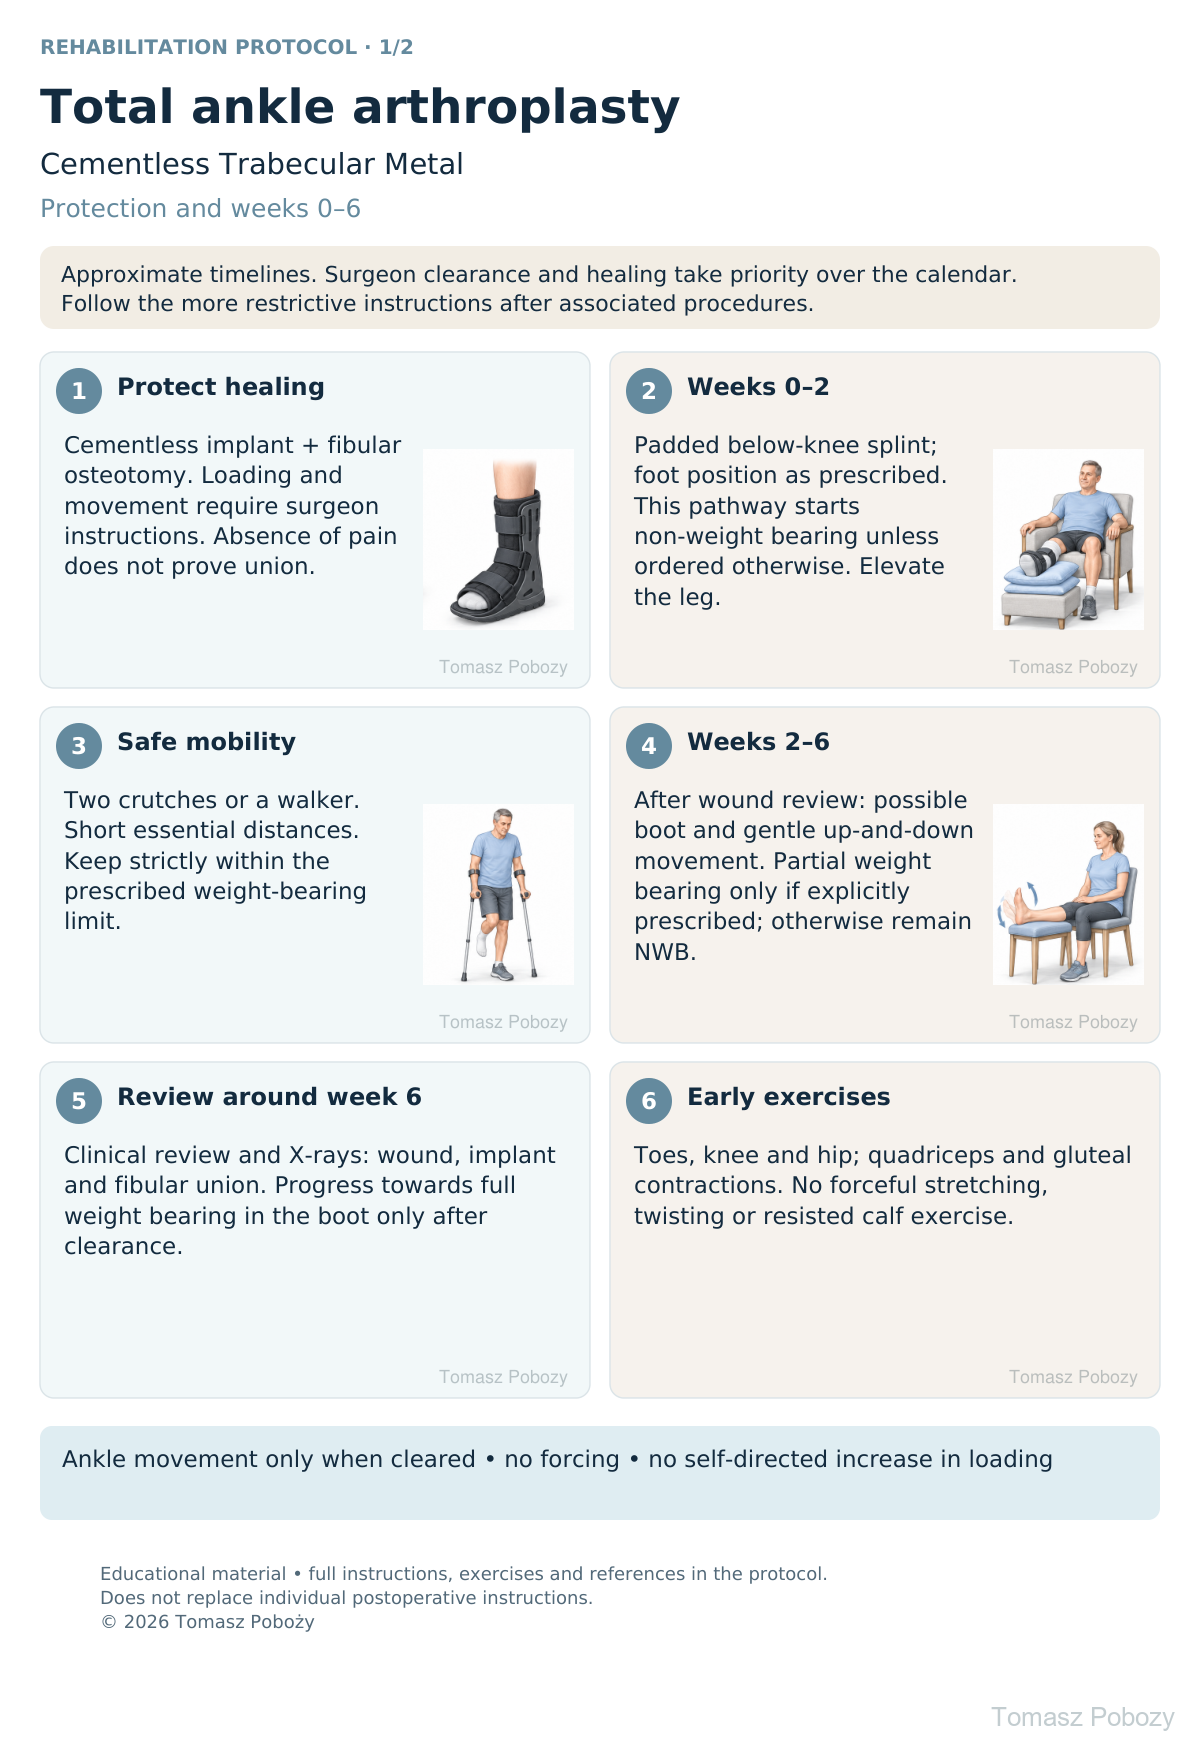
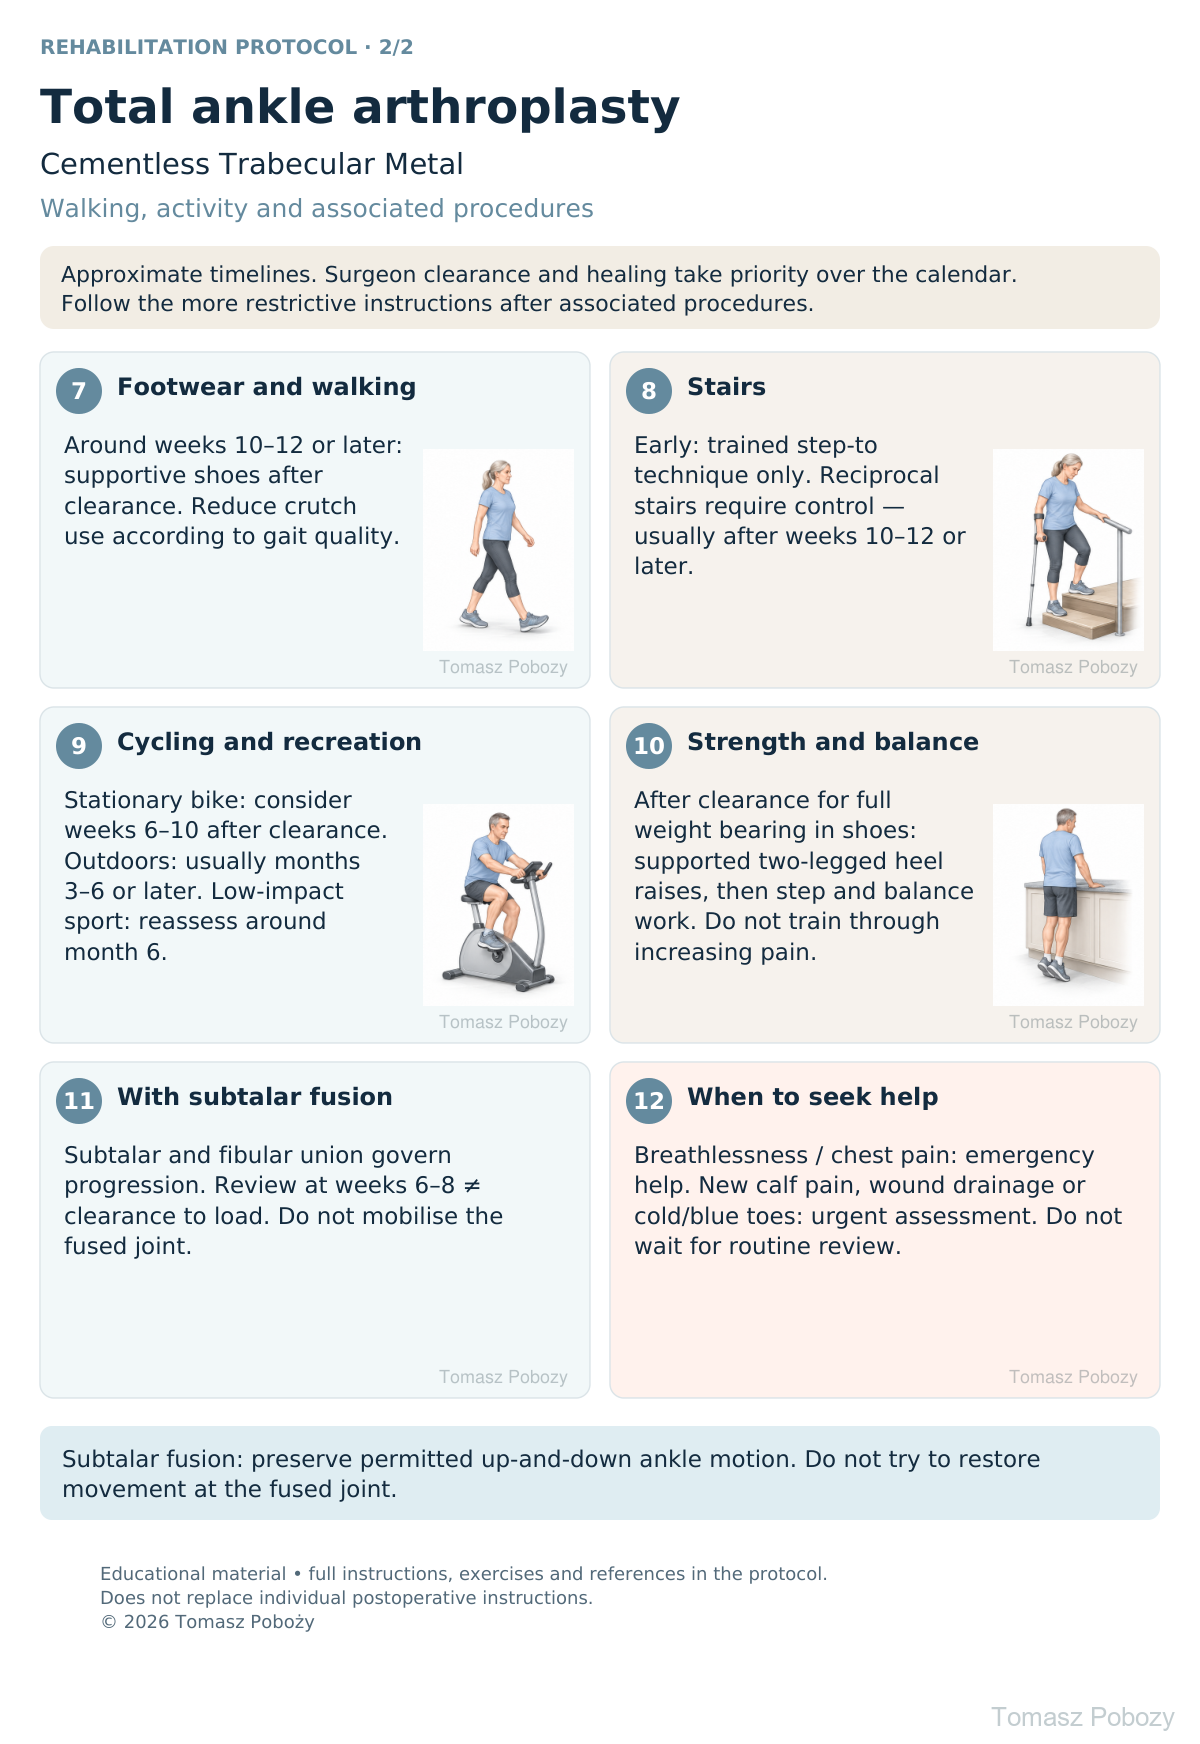
Exercises — a closer look
Use the complete boards above together with the instructions for the chosen stage. An exercise shown for a later stage is not permitted early.
Open the relevant complete board and zoom in. The viewer retains all stages and captions.
Exercise instructions and progression are contained in the stage descriptions linked above.
Scope and protection
Scope, protection and weight bearing
The priorities are wound healing, bone integration at the implant surface and fibular osteotomy union, followed by safe walking. Cementless fixation alone does not authorise immediate full weight bearing. [2],[3]
Before the first therapy session: review the operation report, fibular fixation, associated procedures, wound and sensation, permitted loading and movement, and brace instructions. The prescription should specify weight bearing in kilograms or as a percentage and the review date. Clarify missing instructions with the orthopaedic surgeon before progressing.
Non-weight bearing (NWB) means no weight through the operated limb. Partial weight bearing (PWB) requires a prescribed limit and practical training, for example using scales. Full weight bearing does not automatically mean stopping the boot or crutches. Pain alone is not a reliable measure of safety.
The basic pathway uses a padded below-knee splint initially, usually followed by a removable walker boot. Movement and weight bearing are separate decisions: gentle movement may be allowed while loading remains restricted. Put the prescribed walking boot on before standing; remove it for hygiene, exercise or sleep only as instructed.
Exercises: technique and dosage
The doses below are starting points for individual adjustment, not targets to achieve despite pain. Stop an exercise for sharp pain, instability or wound deterioration.
| Exercise | Technique | Starting dose / requirements |
|---|---|---|
| Toes, thigh and buttocks | Move the toes without tension on the wound. Contract quadriceps and gluteals for about 5 seconds. Move the hip and knee without loading the foot. | 5–10 repetitions in several short sessions daily. Move the unaffected ankle; move the operated ankle only as permitted. |
| Ankle up-and-down movement | Sit with the leg supported and gently lift and lower the foot. Do not force it with your hand, a strap or body weight. | After clearance, often from review around week 2: 5–10 repetitions, 3–5 times daily. No forced range; no ankle circles after subtalar fusion. |
| Resistance and weight shifts | After clearance for loading and resistance: use light resistance appropriate to any repairs and controlled weight shifts with support. | Usually only after review around week 6; often later after tendon repair. Start with 1 set of 8–10 repetitions; resistance work 2–3 times weekly. |
| Heel raises and balance | Start with two-legged heel raises holding a counter and supported standing. Reduce support gradually. Single-leg tasks and unstable surfaces require good control. | After clearance for full weight bearing in shoes, often around weeks 10–12. Begin with 5–8 repetitions. No heel raises while Achilles protection remains necessary. |
| Step and gait practice | Use a low step and handrail. Ascend and descend slowly without pelvic drop or knee collapse. Walk with short, even steps. | Only after clearance for that loading level; prioritise movement quality over step height or distance. |
If pain, swelling or limping clearly increase, or fail to return to baseline by the following day, reduce the dose and review progression. Avoid aggressive mobilisation around the implant, a fresh osteotomy or a fused joint.
Stages and progression criteria
Early stages: weeks 0–6
| Stage | Protection and therapy | Progression criteria |
|---|---|---|
| Days 0–14 | Padded below-knee splint, usually with the foot neutral unless an associated procedure requires another position. This cautious pathway starts NWB unless the surgeon explicitly prescribes otherwise. Two crutches or a walker. Elevation, toe movement, hip and knee exercises, quadriceps and gluteal isometrics. Do not force ankle movement inside the splint. | Wound review usually around days 10–14; assess skin, swelling and stability. Suture removal depends on healing. |
| Weeks 2–6 | A walker boot may be introduced after review. Gentle active dorsiflexion and plantarflexion out of the boot only when cleared. No forceful stretching, twisting, single-leg balance on the operated side or resisted calf work. | Follow one explicitly prescribed loading pathway: remain NWB until review around week 6, or prescribed limited PWB in the boot. Do not choose the faster pathway yourself. |
| Around week 6 | Clinical review and radiographs: implant position and healing of the fibular osteotomy and any fusion. | Only after surgeon clearance, progress gradually towards full weight bearing in the boot. Continue protection if healing is delayed; the surgeon sets the next review. |
The basic protection pathway reflects the lateral approach and TM-specific recommendations. Published protocols differ particularly in whether partial weight bearing is allowed before week 6. [1],[2],[3]
Later stages and return to activity
These planning windows apply to an uncomplicated basic pathway. They are not validated clearance dates. Associated procedures may delay them. Increase one variable at a time: duration, distance or resistance.
| Activity / stage | Approximate timing | Requirements |
|---|---|---|
| Assisted level walking | From the first days after training | Essential short distances only, strictly within the prescribed loading limit. Early mobility does not mean exercise walks. |
| Full weight bearing in the boot | Usually only after review around week 6 at the earliest | Acceptable imaging/healing, surgeon clearance and no increasing pain. Progress gradually with crutches. |
| Transition to footwear | Around weeks 10–12 or later | Surgeon clearance, stable gait and manageable swelling. Supportive shoes; additional brace if prescribed. |
| Step-to stairs | Early if essential | Physiotherapy training, handrail and assistance; maintain the loading restriction. |
| Reciprocal stairs | Usually considered after weeks 10–12, often later | Full weight bearing in shoes, controlled low-step ascent and descent, no limp or reactive swelling. |
| Stationary cycling | Consider around weeks 6–10 | Clearance for the activity and loading, healed wound and sufficient comfortable movement. Low resistance, brief sessions, no standing on the pedals. After fusion, follow union-based restrictions. |
| Outdoor cycling | Usually months 3–6 or later | Out of the boot; safe mounting, stopping and putting the foot down; adequate balance and a safe route. Avoid clipless pedals initially. |
| Pool / swimming | After complete wound healing and clearance | No scabs or drainage; safe entry and exit. Avoid forceful wall push-offs initially. Suture removal alone is insufficient. |
| Longer walks and uneven ground | Gradually from around month 3 | Start on level ground. Uneven surfaces may be harder after subtalar fusion. Do not progress if symptoms worsen the following day. |
| Low-impact sport | Plan reassessment around month 6 or later | Adequate gait, strength, balance, exercise tolerance and surgeon clearance. Prefer swimming, cycling and walking; no guaranteed return date. |
| Running, jumping, contact sports | Not routine rehabilitation goals | Do not introduce routinely. Discuss implant loading and risks individually; elapsed time alone does not confer clearance. |
Studies most often describe return to low-impact activities and do not establish one safe return-to-sport date. Functional improvement and reduction in swelling may take 6–12 months or longer. [6],[7]
Daily activities and follow-up
Progress in everyday activities follows the permitted loading and motion for your procedure. Walking without aids requires a controlled gait; returning to driving requires safe vehicle control and no impairing medication. The detailed recommendations below explain the criteria and exceptions.
Daily activities, stairs and driving
At home: remove loose rugs; arrange a shower seat, stable chair and help with shopping. Do not rely on movable furniture. Push through the arms when rising and respect the loading limit. Keep the wound dry; the boot and dressing must not cause skin pressure.
Stairs: with permitted PWB, the usual sequence is unaffected leg first going up, followed by the operated leg and aid; going down, aid and operated leg first, followed by the unaffected leg. With strict NWB, keep the operated foot off the step; a physiotherapist must select and teach the technique. If you cannot maintain the restriction or balance, arrange assistance or another method rather than attempting it alone.
Car travel: as a passenger, arrange a comfortable position and avoid prolonged uninterrupted sitting in accordance with the prescribed thrombosis-prevention advice. Resume driving only when rapid, reliable emergency braking is possible, without immobilisation that impairs control and without medication that slows reactions. The operated side and transmission type matter; discuss clearance and insurance requirements individually.
Work: desk work depends on elevation, travel and swelling control. Standing and manual work require sustained loading tolerance and task-specific assessment. Do not set the return date solely by time since surgery.
Warning signs
Pain, swelling and warning signs
Rest with the limb elevated and protect the heel from sustained pressure. If allowed, apply cooling through fabric without wetting the dressing; avoid skin with impaired sensation. Follow discharge instructions for pain relief and thrombosis prevention. Exercise does not replace prescribed prophylaxis.
Emergency help — call your local emergency number (112 in Poland/EU): sudden breathlessness, chest pain, fainting or coughing blood.
Urgent same-day assessment: new calf pain/swelling, increasing redness, fever, drainage or wound separation; increasing pain beneath the dressing, numbness, pale/blue or cold toes; a fall with sudden pain or loss of function. Do not massage a painful calf or wait for the scheduled appointment.
For a life-threatening emergency, call your local emergency number immediately — 112 in the European Union. On the boards, 112 refers to the EU.
References
References
- Mazzotti A, Viglione V, Gerardi S, et al. Post-operative management after total ankle arthroplasty: A systematic review of the literature. Foot Ankle Surg. 2022;28(5):535–542. doi:10.1016/j.fas.2021.05.013.
- Bryden K, Ramaskandhan J, Siddique M. Total ankle replacement: Implant Manufacturer’s guidelines for post-operative rehabilitation: A review of literature. J Clin Orthop Trauma. 2024;56:102517. doi:10.1016/j.jcot.2024.102517.
- Usuelli FG, Indino C, Maccario C, Manzi L, Salini V. Total ankle replacement through a lateral approach: surgical tips. SICOT J. 2016;2:38. doi:10.1051/sicotj/2016029.
- Mainzer J, Rippstein P. Endoprothese des oberen Sprunggelenks mit simultaner Subtalararthrodese. Oper Orthop Traumatol. 2017;29(3):194–206. doi:10.1007/s00064-017-0498-4.
- Usuelli FG, Maccario C, Manzi L, Gross CE. Clinical Outcome and Fusion Rate Following Simultaneous Subtalar Fusion and Total Ankle Arthroplasty. Foot Ankle Int. 2016;37(7):696–702. doi:10.1177/1071100716642751.
- Arceri A, Mazzotti A, Zielli S, et al. Return to sports after total ankle arthroplasty: A systematic review and meta-analysis. J Orthop. 2023;44:57–65. doi:10.1016/j.jor.2023.09.001.
- Johns WL, Sowers CB, Walley KC, et al. Return to Sports and Activity After Total Ankle Arthroplasty and Arthrodesis: A Systematic Review. Foot Ankle Int. 2020;41(8):916–929. doi:10.1177/1071100720927706.
- Nguyen MT, Gross MM, Drake B, Choubey A, Weatherford BM. Effect of Earlier Weightbearing on Ankle Range of Motion and Complications After Primary Total Ankle Arthroplasty. Foot Ankle Int. 2026;47(3):281–290. doi:10.1177/10711007251401557.
Clinical commentary and terms of use
Commentary: subtalar fusion and associated procedures
Simultaneous subtalar fusion: ankle replacement aims to preserve up-and-down tibiotalar movement, while fusion intentionally removes subtalar movement. Do not attempt to restore inversion/eversion by mobilising the fusion site. Sagittal-plane exercises require surgeon clearance and must not stress the healing fixation.
Strict protection in a splint or boot, with NWB or precisely limited loading, is commonly required until around week 6. Review around weeks 6–8 is an assessment point, not automatic clearance for full weight bearing. Progression depends jointly on subtalar union, fibular osteotomy healing, implant stability and the wound. Continue protection when union is uncertain; the surgeon may request additional imaging, including CT.
One published combined-replacement-and-subtalar-fusion pathway used a cast for 1 week followed by a boot for 5 weeks with 15 kg partial weight bearing, progressing after radiographic consolidation. This involved an anterior ankle approach; it is not an automatic prescription for lateral TM replacement with fibular osteotomy. Union data do not establish a safe return-to-sport date. [4],[5]
Footwear, cycling, reciprocal stairs and uneven ground may need to begin later than in the activity table. A previously healed subtalar fusion is not a new union site: it still affects gait mechanics but does not, for that reason alone, require fresh-fusion protection.
| Procedure / situation | Effect on rehabilitation |
|---|---|
| Corrective osteotomy, e.g. calcaneal or tibial | Loading depends on fixation stability and healing at every osteotomy site. Do not automatically apply the isolated-replacement calendar. |
| Achilles lengthening / gastrocnemius recession | Confirm boot position and allowed dorsiflexion. Avoid forceful stretching and strong heel raises until protection is released. Recession and tendon lengthening are not equivalent procedures. |
| Tendon repair / transfer | Protect against stretching the repair and resistance involving the transferred tendon. Timing of active movement and resistance must follow the specific repair; do not assume clearance at week 6. |
| Lateral or medial ligament reconstruction | Side-to-side and rotational restrictions depend on the repaired structure. Protect lateral repairs particularly from inversion; do not automatically use resistance bands in every direction. |
| Fracture / syndesmotic fixation, revision, bone defects | Separate surgeon instructions are required. This basic pathway may not apply. |
| Wound problems, neuropathy, impaired circulation or delayed union | Pause progression and reassess; check skin and boot fit. Low pain levels alone must not prompt accelerated exercise. |
What does the evidence show? Reviews report substantial variation and do not identify one superior rehabilitation protocol. A 2026 study of earlier weight bearing involved INBONE II and does not establish safety for TM replacement with a fibular osteotomy and fresh subtalar fusion. This pathway therefore combines time windows with healing and functional criteria. [1],[2],[8]