 Skip to content
FOOT AND ANKLE / POSTOPERATIVE PROTOCOL
Hallux rigidus — rehabilitation after cheilectomy
Isolated removal of dorsal osteophytes and impingement at the first metatarsophalangeal joint, without osteotomy, fusion or an implant. The aim is pain reduction and improved function while preserving the joint.
For clinicians, physiotherapists and patients. The individual plan based on the operative report takes precedence over the time ranges on this page.
Essential protection
- Weight-bearing
- After isolated cheilectomy, early weight-bearing as tolerated in a postoperative shoe is often allowed. Confirm the discharge prescription; reduce distance if pain causes a limp.
- Brace / immobilisation
- A stiff-soled postoperative shoe while the wound heals, often around 1–2 weeks; then roomy footwear as tolerated and cleared.
- Range of motion
- Start gentle big-toe motion early once cleared and with attention to the wound. Do not force a fixed angle.
Rehabilitation at a glance
Timings are approximate. Progression requires criteria and clearance for the relevant motion or loading level.
- 01
Wound care and gentle motion
Weeks 0–2Control swelling, protect the wound and limit avoidable stiffness.
- 02
Motion and footwear
Weeks 2–6Comfortable big-toe motion and transition to a roomy shoe.
- 03
Walking and endurance
Usually weeks 6–12Restore everyday walking distances and stairs.
- 04
Strength and chosen activity
Further progression according to symptomsReturn to activity compatible with the remaining joint condition.
Full rehabilitation board
Click to enlarge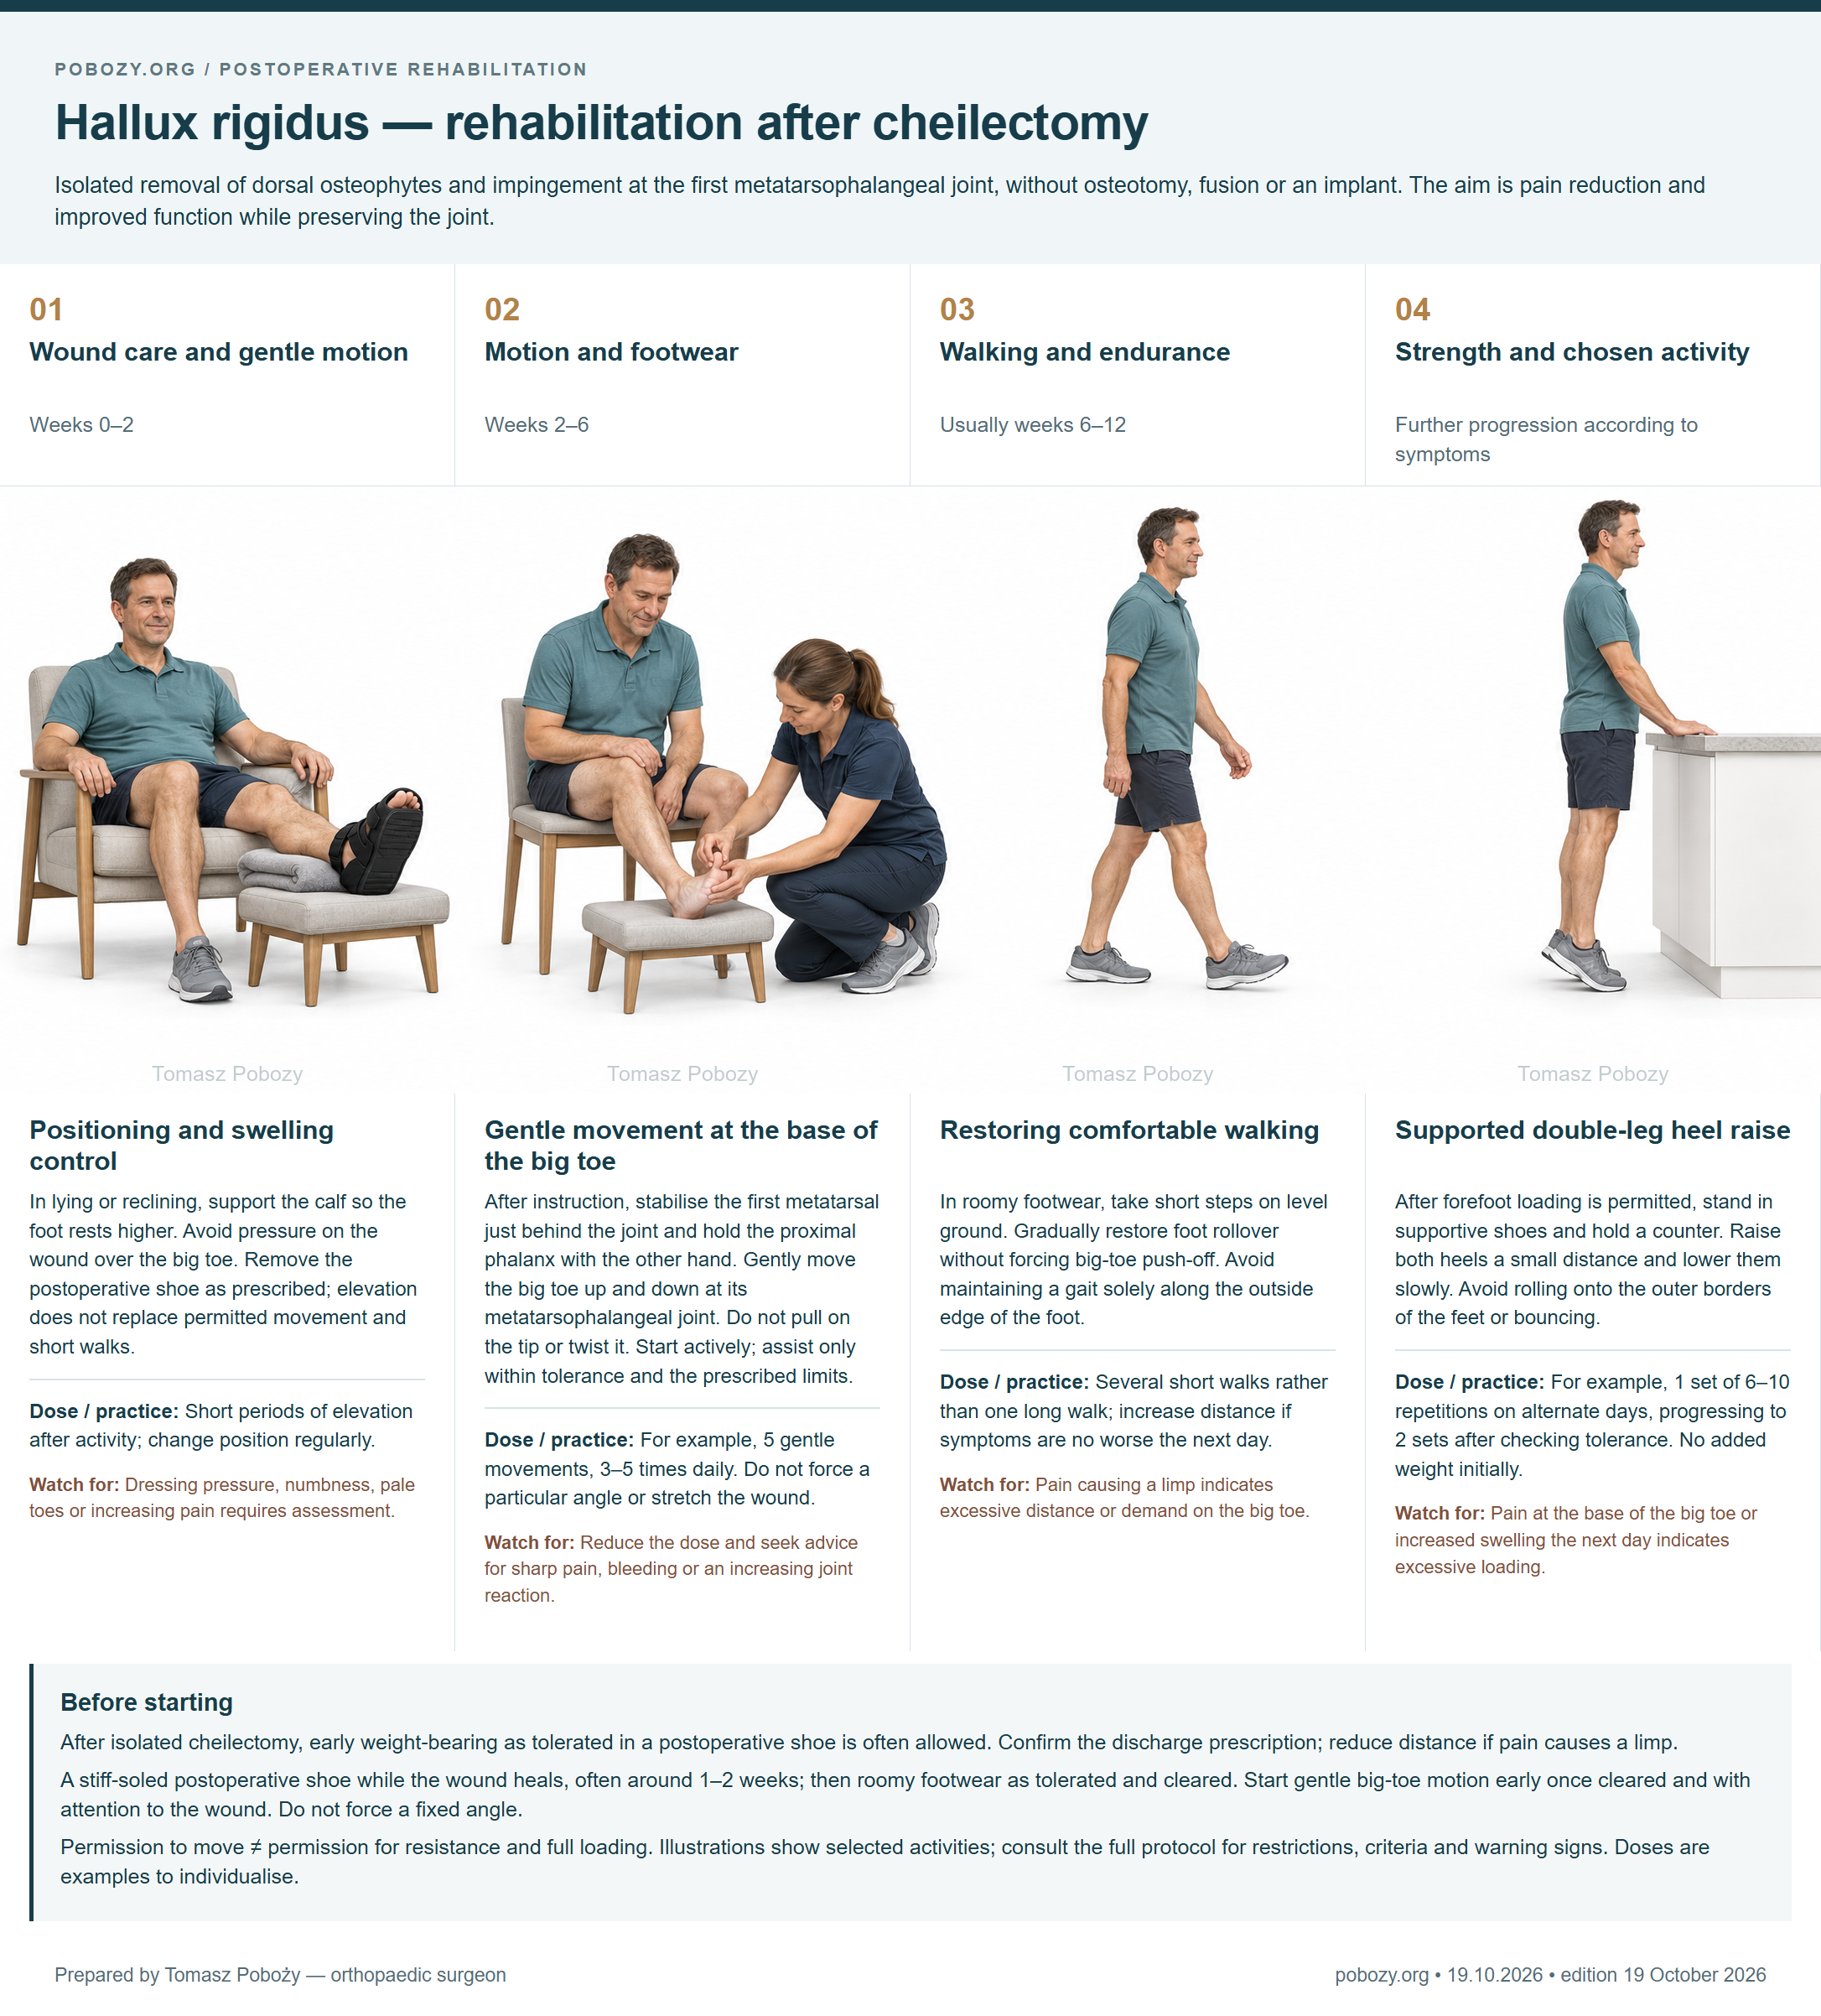
Exercises — take a closer look4 phases • technique • dosage • when to stop
Each phase has its own illustration. The descriptions below are the text equivalent of the board. Doses are starting examples to individualise with a physiotherapist and do not override surgical restrictions.
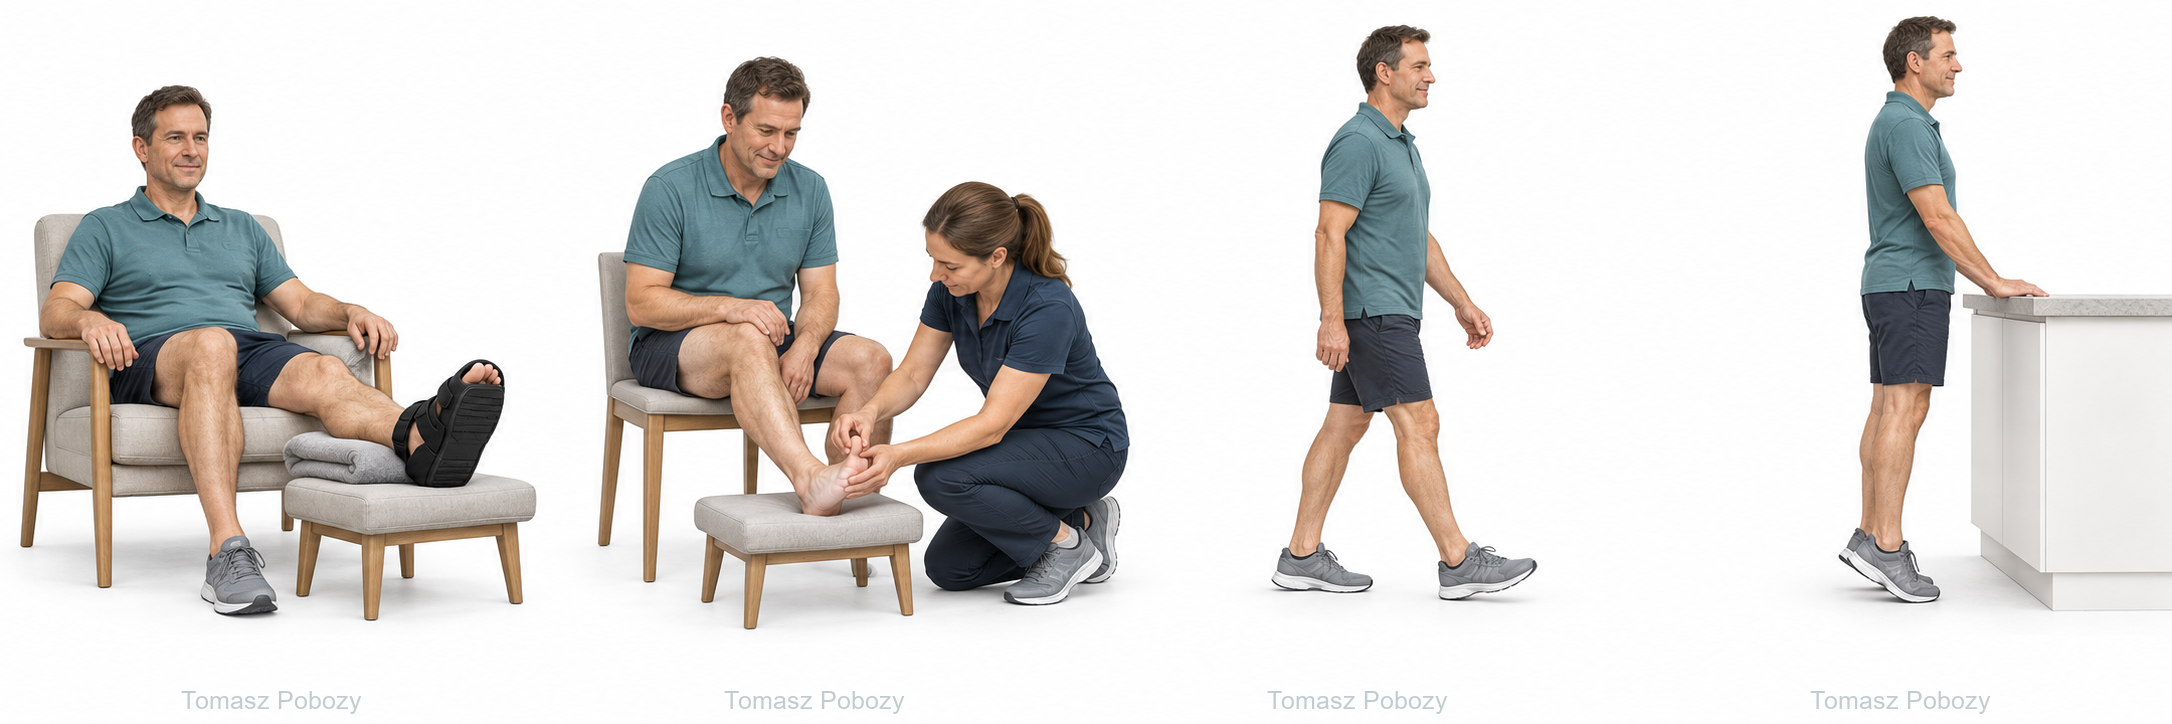
Positioning and swelling control
In lying or reclining, support the calf so the foot rests higher. Avoid pressure on the wound over the big toe. Remove the postoperative shoe as prescribed; elevation does not replace permitted movement and short walks.
- Dose to individualise
- Short periods of elevation after activity; change position regularly.
- When to reduce or stop
- Dressing pressure, numbness, pale toes or increasing pain requires assessment.
Gentle movement at the base of the big toe
After instruction, stabilise the first metatarsal just behind the joint and hold the proximal phalanx with the other hand. Gently move the big toe up and down at its metatarsophalangeal joint. Do not pull on the tip or twist it. Start actively; assist only within tolerance and the prescribed limits.
- Dose to individualise
- For example, 5 gentle movements, 3–5 times daily. Do not force a particular angle or stretch the wound.
- When to reduce or stop
- Reduce the dose and seek advice for sharp pain, bleeding or an increasing joint reaction.
Restoring comfortable walking
In roomy footwear, take short steps on level ground. Gradually restore foot rollover without forcing big-toe push-off. Avoid maintaining a gait solely along the outside edge of the foot.
- Dose to individualise
- Several short walks rather than one long walk; increase distance if symptoms are no worse the next day.
- When to reduce or stop
- Pain causing a limp indicates excessive distance or demand on the big toe.
Supported double-leg heel raise
After forefoot loading is permitted, stand in supportive shoes and hold a counter. Raise both heels a small distance and lower them slowly. Avoid rolling onto the outer borders of the feet or bouncing.
- Dose to individualise
- For example, 1 set of 6–10 repetitions on alternate days, progressing to 2 sets after checking tolerance. No added weight initially.
- When to reduce or stop
- Pain at the base of the big toe or increased swelling the next day indicates excessive loading.
Who this protocol is for
Isolated removal of dorsal osteophytes and impingement at the first metatarsophalangeal joint, without osteotomy, fusion or an implant. The aim is pain reduction and improved function while preserving the joint.
If a Moberg or other osteotomy, cartilage procedure, implant or fusion was added, use the relevant extended pathway. A fused joint must not be mobilised.
Before starting, confirm the operation date and extent, fixation, permitted loading, support-removal rules, range of motion and review date. Obtain any missing instruction from the surgeon before progressing.
Full programme by phase
01 · Wound care and gentle motionWeeks 0–2
- Goal
- Control swelling, protect the wound and limit avoidable stiffness.
- Weight-bearing
- Load as prescribed, usually as tolerated in the protective shoe; keep walking distances short.
- Support / immobilisation
- Postoperative shoe and dressing; crutches if they help avoid limping.
- Motion
- Big-toe motion may start in the first few days after clearance. Avoid wound tension and forced extension.
- Work in this phase
- Rest with elevation, ankle motion and gentle active big-toe movement. Follow wound-care instructions.
- Progression criteria
- Uncomplicated wound healing; loading and movement do not provoke a marked inflammatory response.
02 · Motion and footwearWeeks 2–6
- Goal
- Comfortable big-toe motion and transition to a roomy shoe.
- Weight-bearing
- Gradually increase walking without forced big-toe push-off. Reduce the dose if symptoms worsen the next day.
- Support / immobilisation
- Wean from the postoperative shoe after wound review; avoid narrow shoes pressing on the top of the joint.
- Motion
- Short active and gently assisted first-MTP movement sessions. Scar mobilisation only after complete wound closure.
- Work in this phase
- Big-toe exercises after instruction and rollover training without shifting onto the outer foot border.
- Progression criteria
- Comfortable footwear, healed wound, smoother gait and no persistent exercise-related flare.
03 · Walking and enduranceUsually weeks 6–12
- Goal
- Restore everyday walking distances and stairs.
- Weight-bearing
- Increase distance before speed. Add cycling and other low-impact activity when footwear, motion and pressure are tolerated.
- Support / immobilisation
- Choose footwear for the remaining range; a stiffer or rocker sole may help when individually selected.
- Motion
- Maintain the available comfortable range. Pain relief does not necessarily mean normal motion is restored.
- Work in this phase
- Gait training and gentle foot and calf strengthening without excessive joint pressure.
- Progression criteria
- Walking without a significant limp, stair tolerance and no increasing swelling after routine activity.
04 · Strength and chosen activityFurther progression according to symptoms
- Goal
- Return to activity compatible with the remaining joint condition.
- Weight-bearing
- Introduce heel raises and more dynamic tasks gradually. Running requires push-off tolerance and individual assessment; there is no universal return date.
- Support / immobilisation
- Comfortable activity-appropriate footwear.
- Motion
- Do not force a painful end range to meet an angle target.
- Work in this phase
- Supported double-leg heel raises once cleared, strengthening and work- or sport-specific tasks.
- Progression criteria
- Activity without persistent flare, safe gait and an informed understanding of residual limitations from arthritis.
How to adjust the dose
Increase one element at a time: repetitions, distance, range or resistance. Sharp pain, limping or markedly increased swelling calls for reducing the load. Check symptoms after exercise and the following day; discuss persistent deterioration. Absence of pain does not replace wound and joint-function assessment.
If the surgeon prescribes a kilogram limit, record the value and duration. Do not independently convert “as tolerated” into kilograms. Do not add weights without clearance for resistance.
Everyday activities and return to function
- Walking and stairs
- Use aids while needed to respect the load restriction and maintain gait quality. Practise stairs with a physiotherapist; choose a safer alternative when support or a rail is unavailable.
- Driving
- Resume only after assessment of rapid, forceful emergency braking and without medication impairing alertness. Operated side, transmission, bracing and loading restrictions affect the decision; discuss it with the treating team and consider insurance conditions.
- Work, rest and swelling
- Seated work requires opportunities to change position and elevate the leg; standing or manual work requires loading and task tolerance. Swelling may persist, but new or rapidly increasing swelling requires assessment.
- Wound care and prevention
- Do not soak an unhealed wound, remove wires yourself or change prescribed thromboprophylaxis. Follow individual medication, dressing, compression and scar-care instructions. Swimming requires complete wound closure and clearance.
- Running and sport
- Timing follows healing and capacity; it is not a stand-alone criterion. Establish safe gait, strength, balance and task tolerance first, progressing without significant next-day worsening.
Warning signs — when to seek help
- Emergency help
- Sudden shortness of breath, chest pain, collapse or coughing up blood: call emergency services. Use 112 in the EU; elsewhere use the appropriate local emergency number.
- Urgent same-day assessment
- New one-sided calf pain and swelling; increasing pain despite rest; fever with wound redness or discharge; wound breakdown; a new injury or pain after accidental loading.
- Do not wait for a routine appointment
- A cold, pale or blue foot, rapidly increasing numbness, loss of toe movement or severe increasing pain under a cast requires immediate emergency assessment.
Variants and clinical context
- Cheilectomy does not remove all arthritis. Residual motion restriction does not always mean failure, but increasing pain warrants review.
- The phases guide activity selection; they do not impose a mandatory ban on earlier functional recovery. Wound status, symptoms, procedure extent and capacity determine progression.
- Evidence for precise rehabilitation dosing after cheilectomy is limited. Example doses are proposed starting points to individualise, not results of a comparative dosing trial.
Related resources
References and evidenceVerified publications and evidence limitations
- Foot kinematics in walking on a level surface and on stairs in patients with hallux rigidus before and after cheilectomy. Journal of Foot and Ankle Research. 2014. DOI: 10.1186/1757-1146-7-13.
Research informs protection and progression decisions; it does not validate every illustrated exercise or example dose. Procedure details, tissue condition and the individual plan determine application.
Glossary
- ROM
- Joint range of motion. Active movement uses your own muscles; assisted movement uses additional help.
- Non-weight-bearing
- No body-weight transfer through the operated foot during standing and walking.
- As tolerated
- Once this pathway is authorised: loading limited by symptoms and movement quality within prescribed protection. It is not permission for unrestricted sport.
- Walker
- A walking boot is a protective ankle-foot support. A walking frame is a separate mobility aid.