 Skip to content
FOR CLINICIANS AND PHYSIOTHERAPISTS
Hallux valgus — first metatarsal osteotomy
Tomasz Poboży — orthopaedic surgeon · Evidence review: 30 September 2026
Using and loading the limb
For the first 6 weeks, walk in a forefoot-offloading shoe with prescribed heel/limb loading. Progress after clinical and X-ray review.
Full guidance ↓Brace or immobilisation
Use the postoperative shoe for all walking; crutches follow balance and loading limits. Additional osteotomies, wires or fusion may change protection.
Full guidance ↓Permitted movement
Use gentle great-toe motion after clearance and suitable wound healing. Do not force alignment or mobilise a transfixed or fused joint.
Full guidance ↓Permitted movement, loading and removal of a brace are separate decisions. Additional repairs may require a more protective programme.
Rehabilitation at a glance
Progression follows healing and functional criteria, not dates alone.
Rehabilitation boards
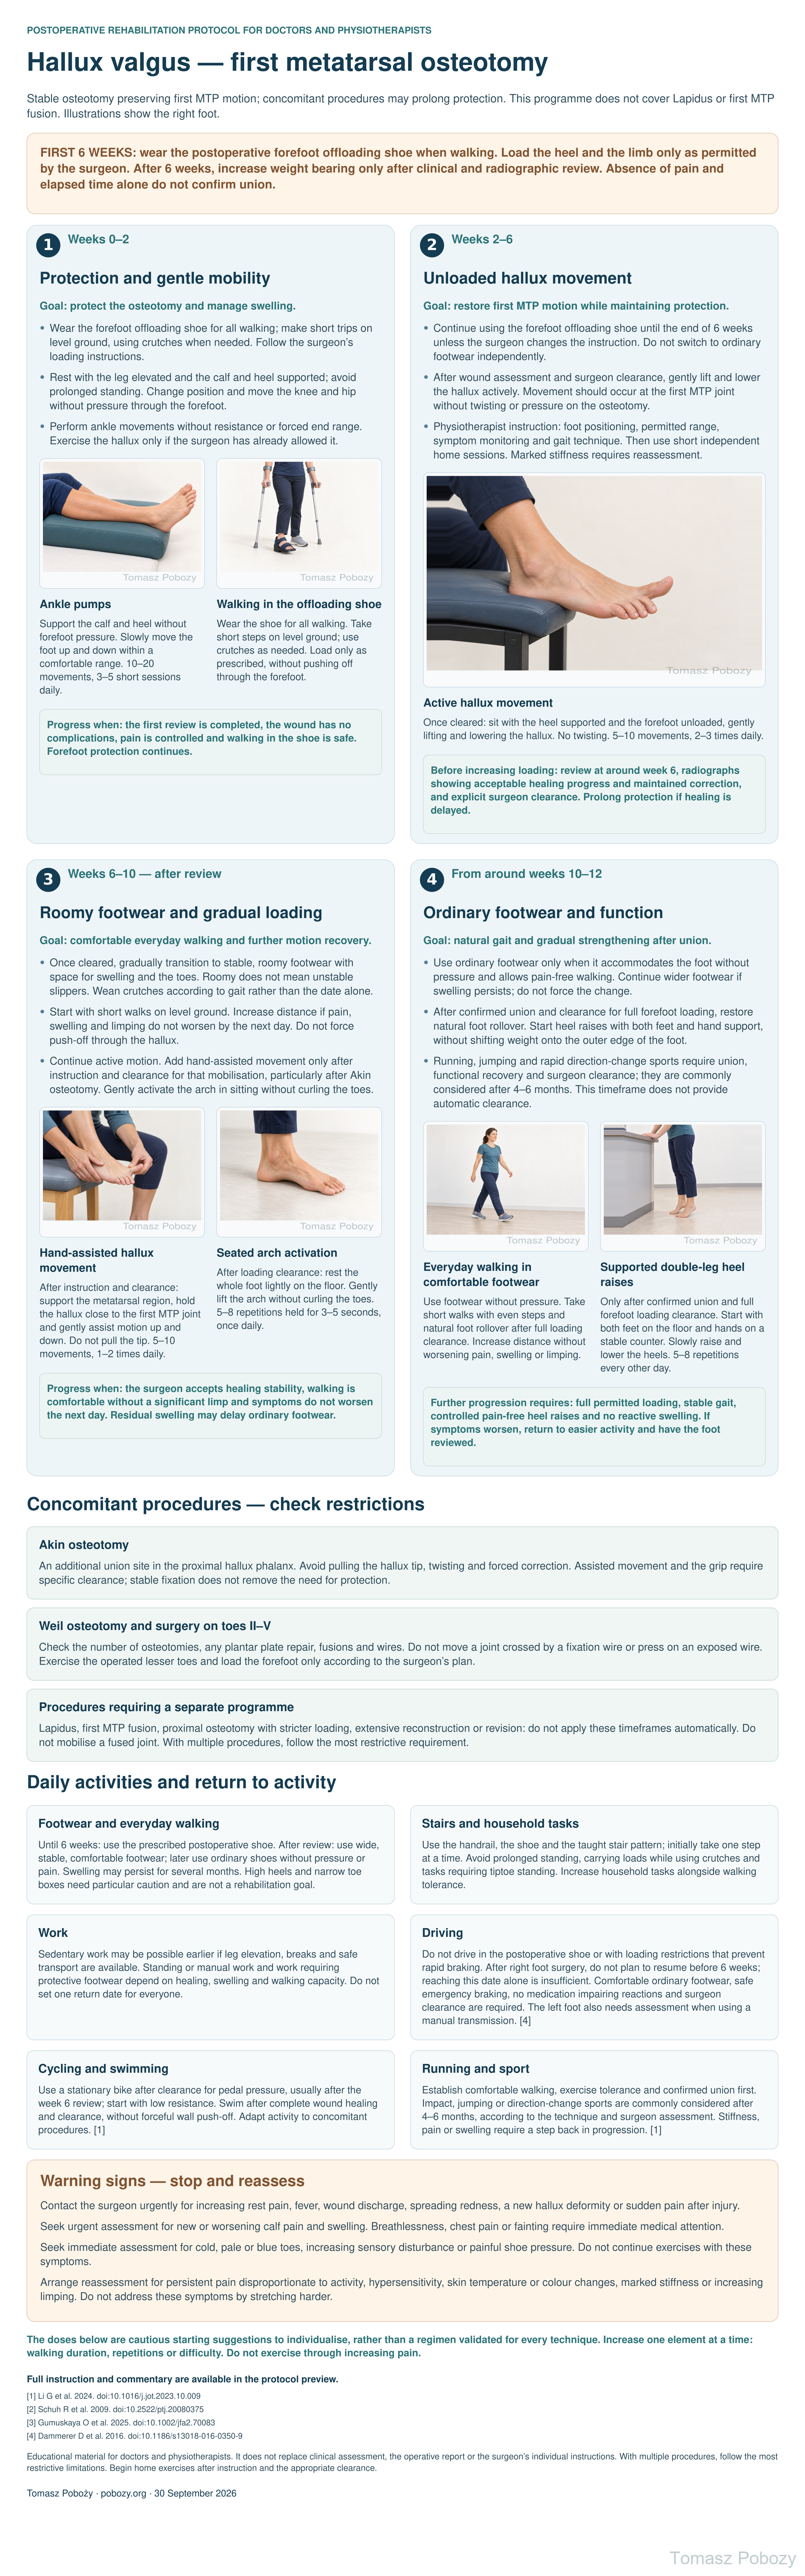
Open the poster at full resolution
Exercises — a closer look
Use the complete boards above together with the instructions for the chosen stage. An exercise shown for a later stage is not permitted early.
Open the relevant complete board and zoom in. The viewer retains all stages and captions.
Protection of the osteotomy, gradual return to weight bearing and a simple home exercise programme following physiotherapist instruction. The programme covers hallux valgus correction preserving a mobile first metatarsophalangeal joint (first MTP joint), including selected concomitant procedures.
8. Instruction and home exercises
At the instruction visit, confirm the procedure and restrictions. Check the shoe, crutches, safe transfers and stairs. The patient should demonstrate the exercise correctly and identify symptoms requiring a stop.
Set a short home plan: start with ankle movements and protected walking; add active hallux motion when cleared; add further phase-specific exercises after healing review. Repeat only exercises whose technique has been checked.
Choose the number of physiotherapy reviews according to need. Marked first MTP stiffness, persistent swelling, abnormal gait, pain or difficulty performing exercises independently justify another visit. A routine long course of physical modalities is not a mandatory component.
Scope and protection
1. Scope and individualisation
Adults after first metatarsal osteotomy with stable fixation, such as chevron/Austin, scarf or minimally invasive chevron and Akin osteotomies (MICA). Before starting, review the operative report, every osteotomy site, fixation stability and the orthopaedic surgeon’s written instructions. Akin osteotomy, lesser metatarsal osteotomies and surgery on toes II–V may require additional restrictions. Proximal osteotomies and extensive reconstructions need an individual plan. First tarsometatarsal fusion (Lapidus), first MTP fusion, revision surgery, infection and impaired union require a separate protocol.
FIRST 6 WEEKS: wear the postoperative forefoot offloading shoe when walking. Load the heel and the limb only as permitted by the surgeon. After 6 weeks, increase weight bearing only after clinical and radiographic review. Absence of pain and elapsed time alone do not confirm union.
2. Protection, loading and dosing
Forefoot offloading does not automatically mean the entire limb must remain non-weight-bearing. The surgeon specifies permitted loading; crutches assist protection, balance and gait. If non-weight-bearing is prescribed, that instruction takes priority.
During the first 6 weeks, do not walk barefoot or in an ordinary shoe on the operated foot. Avoid heel raises, jumping, running, resistance under the forefoot and forceful foot rollover. Do not lengthen walks merely because the shoe reduces pain.
Begin hallux motion with the surgeon’s clearance when wound condition and correction stability allow; a routine 6-week delay is not required. Start with gentle unloaded active motion. Do not manually straighten the hallux alignment or pull it sideways. Therapist-applied joint mobilisation is not automatically an exercise to repeat independently.
Exercise without sharp pain, painful catching or a mechanical block. Any mild discomfort should settle promptly. If pain, swelling or limping are worse the next day, reduce the dose and return to the previous level. Persistent worsening requires review.
The doses below are cautious starting suggestions to individualise, rather than a regimen validated for every technique. Increase one element at a time: walking duration, repetitions or difficulty. Do not exercise through increasing pain.
7. Concomitant procedures and exclusions
Akin osteotomy
An additional union site in the proximal hallux phalanx. Avoid pulling the hallux tip, twisting and forced correction. Assisted movement and the grip require specific clearance; stable fixation does not remove the need for protection.
Weil osteotomy and surgery on toes II–V
Check the number of osteotomies, any plantar plate repair, fusions and wires. Do not move a joint crossed by a fixation wire or press on an exposed wire. Exercise the operated lesser toes and load the forefoot only according to the surgeon’s plan.
Procedures requiring a separate programme
Lapidus, first MTP fusion, proximal osteotomy with stricter loading, extensive reconstruction or revision: do not apply these timeframes automatically. Do not mobilise a fused joint. With multiple procedures, follow the most restrictive requirement.
9. Daily tasks and return to activity
Footwear and everyday walking
Until 6 weeks: use the prescribed postoperative shoe. After review: use wide, stable, comfortable footwear; later use ordinary shoes without pressure or pain. Swelling may persist for several months. High heels and narrow toe boxes need particular caution and are not a rehabilitation goal.
Stairs and household tasks
Use the handrail, the shoe and the taught stair pattern; initially take one step at a time. Avoid prolonged standing, carrying loads while using crutches and tasks requiring tiptoe standing. Increase household tasks alongside walking tolerance.
Work
Sedentary work may be possible earlier if leg elevation, breaks and safe transport are available. Standing or manual work and work requiring protective footwear depend on healing, swelling and walking capacity. Do not set one return date for everyone.
Driving
Do not drive in the postoperative shoe or with loading restrictions that prevent rapid braking. After right foot surgery, do not plan to resume before 6 weeks; reaching this date alone is insufficient. Comfortable ordinary footwear, safe emergency braking, no medication impairing reactions and surgeon clearance are required. The left foot also needs assessment when using a manual transmission. [4]
Cycling and swimming
Use a stationary bike after clearance for pedal pressure, usually after the week 6 review; start with low resistance. Swim after complete wound healing and clearance, without forceful wall push-off. Adapt activity to concomitant procedures. [1]
Running and sport
Establish comfortable walking, exercise tolerance and confirmed union first. Impact, jumping or direction-change sports are commonly considered after 4–6 months, according to the technique and surgeon assessment. Stiffness, pain or swelling require a step back in progression. [1]
Stages and progression criteria
3. Phase 1: Weeks 0–2
Goal: protect the osteotomy and manage swelling.
- Wear the forefoot offloading shoe for all walking; make short trips on level ground, using crutches when needed. Follow the surgeon’s loading instructions.
- Rest with the leg elevated and the calf and heel supported; avoid prolonged standing. Change position and move the knee and hip without pressure through the forefoot.
- Perform ankle movements without resistance or forced end range. Exercise the hallux only if the surgeon has already allowed it.
Ankle pumps
Lie or recline with the calf and heel supported on a cushion, leaving the forefoot free of pressure. Slowly move the foot towards and away from the shin without resistance or extreme plantar flexion. Do not press the hallux into a surface.
Starting dose: 10–20 slow movements, 3–5 short sessions daily; reduce this if symptoms worsen.
Walking in the offloading shoe
The physiotherapist adjusts the crutches and teaches a safe gait pattern matching the prescribed loading. Fasten the shoe, take short steps and avoid rocking forwards onto the forefoot. If you cannot maintain the restriction, reduce loading and review the technique with the therapist. The illustration applies to a pathway allowing heel contact.
Dose: short necessary trips interspersed with rest and leg elevation. There is no mandatory daily step count.
Progress when: the first review is completed, the wound has no complications, pain is controlled and walking in the shoe is safe. Forefoot protection continues.
4. Phase 2: Weeks 2–6
Goal: restore first MTP motion while maintaining protection.
- Continue using the forefoot offloading shoe until the end of 6 weeks unless the surgeon changes the instruction. Do not switch to ordinary footwear independently.
- After wound assessment and surgeon clearance, gently lift and lower the hallux actively. Movement should occur at the first MTP joint without twisting or pressure on the osteotomy.
- Physiotherapist instruction: foot positioning, permitted range, symptom monitoring and gait technique. Then use short independent home sessions. Marked stiffness requires reassessment.
Active hallux movement
Sit with the heel supported so the toes do not press against a surface. Lift the hallux at the first MTP joint and then lower it gently. Avoid moving only at the interphalangeal joint. Relax the lesser toes. Do not pull the hallux sideways or press on it with your hand.
Starting dose after clearance: 5–10 slow movements, 2–3 times daily, within the permitted comfortable range.
Before increasing loading: review at around week 6, radiographs showing acceptable healing progress and maintained correction, and explicit surgeon clearance. Prolong protection if healing is delayed.
5. Phase 3: Weeks 6–10 — after review
Goal: comfortable everyday walking and further motion recovery.
- Once cleared, gradually transition to stable, roomy footwear with space for swelling and the toes. Roomy does not mean unstable slippers. Wean crutches according to gait rather than the date alone.
- Start with short walks on level ground. Increase distance if pain, swelling and limping do not worsen by the next day. Do not force push-off through the hallux.
- Continue active motion. Add hand-assisted movement only after instruction and clearance for that mobilisation, particularly after Akin osteotomy. Gently activate the arch in sitting without curling the toes.
Hand-assisted hallux movement
This exercise is an addition for residual stiffness, not a requirement. Gently support the metatarsal region with one hand and hold the base of the hallux close to the first MTP joint with the other, using the grip taught by the therapist. Assist gentle flexion and extension only; avoid traction, twisting, pressure over the osteotomy and forced alignment correction. After Akin osteotomy or soft-tissue repair, the surgeon specifies the grip and timing. If you cannot perform it without pain, continue active motion alone.
Starting dose: 5–10 gentle movements, 1–2 times daily. Do not hold a painful stretch.
Seated arch activation
Sit with the knee aligned over the foot. Once forefoot loading is permitted, rest the whole foot lightly on the floor. Gently shorten the foot by activating the arch muscles to bring the metatarsal head region towards the heel. Keep the toes long and relaxed; do not grip the floor or lift the heel. Do not force hallux adduction. If pain develops under the first metatarsal head, reduce the contraction or defer the exercise.
Starting dose: 5–8 repetitions held for 3–5 seconds, once daily. Start without additional weight.
Progress when: the surgeon accepts healing stability, walking is comfortable without a significant limp and symptoms do not worsen the next day. Residual swelling may delay ordinary footwear.
6. Phase 4: From around weeks 10–12
Goal: natural gait and gradual strengthening after union.
- Use ordinary footwear only when it accommodates the foot without pressure and allows pain-free walking. Continue wider footwear if swelling persists; do not force the change.
- After confirmed union and clearance for full forefoot loading, restore natural foot rollover. Start heel raises with both feet and hand support, without shifting weight onto the outer edge of the foot.
- Running, jumping and rapid direction-change sports require union, functional recovery and surgeon clearance; they are commonly considered after 4–6 months. This timeframe does not provide automatic clearance.
Everyday walking in comfortable footwear
Choose stable ordinary footwear that accommodates the foot without hallux pressure. Walk on level ground with even step lengths. After full loading clearance, gradually restore natural rollover through the whole foot; avoid persisting with walking only along the outer edge. If you limp, shorten the walk and review footwear and technique with the physiotherapist.
Dose: start with a short distance that does not increase symptoms. Gradually lengthen the walk if symptoms remain settled by the next day; there is no fixed step target.
Supported double-leg heel raises
Stand at a stable counter with the hands supported, feet parallel and weight distributed evenly. Slowly raise both heels a small distance and then lower them gently. Keep the hallux and lesser toes in contact with the floor; do not roll onto the outer edge of the foot. Do not start with single-leg raises or raises off a step. Stop if the osteotomy site or first MTP joint hurts and return to walking.
Starting dose after clearance: 5–8 repetitions every other day. Increase gradually only if there is no pain or worsening the next day.
Further progression requires: full permitted loading, stable gait, controlled pain-free heel raises and no reactive swelling. If symptoms worsen, return to easier activity and have the foot reviewed.
Warning signs
10. Warning signs
Contact the surgeon urgently for increasing rest pain, fever, wound discharge, spreading redness, a new hallux deformity or sudden pain after injury.
Seek urgent assessment for new or worsening calf pain and swelling. Breathlessness, chest pain or fainting require immediate medical attention.
Seek immediate assessment for cold, pale or blue toes, increasing sensory disturbance or painful shoe pressure. Do not continue exercises with these symptoms.
Arrange reassessment for persistent pain disproportionate to activity, hypersensitivity, skin temperature or colour changes, marked stiffness or increasing limping. Do not address these symptoms by stretching harder.
For a life-threatening emergency, call your local emergency number immediately — 112 in the European Union. On the boards, 112 refers to the EU.
Additional scope notes
Adults after first metatarsal osteotomy with stable fixation, such as chevron/Austin, scarf or minimally invasive chevron and Akin osteotomies (MICA). Before starting, review the operative report, every osteotomy site, fixation stability and the orthopaedic surgeon’s written instructions. Akin osteotomy, lesser metatarsal osteotomies and surgery on toes II–V may require additional restrictions. Proximal osteotomies and extensive reconstructions need an individual plan. First tarsometatarsal fusion (Lapidus), first MTP fusion, revision surgery, infection and impaired union require a separate protocol.
FIRST 6 WEEKS: wear the postoperative forefoot offloading shoe when walking. Load the heel and the limb only as permitted by the surgeon. After 6 weeks, increase weight bearing only after clinical and radiographic review. Absence of pain and elapsed time alone do not confirm union.
References
12. References
- Li G, Zhang H, Wang X, Yang Y, Xu H, Hong J, Kong SW, Chan KB, Chong KW, Yan A, Shi Z, Ma X. Clinical guideline on the third generation minimally invasive surgery for hallux valgus. Journal of Orthopaedic Translation. 2024;45:48-55. doi:10.1016/j.jot.2023.10.009
- Schuh R, Hofstaetter SG, Adams SB, Pichler F, Kristen KH, Trnka HJ. Rehabilitation After Hallux Valgus Surgery: Importance of Physical Therapy to Restore Weight Bearing of the First Ray During the Stance Phase. Physical Therapy. 2009;89(9):934-945. doi:10.2522/ptj.20080375
- Gumuskaya O, Peterson B, Donnelly H, Unver B, Lafferty D, Tehan P. Preoperative and Postoperative Physical and Mechanical Rehabilitation Interventions in Hallux Valgus: A Systematic Review. Journal of Foot and Ankle Research. 2025;18(3):e70083. doi:10.1002/jfa2.70083
- Dammerer D, Braito M, Biedermann R, Ban M, Giesinger J, Haid C, Liebensteiner MC, Kaufmann G. Effect of surgical shoes on brake response time after first metatarsal osteotomy—a prospective cohort study. Journal of Orthopaedic Surgery and Research. 2016;11:14. doi:10.1186/s13018-016-0350-9
Clinical commentary and terms of use
11. Clinical commentary
The author’s protective pathway uses 6 weeks in a forefoot offloading shoe, followed by gradual transition to comfortable footwear and loading. Protection duration and type vary with technique, fixation stability and concomitant procedures. This does not mean every osteotomy patient needs 6 weeks of complete non-weight-bearing. The MICA guideline supports protective footwear, permitted movement and imaging review; its detailed timeframes were not automatically transferred to every osteotomy. [1]
First MTP motion and gait training may improve function, but radiographic correction does not guarantee normal use of the first ray during walking. A study after Austin/scarf osteotomy describes improvement with a multimodal programme, but the lack of a control group prevents attributing this solely to physiotherapy. [2]
The review of randomised trials identifies a limited, low-quality basis for specific postoperative interventions. It does not establish the optimal number of visits, exercise frequency or superiority of an extensive programme over well-taught home exercises. In this proposal, the physiotherapist teaches and checks technique, and the patient performs short home sessions. Additional visits depend on stiffness, swelling, gait and exercise difficulties. [3]
Do not treat an early weight-bearing study after a soft-tissue procedure as proof that earlier osteotomy loading is safe. The phase timeframes and exercise doses are practical suggestions requiring surgeon assessment and adjustment to healing and patient response. [3]