 Skip to content
FOR CLINICIANS AND PHYSIOTHERAPISTS
Hip arthroplasty — anterior approach: rehabilitation protocol
Protection, movement and a gradual return to daily activity. Select the stage appropriate to the actual procedure and current clearance.
Using and loading the limb
Use WBAT only when prescribed. Crutches or a frame support controlled gait; loading restrictions are separate from movement precautions.
Full guidance ↓Brace or immobilisation
This programme does not prescribe a routine hip brace. Additional repairs or a specific protection order require an individual support plan.
Full guidance ↓Permitted movement
Avoid forced extension, particularly combined with external rotation. Do not automatically transfer the posterior-approach 90° flexion limit.
Full guidance ↓Permitted movement, loading and removal of a brace are separate decisions. Additional repairs may require a more protective programme.
Rehabilitation at a glance
Progression follows healing and functional criteria, not dates alone.
Rehabilitation boards
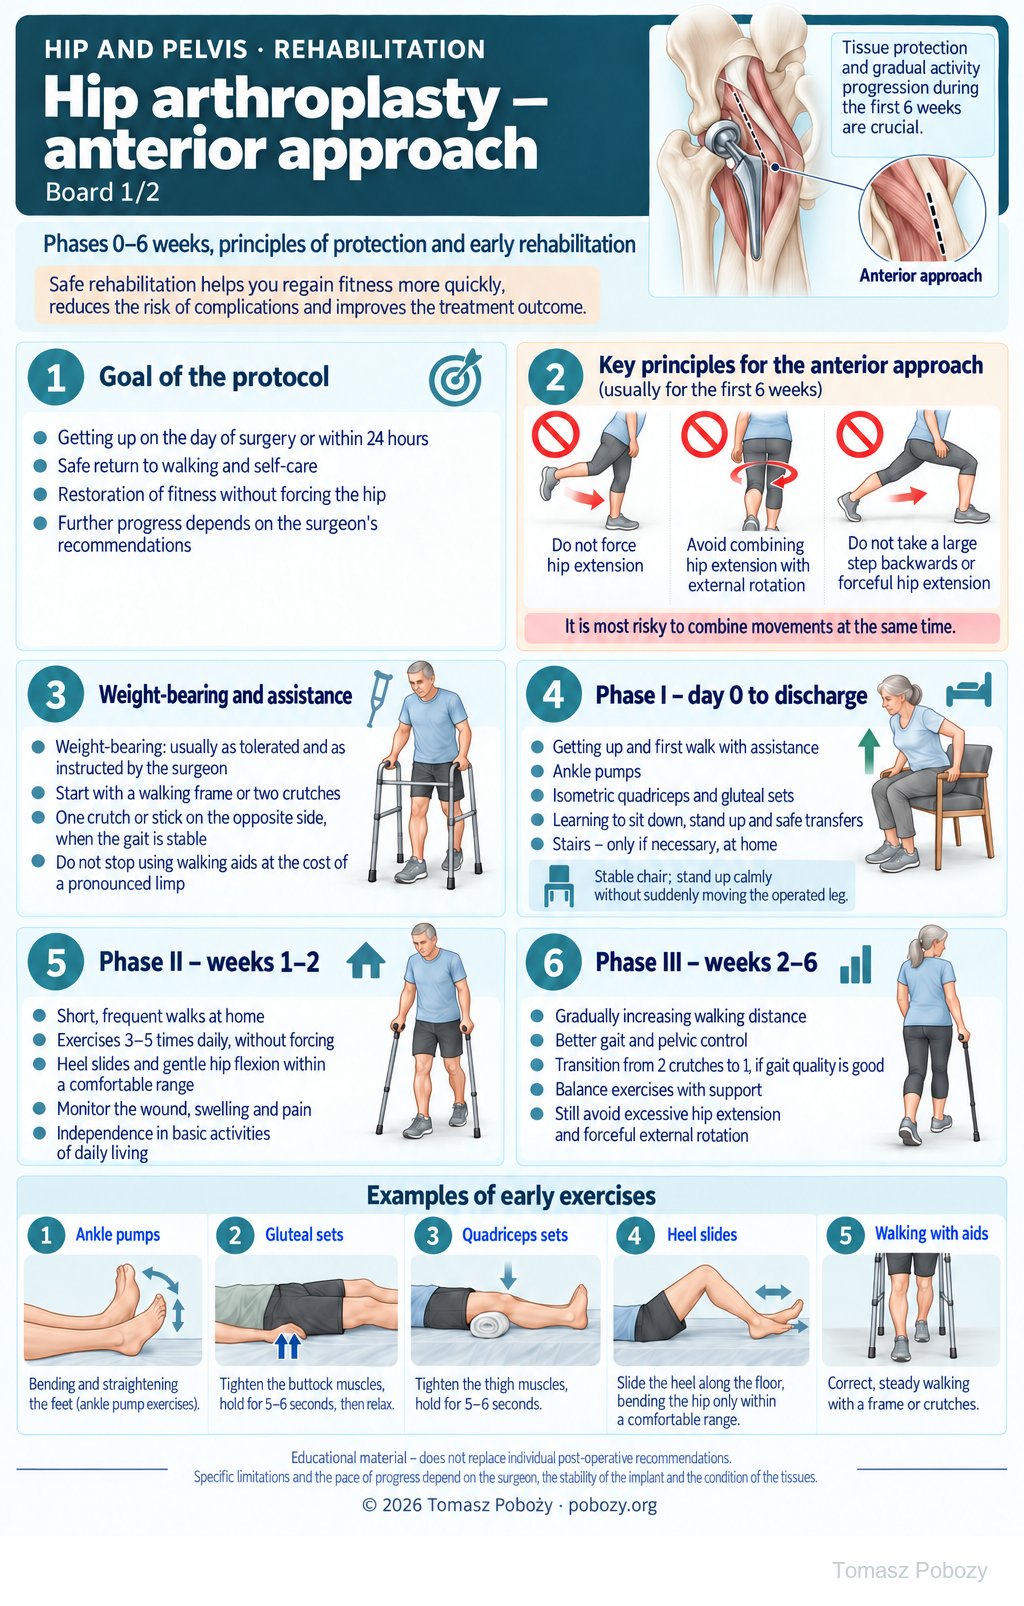
Poster 1. The first 6 weeks — protection, walking and early exercises.
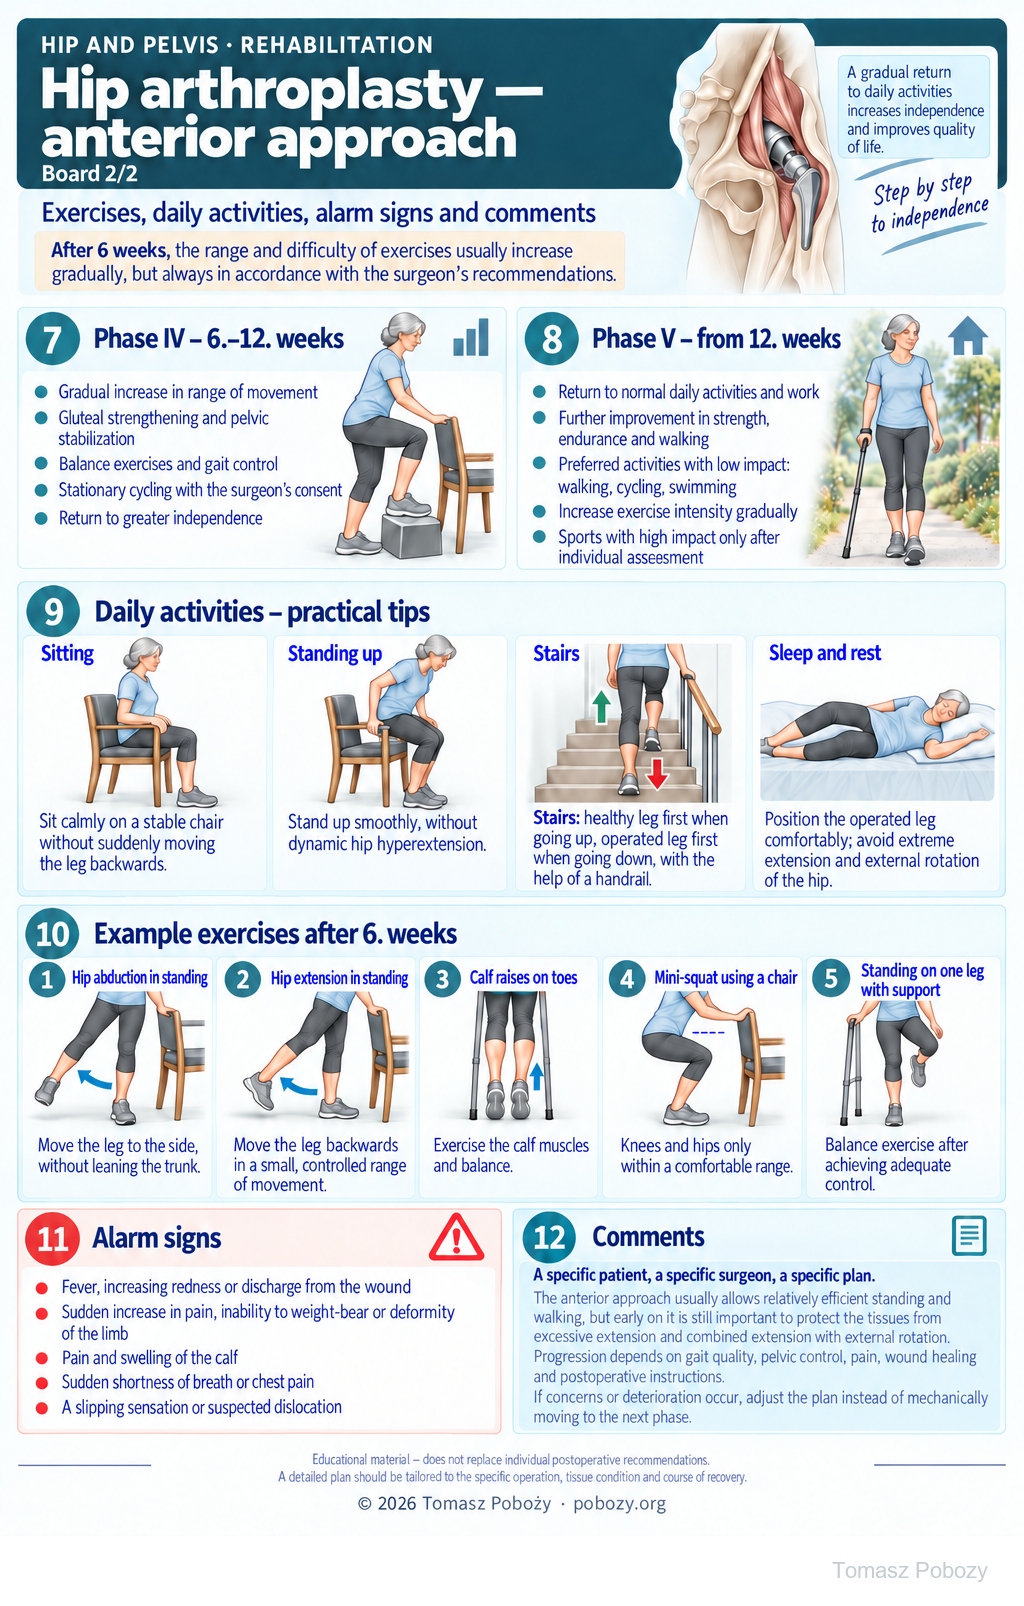
Poster 2. Further rehabilitation, daily activities and warning signs.
Exercises — a closer look
Use the complete boards above together with the instructions for the chosen stage. An exercise shown for a later stage is not permitted early.
Open the relevant complete board and zoom in. The viewer retains all stages and captions.
How should the illustrated exercises be performed?
Early exercises
Ankle pumps: gently flex and extend the ankles. These do not replace prescribed anticoagulant treatment.
Gluteal sets: gently tighten, hold and relax, without lifting the pelvis. Quadriceps sets: tighten the front of the thigh with the leg supported, without forcing the knee down. The illustrated 5–6-second hold is an example; the patient breathes freely.
Heel slides: slowly slide the heel along the surface, bending the knee and hip within the permitted, comfortable range, then return. The movement should not cause increasing pain.
Walking with aids: maintain a steady rhythm, correctly adjusted frame or crutch height, gradual loading as instructed and no sudden turns. The physiotherapist checks the technique.
Examples of later exercises
Standing hip abduction: move the leg out to the side without leaning the trunk. Standing hip extension: a small, controlled backward movement of the leg, only within the permitted range; do not combine it with forced external rotation. Heel raises: lift the heels in a controlled manner with stable support. Mini-squat: slightly bend the hips and knees within the comfortable, permitted range. Single-leg standing: only with adequate control, support available and no risk of falling.
Showing these exercises after week 6 does not mean everyone should start the entire set on the first day of that phase. Selection depends on function, current restrictions and the patient’s response.
Daily programme and separate resistance training
The patient performs individually prescribed activity and exercises daily. Later resistance training has a separately planned frequency and recovery intervals. The physiotherapist sets the position, range, repetitions and stopping criteria. Markedly greater pain, swelling or poorer walking after a session and the following day call for dose adjustment.
Scope and protection
Scope, movement precautions and weight-bearing
Who is this for?
Adults following primary elective total hip arthroplasty through the direct anterior approach (DAA), with a typical postoperative course. The programme does not automatically apply to revision surgery, hemiarthroplasty, treatment of an acute fracture, an intraoperative fracture or additional bone or muscle reconstruction. Nor is it a protocol for every variant of the anterolateral approach.
Protection after the anterior approach
Early on, avoid forced hip extension, especially combined with external rotation. This includes taking the operated leg far backwards, deep lunges and suddenly opening the hip backwards. Do not force a long stride or stretch the front of the hip. Turn with small steps instead of twisting the trunk over a planted foot.2
The posters show precautions during the first 6 weeks. This is not an identical set of restrictions for all patients. If the orthopaedic surgeon has prescribed a different scope or duration of protection, the individual plan applies. The end of week six does not itself authorise unrestricted movement; increase the range gradually once restrictions have ended.2
Do not automatically apply posterior-approach restrictions. The anterior approach alone does not justify imposing a 90° flexion limit on every patient. Tailor flexion to the instructions and tolerance, without forcing through groin pain.
Weight-bearing is a separate decision
Weight-bearing follows the discharge instructions. If weight-bearing as tolerated is permitted, the patient can gradually transfer weight onto the operated leg using a frame or crutches. Where a limit is prescribed, it also applies when walking is painless. Permission to bear weight while walking does not mean permission for every movement or any strengthening exercise.
Information is needed about implant stability, tissue condition, any additional repairs, intraoperative events and planned follow-up. Clarify missing details with the surgeon.
Stages and progression criteria
Phases I–III: surgery to week 6
Phase I — day of surgery to discharge
Mobilisation starts on the day of surgery if the clinical condition allows, generally within the first 24 hours. First standing and walking are supervised after assessing limb control and tolerance of position changes.1
Teach moving from lying to sitting, standing up, walking, turning and sitting down. Use a stable chair and calm movements, without suddenly moving the operated leg backwards. Introduce ankle pumps and gentle gluteal and quadriceps sets. Practise stairs before discharge if they will be needed at home.2
Goal: safe basic activities with appropriate assistance, understanding the instructions and preparing to return home. Dizziness, faintness or insufficient limb control are reasons to stop the attempt.
Phase II — the first 2 weeks
Alternate short walks around the home and the exercises learned with rest. Monitor the wound, pain, swelling and tolerance of daily activities. Initially, steady walking without an increasing limp matters more than distance.2
The early exercise set may include ankle pumps, gluteal and quadriceps sets, and heel slides with hip flexion within the permitted, comfortable range. The 3–5 short daily sessions illustrated do not mean that every exercise must be performed that frequently. The dose follows the physiotherapist’s individual instructions.
Goal: increasing independence in basic activities and correct performance of selected exercises. Do not try to exercise through wound deterioration or sudden pain.
Phase III — approximately weeks 2–6
Gradually increase walking distances, improve pelvic control and practise balance with support. Continue avoiding excessive extension and sudden opening of the hip. Do not add resistance to a movement that increases groin or anterior thigh pain.2
Progression from two crutches to one depends on gait quality, balance and permitted weight-bearing. A single crutch or stick is usually held opposite the operated hip. Do not abandon walking aids at the cost of a pronounced limp; resume support if it returns.3
Goal: greater independence and an improved gait pattern. The timing of stopping crutches is not the same for every patient.
Phases IV–V: from week 6 and return to activity
Phase IV — approximately weeks 6–12
After assessing healing and updating instructions, gradually increase exercise range and difficulty. Develop gluteal strength, pelvic control, balance and walking endurance. Examples include chair rises, supported mini-squats, low step-ups and movement against light resistance. Introduce a stationary bicycle once permitted, with appropriate adjustment and without painfully forcing the hip.2
Increase extension through a small, controlled range without arching the lower back. Do not start with deep lunges or aggressive stretching. Persistent groin pain or deteriorating movement control call for load adjustment and assessment, rather than extra repetitions.
Goal: greater independence, more efficient walking, better limb control and tolerance of selected strengthening exercises. Achieve phase goals gradually, rather than at any cost.
Phase V — from approximately week 12
Move the programme towards activities needed for work and recreation. Develop strength, endurance, balance and tolerance of longer walks. Low-impact activities such as walking and cycling are preferred. Swimming and water exercises may begin once the wound is fully healed and the activity is permitted. Contact sports, running and jumping require an individual decision.4
Increase exercise intensity gradually. Starting this phase does not authorise unrestricted loading. Readiness also depends on gait quality, pelvic control, exercise tolerance and the type of activity planned.
Daily activities and follow-up
From first standing to a return to daily activities. Two posters show the stages of rehabilitation, protective precautions and exercise examples after primary anterior-approach hip arthroplasty. Expandable details, commentary and references follow below.
Sitting, standing up, stairs, rest and the car
Sitting and standing up: use a stable chair, calm movements and armrests if needed. Do not drop suddenly onto the seat or abruptly move the operated leg backwards. Standing up should not end in dynamic hip hyperextension.
Stairs: initially, the non-operated leg leads upstairs; downstairs, the walking aid and operated leg go first. Use a handrail and the technique taught. If the other leg is also affected, stair technique needs adapting.
Sleep and rest: position the operated leg comfortably, avoiding extreme extension and external rotation. Use the illustrated side-lying position only once permitted and with suitable support; the drawing should not be read as an instruction to sleep this way from day one.
The car: enter and leave the car calmly without sudden twisting on a weight-bearing leg. Returning to driving requires safe leg control, the ability to perform an emergency stop and freedom from the effects of medicines that impair performance. The number of weeks alone does not establish readiness.
Warning signs
Pain management and warning signs
Take regularly prescribed pain medicines according to the schedule and as-needed medicines as directed. Do not increase doses to force a greater range of motion. Uncontrolled or increasing pain requires reassessment.5
Urgent assessment: sudden severe pain, inability to bear weight, limb deformity or suspected dislocation. Stop exercising and do not attempt self-reduction. Fever, increasing redness, wound discharge or new calf pain and swelling also require prompt medical contact.
Immediate emergency help: sudden shortness of breath, chest pain or fainting. Do not wait for the next rehabilitation appointment.
Further guidance
HIP AND PELVIS · FOR DOCTORS AND PHYSIOTHERAPISTS
The posters illustrate a programme with movement precautions following the direct anterior approach. The scope and duration of restrictions depend on postoperative instructions. Timings and exercise doses are indicative and do not replace an individual programme. Ankle pumps and walking do not replace prescribed thromboprophylaxis.1, 2
The protocol in posters
Click or tap a poster to enlarge it. On a phone, you can also use the text below the posters.
Watch or listen
Conversations with Tomasz Poboży on Radio Rekord Mazowsze (in Polish). General background on treatment; follow this protocol for procedure-specific restrictions.
References
References
The posters are practical summaries. Restrictions and timings should be read alongside the explanation of their scope. Dividing rehabilitation into phases provides structure; it is not one compulsory timetable for every patient.
- Wainwright TW, Gill M, McDonald DA, Middleton RG, Reed M, Sahota O, Yates P, Ljungqvist O. Consensus statement for perioperative care in total hip replacement and total knee replacement surgery: Enhanced Recovery After Surgery (ERAS®) Society recommendations Acta Orthop. 2020;91(1):3–19. doi:10.1080/17453674.2019.1683790.
- Di Martino A, Keating C, Butsick MJ, Platano D, Berti L, Hunter LN, Faldini C. Enhancing recovery: surgical techniques and rehabilitation strategies after direct anterior hip arthroplasty J Orthop Traumatol. 2024;25(1):45. doi:10.1186/s10195-024-00786-y.
- Sara LK, Lewis CL. Rehabilitation Phases, Precautions, and Mobility Goals Following Total Hip Arthroplasty HSS J. 2023;19(4):494–500. doi:10.1177/15563316231192980.
- Sowers CB, Carrero AC, Cyrus JW, Ross JA, Golladay GJ, Patel NK. Return to Sports After Total Hip Arthroplasty: An Umbrella Review for Consensus Guidelines Am J Sports Med. 2023;51(1):271–278. doi:10.1177/03635465211045698.
- Anger M, Valovska T, Beloeil H, et al. PROSPECT guideline for total hip arthroplasty: a systematic review and procedure-specific postoperative pain management recommendations Anaesthesia. 2021;76(8):1082–1097. doi:10.1111/anae.15498.
Clinical commentary and terms of use
Commentary
A specific case, a specific patient, a specific surgeon
The anterior approach allows early mobilisation, but it does not mean completely unrestricted movement from the first few days. The absence of traditional posterior-approach precautions does not authorise forced extension, stretching or combined extension and external rotation.
I relate the pace of rehabilitation to the stability achieved during surgery, bone and tissue condition, muscle strength, gait quality and response to loading. I do not equate permission for weight-bearing walking with permission for any exercise. One patient may stop using crutches early; another may benefit from continued support to avoid establishing a persistent limp.
Restrictions should have a rationale and be reassessed. If uncertainty or deteriorating function arises, adjust the plan instead of mechanically moving to the next week on the poster.
Cooperation between surgeon and physiotherapist
The physiotherapist helps develop the rehabilitation plan: assessing function, selecting exercises, teaching technique and tailoring the dose. The surgeon provides details of the procedure and the restrictions arising from it. Information should flow in both directions. Observations about progress, pain, limping and everyday difficulties support shared decisions.
If information needed to agree individual variations is missing, follow the appropriate protocol and discharge instructions. Within these limits, the physiotherapist continues to select treatment independently, assess its effects and propose changes. The patient should understand the purpose of the exercises and receive consistent guidance.