 Skip to content
FOR CLINICIANS AND PHYSIOTHERAPISTS
Trigger finger surgery — A1 pulley release — rehabilitation protocol
Care after isolated open A1 pulley release in an adult. From gentle digit movement to functional grip recovery, guided by healing, mobility and the response to loading.
Using and loading the limb
After A1 release, begin light activity early without forceful grip or pressure on the fresh wound. Resistance follows healing and clearance.
Full guidance ↓Brace or immobilisation
Continuous immobilisation is not routine. A contracture splint is selected when indicated, not automatically as after tendon repair.
Full guidance ↓Permitted movement
Use gentle finger flexion/extension and tendon gliding. Monitor PIP extension; do not force through locking or increasing pain.
Full guidance ↓Permitted movement, loading and removal of a brace are separate decisions. Additional repairs may require a more protective programme.
Rehabilitation at a glance
Progression follows healing and functional criteria, not dates alone.
Rehabilitation boards
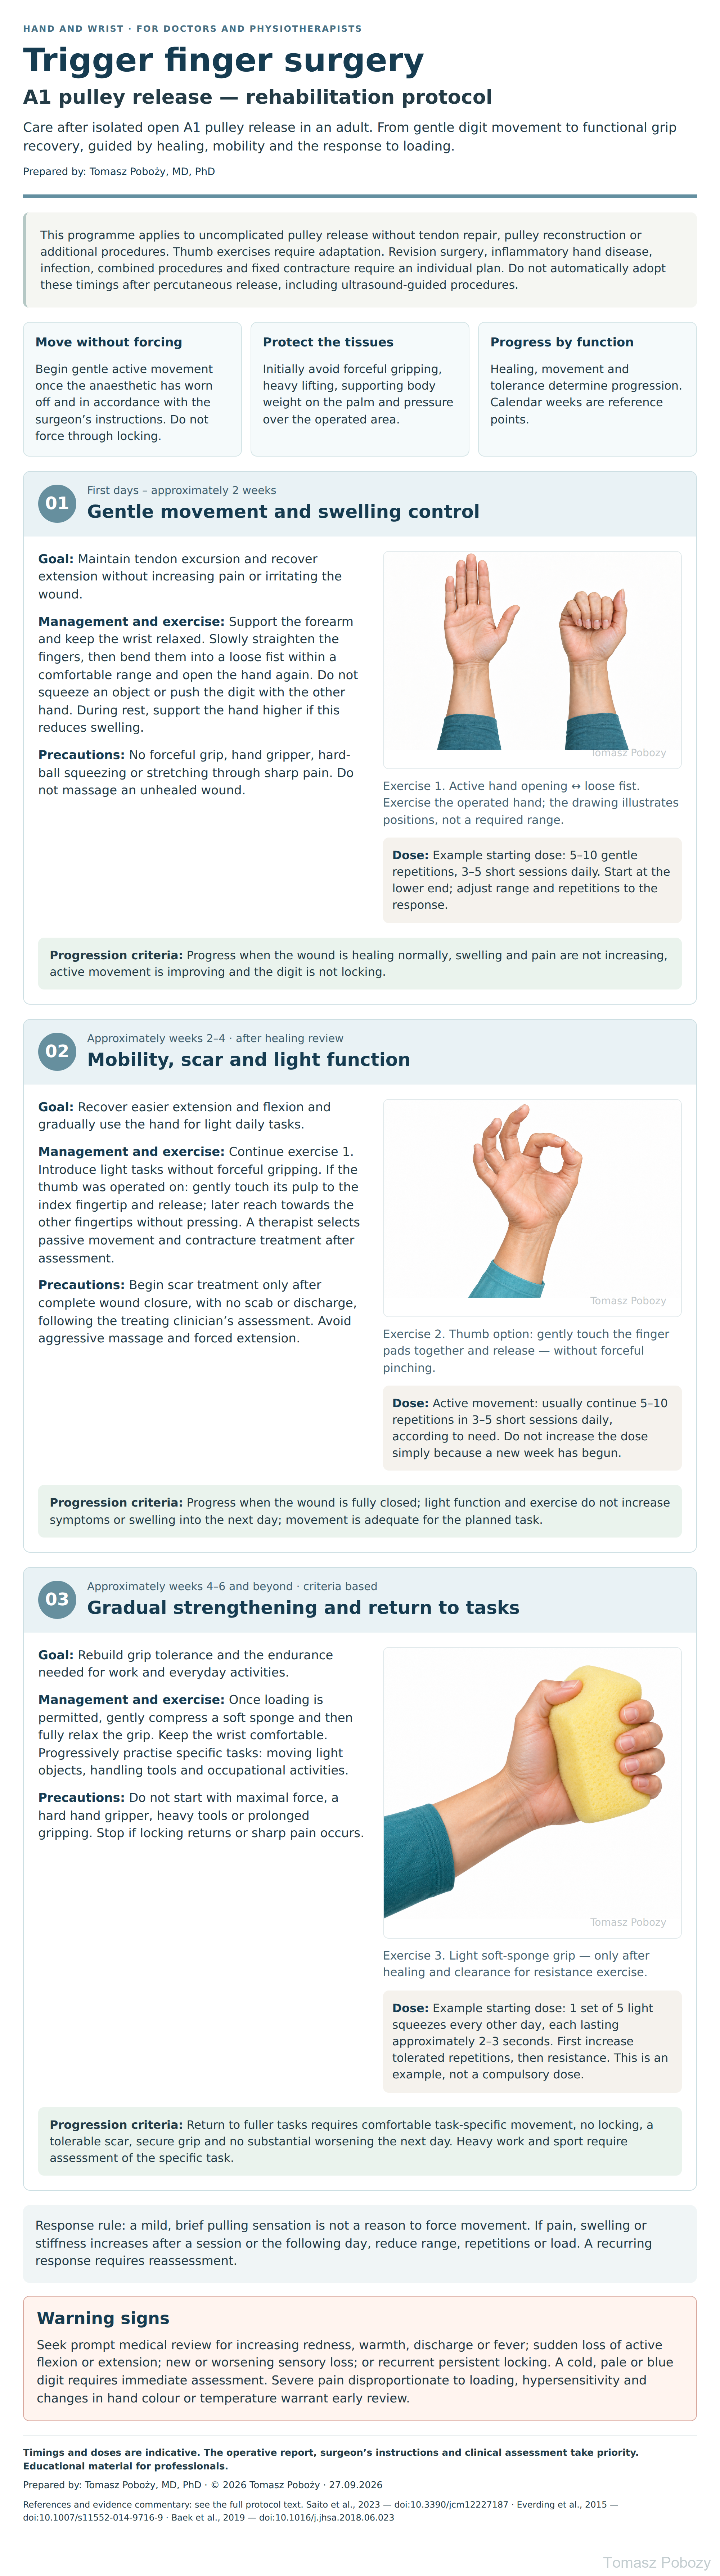
Exercises — a closer look
Use the complete boards above together with the instructions for the chosen stage. An exercise shown for a later stage is not permitted early.
Open the relevant complete board and zoom in. The viewer retains all stages and captions.
4. How should exercises be performed and dosed?
Active movement without resistance
Support the forearm, relax the shoulder and keep the wrist comfortable. Open the hand and then slowly bend the fingers. The fist may initially be incomplete. Do not aim to touch the palm with the fingertips at the cost of sharp pain, wound pressure or triggering. Do not push the joints into hyperextension when straightening. Breathe freely.
Thumb exercise
After trigger thumb release, include active thumb interphalangeal flexion and extension and gentle opposition. Perform the illustrated fingertip contact without pressure. Do not impose a sequence designed for digits II–V on the thumb; exclude an additional thumb-base joint problem.
Resistance exercise
The sponge should deform easily. Compress it gently and relax the hand between repetitions. Do not use this exercise to force a stiff digit to loosen up. If gripping puts pressure on a painful scar, defer the exercise or change the task.
Response rule: a mild, brief pulling sensation is not a reason to force movement. If pain, swelling or stiffness increases after a session or the following day, reduce range, repetitions or load. A recurring response requires reassessment.
The numbers given are example starting doses for the programme, not a trial-validated universal schedule after A1 release. The therapist sets the individual range, frequency and loading. The programme may be shorter or longer according to function.
Scope and protection
1. Scope, initial assessment and protection
This programme applies to uncomplicated pulley release without tendon repair, pulley reconstruction or additional procedures. Thumb exercises require adaptation. Revision surgery, inflammatory hand disease, infection, combined procedures and fixed contracture require an individual plan. Do not automatically adopt these timings after percutaneous release, including ultrasound-guided procedures.
Before starting, confirm the operated digit, side, technique, extent of release and any tendon damage. Record pre-existing contracture, comorbidities, work demands and the orthopaedic surgeon’s restrictions. Assess the wound, swelling, pain, sensation, circulation, and active and passive flexion and extension. In digits II–V, document any proximal interphalangeal (PIP) joint extension deficit in particular.
Isolated A1 release is not flexor tendon repair. Do not automatically apply a protective tendon-repair programme. Equally, free movement does not imply clearance for full grip force. Continuous immobilisation is not a routine component of this programme; a therapist and surgeon select any orthosis needed for a contracture.
Stages and progression criteria
2. Phase I — the first days and first 2 weeks
First days – approximately 2 weeks: Gentle movement and swelling control
Goal: Maintain tendon excursion and recover extension without increasing pain or irritating the wound.
Management and exercise: Support the forearm and keep the wrist relaxed. Slowly straighten the fingers, then bend them into a loose fist within a comfortable range and open the hand again. Do not squeeze an object or push the digit with the other hand. During rest, support the hand higher if this reduces swelling.
Dose: Example starting dose: 5–10 gentle repetitions, 3–5 short sessions daily. Start at the lower end; adjust range and repetitions to the response.
Precautions: No forceful grip, hand gripper, hard-ball squeezing or stretching through sharp pain. Do not massage an unhealed wound.
Progression criteria: Progress when the wound is healing normally, swelling and pain are not increasing, active movement is improving and the digit is not locking.
3. Phases II–III — recovering movement, strength and function
Approximately weeks 2–4 · after healing review: Mobility, scar and light function
Goal: Recover easier extension and flexion and gradually use the hand for light daily tasks.
Management and exercise: Continue exercise 1. Introduce light tasks without forceful gripping. If the thumb was operated on: gently touch its pulp to the index fingertip and release; later reach towards the other fingertips without pressing. A therapist selects passive movement and contracture treatment after assessment.
Dose: Active movement: usually continue 5–10 repetitions in 3–5 short sessions daily, according to need. Do not increase the dose simply because a new week has begun.
Precautions: Begin scar treatment only after complete wound closure, with no scab or discharge, following the treating clinician’s assessment. Avoid aggressive massage and forced extension.
Progression criteria: Progress when the wound is fully closed; light function and exercise do not increase symptoms or swelling into the next day; movement is adequate for the planned task.
Approximately weeks 4–6 and beyond · criteria based: Gradual strengthening and return to tasks
Goal: Rebuild grip tolerance and the endurance needed for work and everyday activities.
Management and exercise: Once loading is permitted, gently compress a soft sponge and then fully relax the grip. Keep the wrist comfortable. Progressively practise specific tasks: moving light objects, handling tools and occupational activities.
Dose: Example starting dose: 1 set of 5 light squeezes every other day, each lasting approximately 2–3 seconds. First increase tolerated repetitions, then resistance. This is an example, not a compulsory dose.
Precautions: Do not start with maximal force, a hard hand gripper, heavy tools or prolonged gripping. Stop if locking returns or sharp pain occurs.
Progression criteria: Return to fuller tasks requires comfortable task-specific movement, no locking, a tolerable scar, secure grip and no substantial worsening the next day. Heavy work and sport require assessment of the specific task.
Daily activities and follow-up
Daily activities follow the permitted joint motion, lifting, grip and arm support for your procedure. Ending immobilisation is not clearance for lifting or driving. The detailed guidance below explains the criteria and exceptions.
5. Daily activities, work, sport and driving
Home and computer use: introduce brief periods of light activity if tolerated. Take breaks and avoid compensating for pain with sustained tension throughout the limb. Early on, avoid opening tight lids, wringing, carrying heavy bags and supporting body weight on the operated palm.
Manual work and sport: loading depends on grip force, duration and repetition, tool pressure and vibration. Begin with shorter and lighter tasks. Returning to desk work and returning to heavy manual work are different decisions. The passage of 4 or 6 weeks alone does not establish readiness.
Driving: resume only with secure grip and the ability to perform an emergency manoeuvre without substantial pain and without the effects of medicines that impair performance. Consider the vehicle, operated side and treating clinician’s restrictions.
Warning signs
6. Pain, warning signs and lack of progress
Use medicines as individually prescribed. Do not increase doses to force movement or grip training. Monitor the trend in pain and swelling, rather than the result of a single session.
Seek prompt medical review for increasing redness, warmth, discharge or fever; sudden loss of active flexion or extension; new or worsening sensory loss; or recurrent persistent locking. A cold, pale or blue digit requires immediate assessment. Severe pain disproportionate to loading, hypersensitivity and changes in hand colour or temperature warrant early review.
If extension deteriorates, improvement remains absent across follow-up assessments or triggering recurs, do not mechanically increase exercise intensity. Reassess the cause. Complications following release may include infection, stiffness, persistent triggering and nerve injury.2
For a life-threatening emergency, call your local emergency number immediately — 112 in the European Union. On the boards, 112 refers to the EU.
Additional scope notes
References
8. References
The publications support management principles and outcome assessment. They do not establish one compulsory weekly schedule or repetition count.
- Saito T, Nakamichi R, Nakahara R, Nishida K, Ozaki T. The Effectiveness of Rehabilitation after Open Surgical Release for Trigger Finger: A Prospective, Randomized, Controlled Study. J Clin Med. 2023;12(22):7187. doi:10.3390/jcm12227187.
- Everding NG, Bishop GB, Belyea CM, Soong MC. Risk factors for complications of open trigger finger release. Hand (N Y). 2015;10(2):297–300. doi:10.1007/s11552-014-9716-9.
- Baek JH, Chung DW, Lee JH. Factors Causing Prolonged Postoperative Symptoms Despite Absence of Complications After A1 Pulley Release for Trigger Finger. J Hand Surg Am. 2019;44(4):338.e1–338.e6. doi:10.1016/j.jhsa.2018.06.023.
References and links checked on 18 October 2026. Existence of a publication does not validate every dose or timetable. Institutional protocols and examples require individualisation.
Clinical commentary and terms of use
7. Commentary — selecting therapy and working together
The individual case, the individual patient, the individual surgeon. Resolution of triggering does not immediately establish full grip tolerance. Pre-existing contracture and longstanding symptoms call for closer observation. An observational study associated these features with prolonged symptoms.3
A small randomised trial after open A1 release found no significant advantage of routine therapy over exercise instruction in whole-group outcomes at 6 months. Signals of benefit in subgroups support individualisation rather than proving that every patient needs therapy.1
In practice, patients with restricted movement, difficulty exercising independently, a painful scar or demanding work need greater attention. For fixed contracture, the therapist assesses passive movement, tendon excursion and any need for an orthosis. Forceful self-stretching is not recommended.
The surgeon supplies operative details and restrictions; the physiotherapist or hand therapist assesses function, teaches technique and adjusts the dose. Information on pain, mobility and work tolerance should flow in both directions. Obtain missing information before accelerating loading.