 Przejdź do treści
FOR CLINICIANS AND PHYSIOTHERAPISTS
Subtalar joint arthrodesis — rehabilitation protocol
Protection, movement and a gradual return to daily activity. Select the stage appropriate to the actual procedure and current clearance.
Using and loading the limb
Do not assume permission for toe-touch or partial loading. Continue prescribed offloading; progress only after assessment and explicit clearance.
Full guidance ↓Brace or immobilisation
Cast or boot according to technique and surgeon. Reaching 6 or 12 weeks does not automatically permit full loading or regular footwear.
Full guidance ↓Permitted movement
Exercise preserved joints, including the ankle after clearance. Do not try to restore motion in the fused subtalar joint.
Full guidance ↓Permitted movement, loading and removal of a brace are separate decisions. Additional repairs may require a more protective programme.
Rehabilitation at a glance
Progression follows healing and functional criteria, not dates alone.
Rehabilitation boards
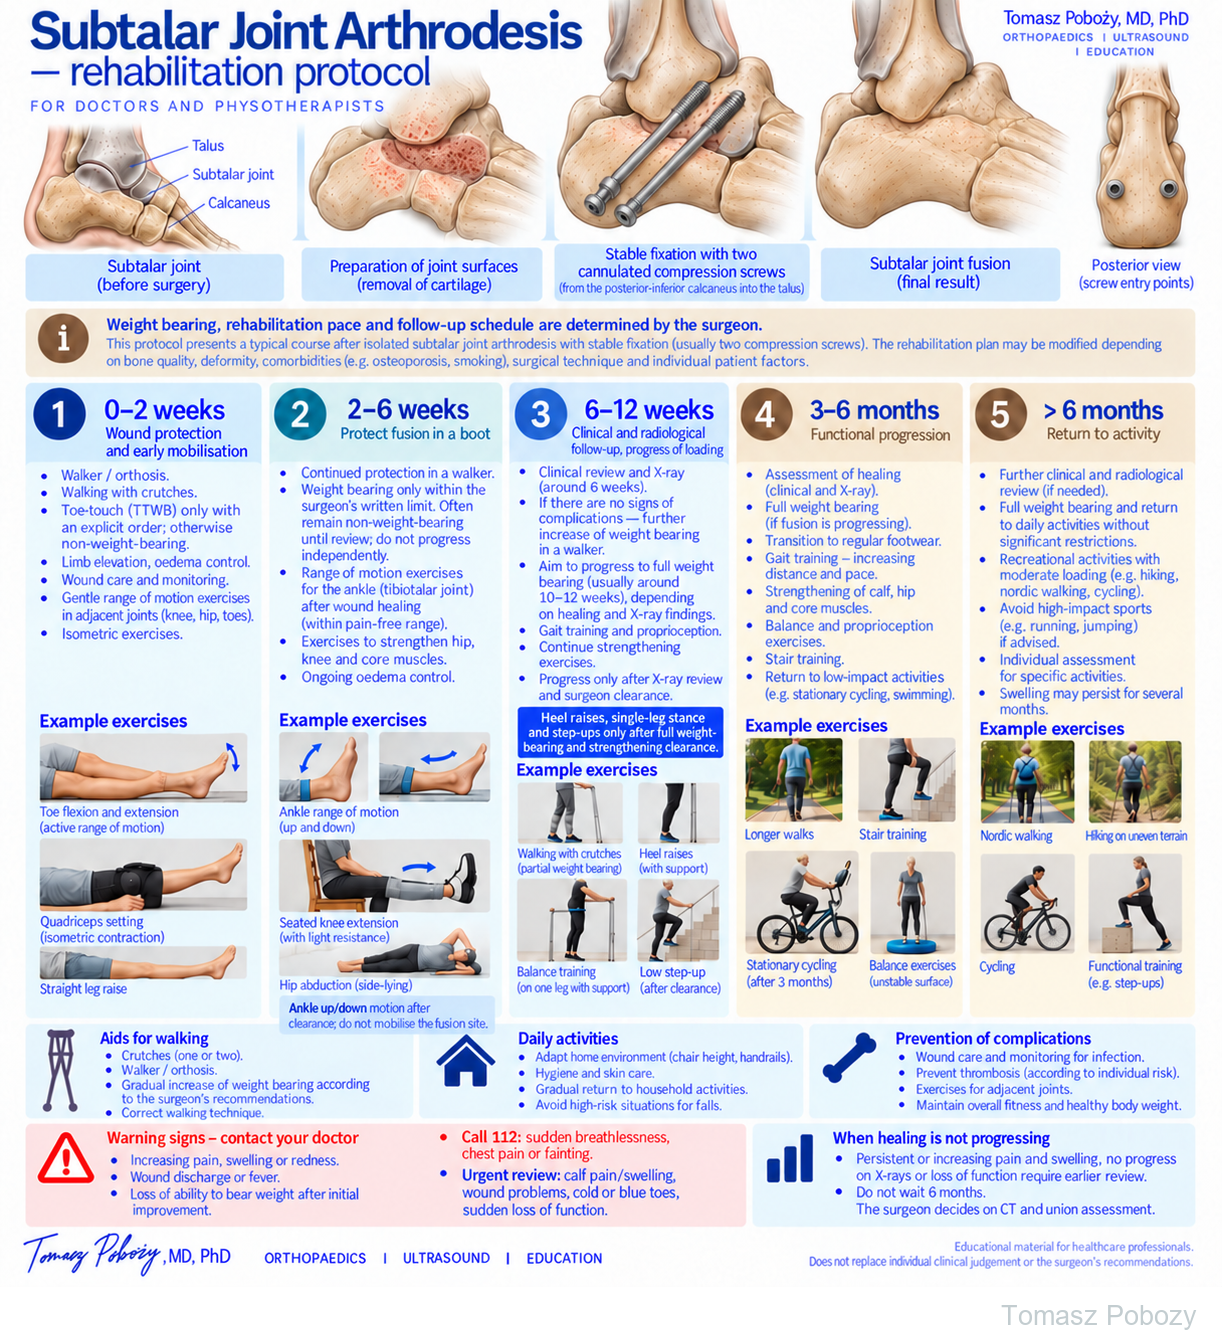
Exercises — a closer look
Use the complete boards above together with the instructions for the chosen stage. An exercise shown for a later stage is not permitted early.
Open the relevant complete board and zoom in. The viewer retains all stages and captions.
Exercise instructions and progression are contained in the stage descriptions linked above.
Exercises on the board — what they show and when
Dates describe approximate phases. The physiotherapist selects exercises within the current motion and loading clearance. Stop if pain, swelling or walking deteriorates; assess the response before increasing difficulty.
0–2 weeks · toes, knee and hip
Gently flex and extend the toes without moving the fusion site. Set the quadriceps with the leg supported, and perform a straight-leg raise if knee extension can be maintained. Keep the prescribed protection; these exercises do not authorise loading the foot.
2–6 weeks · preserved-joint motion
After wound healing and clearance to remove the orthosis: gently move the ankle up and down through the permitted tibiotalar range. Do not stretch or mobilise the subtalar fusion. The board also shows seated knee extension and side-lying hip abduction. Knee resistance requires clearance, no pressure over the fixation and no unauthorised removal of protection.
6–12 weeks · walking and cleared exercise
Crutch walking stays within the prescribed loading limit. Supported heel raises, single-leg stance, small squats or low step-ups require separate full-weight-bearing and strengthening clearance. Reaching week 6 alone does not permit them. Use stable support, control the limb and begin with the easiest cleared version.
3–6 months · distance, stairs and balance
After adequate union is confirmed, gradually increase walking distance and practise stairs with a handrail. Start stationary cycling with low resistance after clearance. Practise balance on a stable surface first; use an unstable surface only after mastering the easier version and physiotherapist clearance. Swimming requires a healed wound and safe pool entry and exit.
Over 6 months · recreation
Match Nordic walking, cycling and hiking to union, symptoms and foot control. Uneven terrain and higher steps increase demand; introduce them gradually. Running and jumping require a separate surgeon decision and do not follow automatically from reaching the end of the rehabilitation timetable.
Scope and protection
This pathway is for an isolated subtalar fusion with stable fixation. The operation record and the written loading restriction take priority. Combined fusions, bone grafting, revision surgery and impaired healing may require a different pathway.
Different published fusion pathways use different periods of protection. Continue the written restriction until the surgeon updates it; pain relief alone does not confirm union.
Stages and progression criteria
0–2 weeks — protection and safe transfers
Use the cast or orthosis and walking aids prescribed by the surgeon. Do not assume permission for toe-touch or partial weight bearing. Confirm the loading instruction for the actual fusion and fixation. Elevate the limb and manage swelling. Maintain permitted isometrics and movement of the toes, knee and hip without stressing the fusion.
2–6 weeks — protection; loading only if specifically permitted
Continue the prescribed cast or boot and walking aids. In a published isolated subtalar fusion technique, patients remain non-weight-bearing for the first 6 weeks; this is a technique-specific programme, not a rule for every fixation. Start or increase loading only after the surgeon explicitly permits it, considering wound healing, fixation and imaging. Pain relief alone does not demonstrate fusion.
After wound healing and permission to remove the orthosis, move the preserved ankle joint within the prescribed range. Do not mobilise the fused subtalar joint. Maintain permitted hip, knee and trunk exercise without violating the loading limit. Isolated Subtalar Arthrodesis.
6–12 weeks — review before loading progression
Clinical assessment and imaging guide progression according to fixation stability and fusion. Increase loading and introduce gait, strength and balance exercises only within the revised prescription. Approximately 10–12 weeks is a possible review/progression period, not a universal deadline for full weight bearing or regular footwear. Arrange follow-up according to the surgeon’s plan. Heel raises, single-leg stance and loaded squats require specific clearance for full weight bearing and strengthening. Ankle motion permission alone does not allow these exercises.
3–6 months — functional progression
With satisfactory progression of fusion, transition to full weight bearing and regular footwear. Increase walking distance and pace, strengthen the calf, hip and core, and progress balance and proprioception on uneven surfaces and stair training. Low-impact activities such as stationary cycling can be introduced gradually.
>6 months — return to activity
Further clinical and radiological review is performed as required. Return to unrestricted daily activity and recreation depends on union, pain and function. Hiking, Nordic walking and cycling are usually suitable. High-impact and jumping activities require individual assessment. Swelling may persist for several months.
Warning signs
Call 112: sudden breathlessness, chest pain or fainting. New calf pain/swelling, wound breakdown, cold or blue toes or sudden loss of function require urgent same-day assessment.
Warning signs
Increasing pain, redness, swelling, wound discharge, fever, sudden deterioration in weight-bearing ability, deformity or instability, calf pain require medical reassessment.
When should healing be reassessed?
Increasing loading pain, worsening swelling or function, or lack of progression on serial imaging requires review. Do not wait until 6 months if the course is concerning. Persistent pain beyond 6 months is also a reason for reassessment; CT may help if fusion is uncertain. Time alone neither diagnoses nor excludes nonunion.
For a life-threatening emergency, call your local emergency number immediately — 112 in the European Union. On the boards, 112 refers to the EU.
Additional scope notes
FOOT AND ANKLE · FOR DOCTORS AND PHYSIOTHERAPISTS
Rehabilitation after isolated subtalar fusion with stable fixation, usually using two compression screws.
Prepared by: Tomasz Poboży, MD, PhD — orthopaedic surgeon · Updated: 03 October 2026
Weight bearing, rehabilitation pace and follow-up imaging are determined by the orthopaedic surgeon. This pathway applies to isolated subtalar arthrodesis with stable fixation. Progression may be slower with poor bone quality, major deformity correction, bone grafting, revision surgery, smoking or other risk factors for impaired fusion.
Key message: protect the subtalar fusion without unnecessarily immobilising the entire limb. With stable fixation, protected partial weight bearing in a walker boot can progress gradually, aiming for full weight bearing at around 3 months.
Everyday activities
Functional clearance takes priority over the calendar.
Walking and stairs
Keep the prescribed loading limit and protection. Practise transfers and stairs with a physiotherapist; use a handrail and assistance until the technique is safe.
Driving and work
Driving requires safe emergency braking, no immobilisation interfering with the pedals and no medication impairing alertness. Operated side and transmission matter. Desk work requires safe access and the ability to elevate the leg; standing work depends on loading clearance and tolerance.
References
References
- Royal National Orthopaedic Hospital. Rehabilitation guidelines for subtalar and hindfoot fusion. · Source
- Royal National Orthopaedic Hospital. Ankle and hindfoot arthrodesis patient guidance. · Source
- Isolated Subtalar Arthrodesis. JBJS Essential Surgical Techniques. 2016. doi:10.2106/JBJS.ST.15.00065.
RNOH documents include several types of hindfoot/ankle fusion. They are not interchangeable with an isolated subtalar fusion prescription. The linked surgical-technique paper describes its own protection pathway.