 Skip to content
FOR CLINICIANS AND PHYSIOTHERAPISTS
Medial patellofemoral ligament (MPFL) repair and reconstruction — rehabilitation protocol
Tendon graft or tape. Protection of healing, recovery of motion and strength, and a criteria-based return to activity.
Using and loading the limb
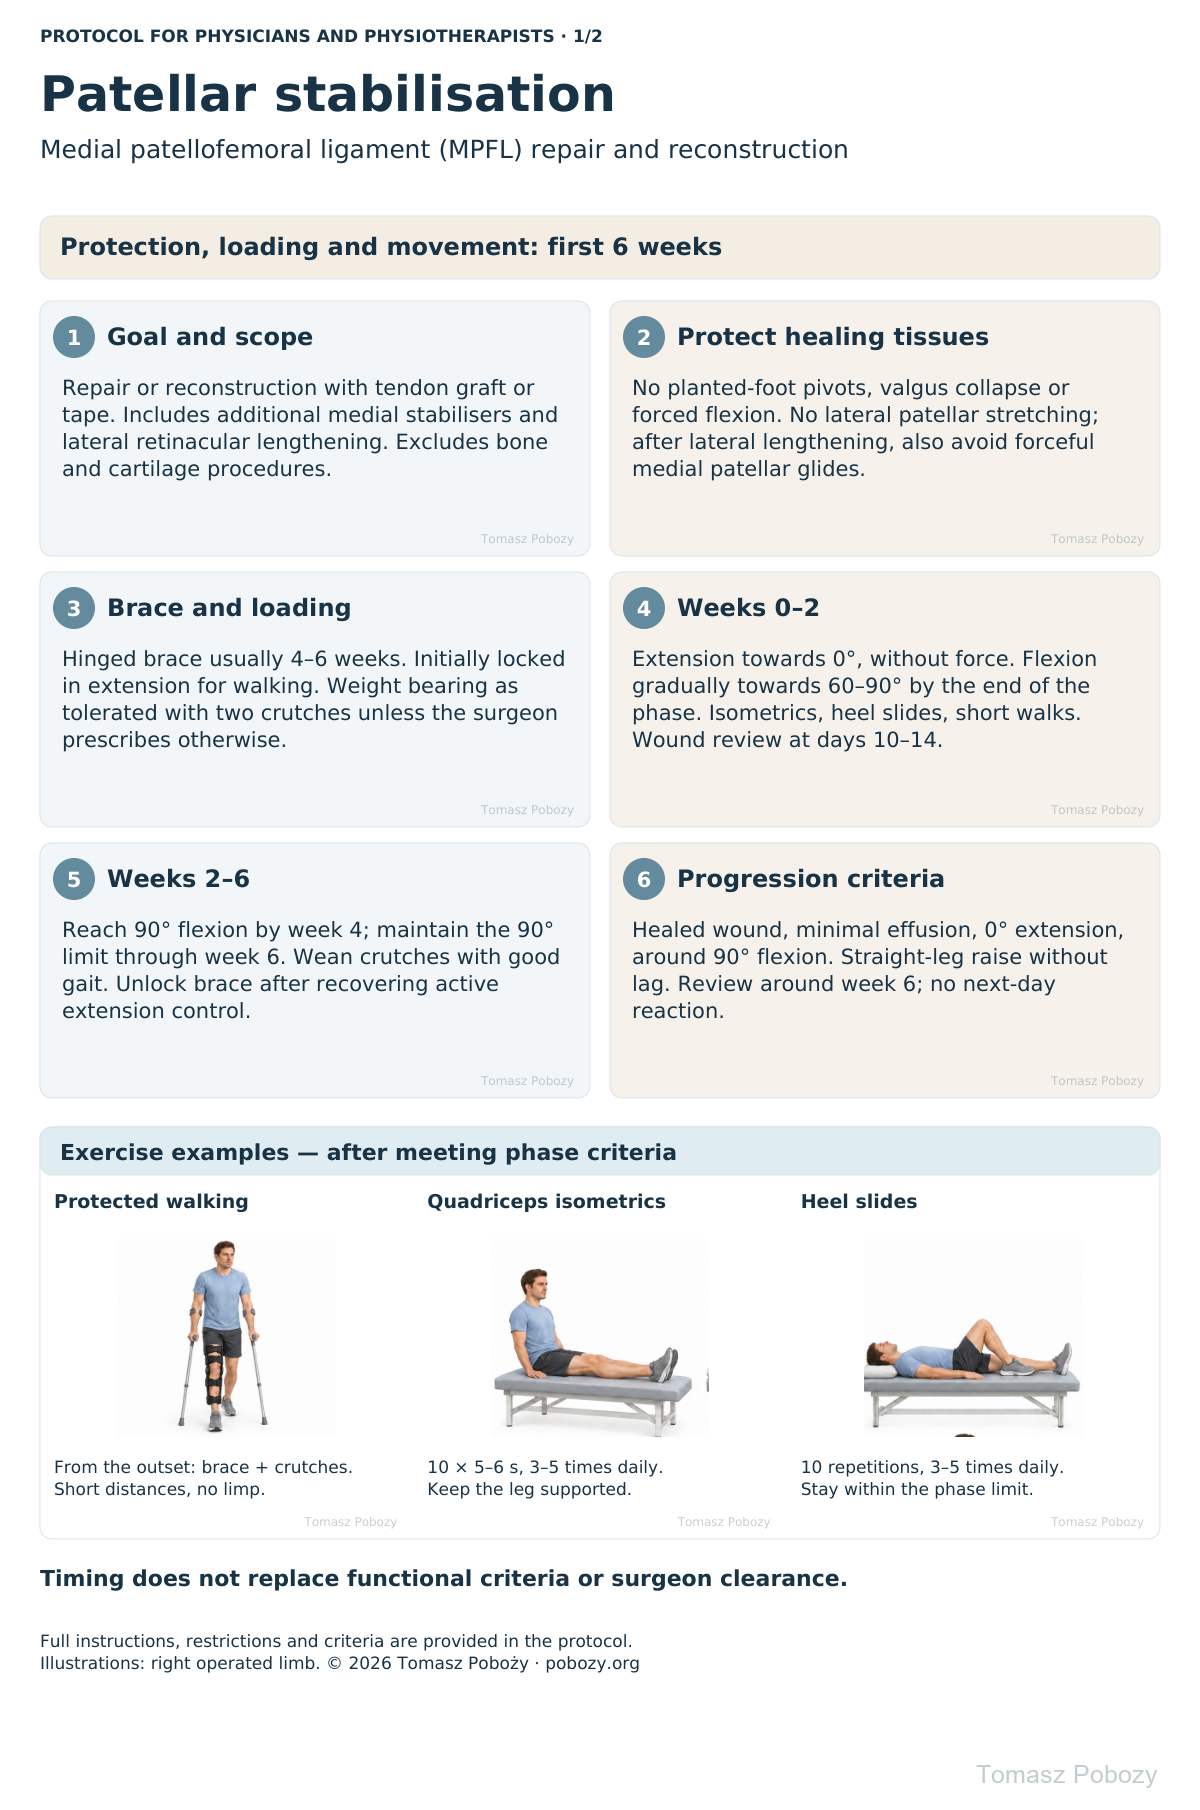
For isolated MPFL in this pathway, use WBAT in the brace with two crutches after motor block resolves and with assistance. Osteotomy or other procedures change the rules.
Full guidance ↓Brace or immobilisation
Brace usually 4–6 weeks; initially locked in extension for walking. Unlock after assessment of knee control and absence of extension lag.
Full guidance ↓Permitted movement
Restore neutral 0° extension without forcing hyperextension. This pathway limits flexion to 90° through week 6 unless the orthopaedic surgeon permits otherwise.
Full guidance ↓Permitted movement, loading and removal of a brace are separate decisions. Additional repairs may require a more protective programme.
Rehabilitation at a glance
Progression follows healing and functional criteria, not dates alone.
Rehabilitation boards
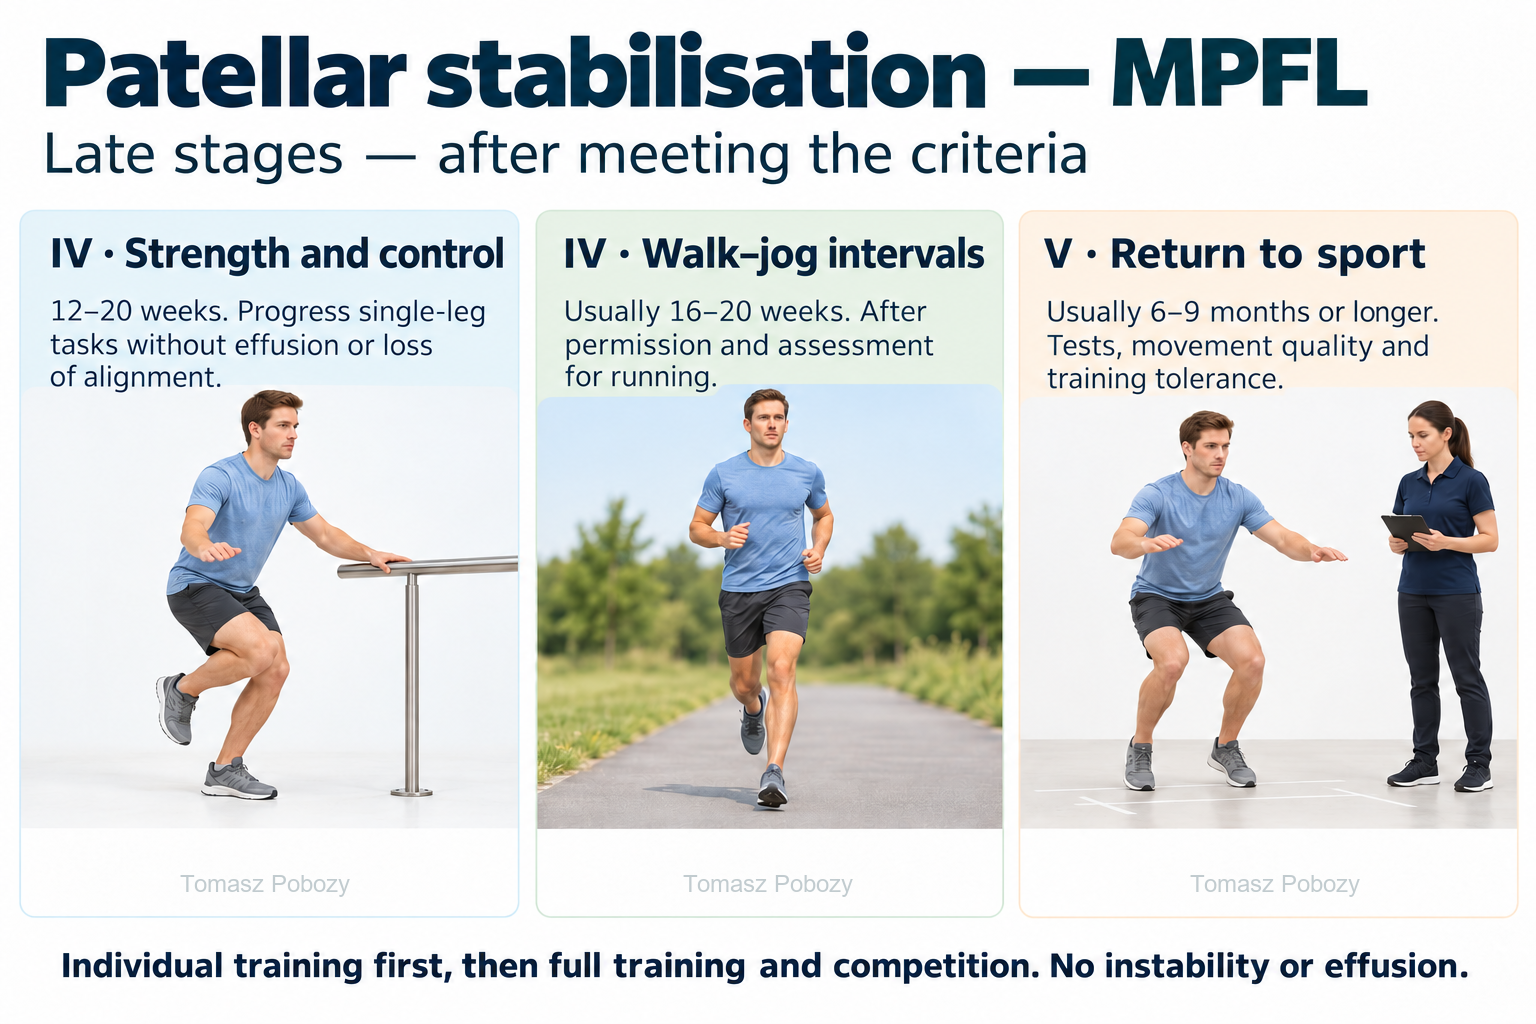
Stage IV: 12–20 weeks — strength and single-leg control without effusion or loss of alignment; walk–jog intervals usually at 16–20 weeks after permission and assessment. Stage V: sport usually at 6–9 months or later — tests, movement quality and training tolerance. Individual training first, then full training and competition. No instability or effusion.
Exercises — a closer look · 3 boards
Use the complete boards above together with the instructions for the chosen stage. An exercise shown for a later stage is not permitted early.
Open the relevant complete board and zoom in. The viewer retains all stages and captions.
Illustrated exercises: technique and dosage
Crutch walking: advance both crutches, then the operated limb and the non-operated limb, using the taught pattern. Wear the knee brace as prescribed for the phase; use short distances without limping.
Quadriceps isometrics: support the leg in extension, tighten the front of the thigh for 5–6 seconds, then relax. 10 repetitions, 3–5 short sessions daily. Heel slides: slowly bend and straighten the knee with the heel on the surface; 10 repetitions, 3–5 times daily, within the phase limit and without force.
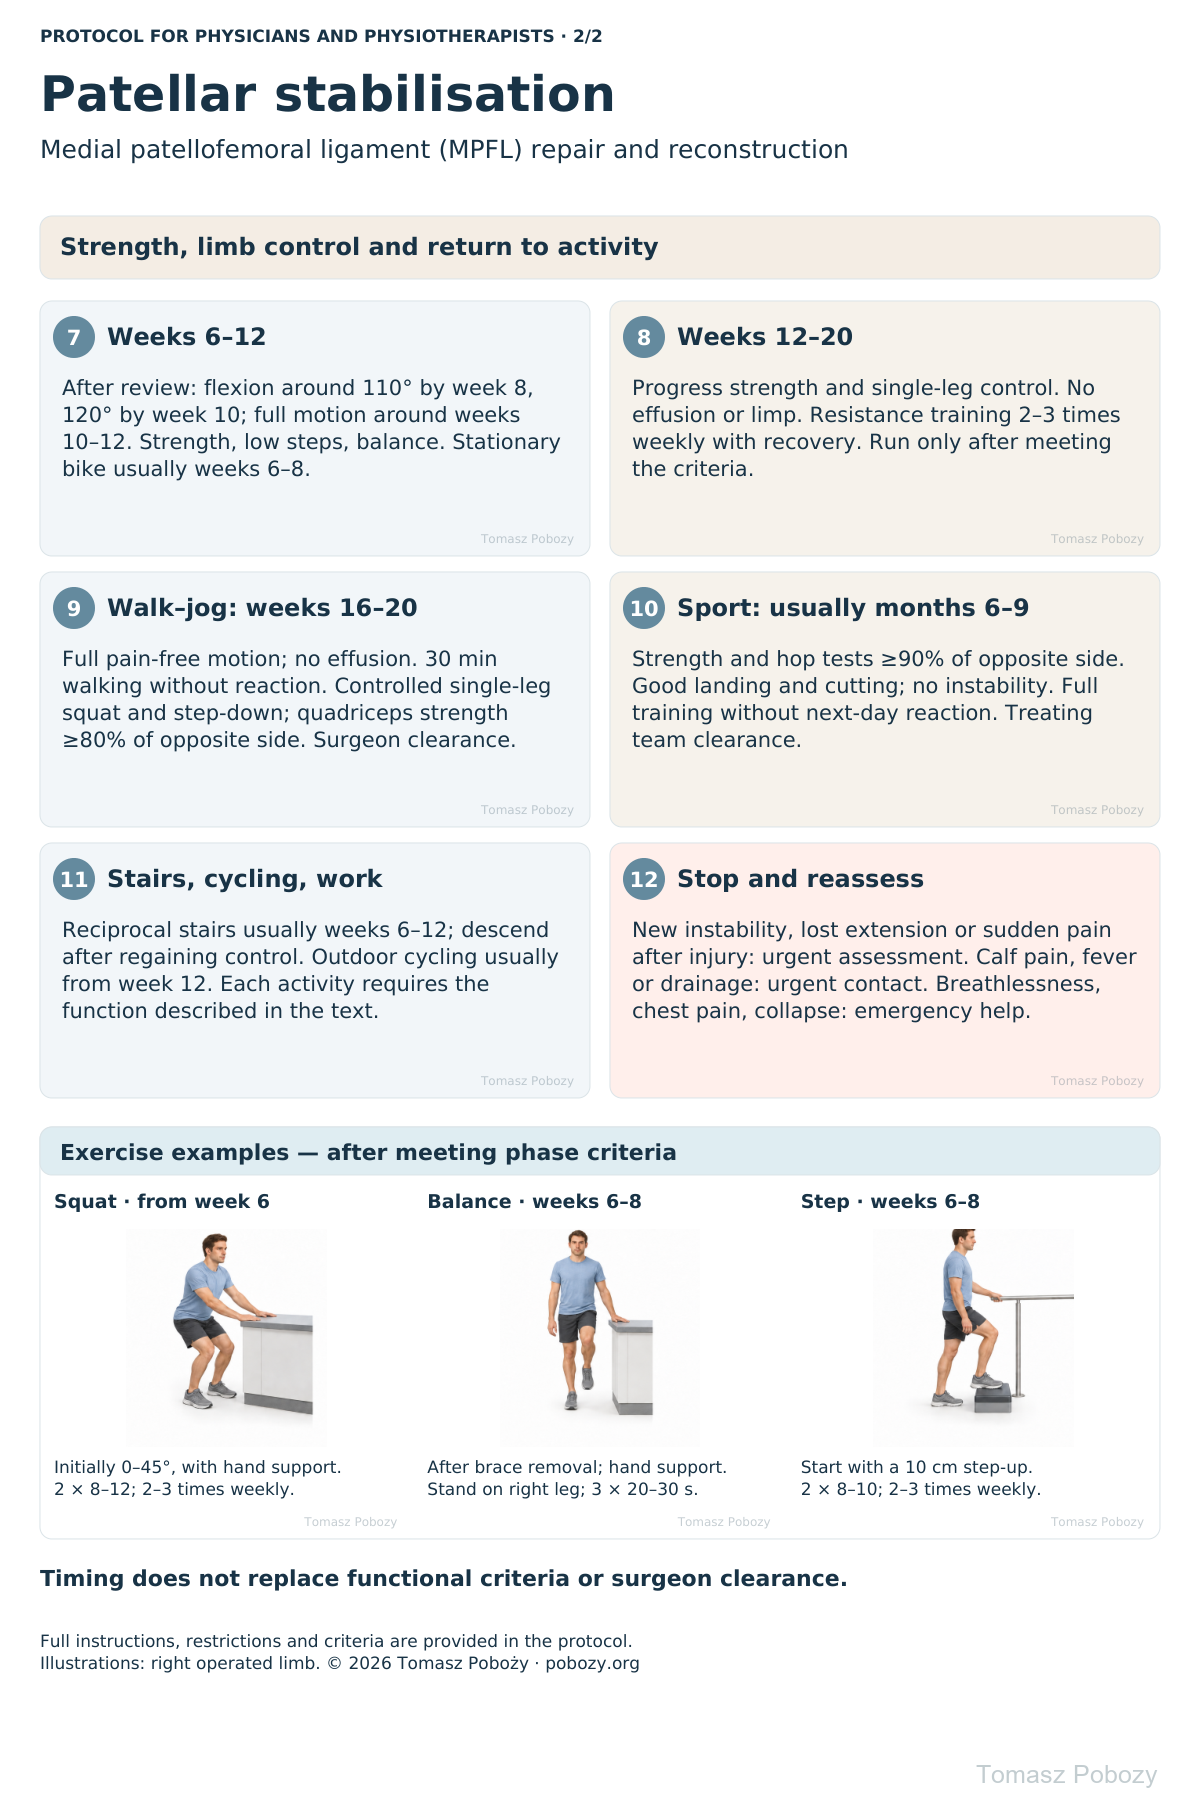
Mini-squat from week 6: stable hand support, initially 0–45°, knees aligned over the feet; 2 sets of 8–12, 2–3 times weekly. Single-leg balance from weeks 6–8: after clearance for full loading and brace discontinuation, on firm ground with hand support available; 3 × 20–30 seconds. Step work from weeks 6–8: start with a 10 cm step-up, then gradually introduce step-downs with good control; 2 × 8–10, 2–3 times weekly.
Illustrations show the right operated limb. Reduce dosage if pain, effusion or limping increases after a session or the following day. Do not exercise through a sensation of patellar giving way.
Stage IV: 12–20 weeks — strength and single-leg control without effusion or loss of alignment; walk–jog intervals usually at 16–20 weeks after permission and assessment. Stage V: sport usually at 6–9 months or later — tests, movement quality and training tolerance. Individual training first, then full training and competition. No instability or effusion.
Scope and protection
Scope and progression principles
This protocol covers repair or reconstruction of the medial patellofemoral ligament (MPFL) using a tendon graft, synthetic tape, or a tape-augmented tendon graft. It also includes reconstruction of the medial quadriceps tendon–femoral ligament (MQTFL) and/or the medial patellotibial ligament (MPTL), with or without lateral retinacular lengthening.
It applies to an uncomplicated postoperative course with stable tissue restoration. It excludes osteotomies, trochleoplasty, cartilage repair, osteochondral fragment fixation and extensor mechanism reconstruction. Revision surgery or a skeletally immature patient requires individual confirmation of the plan.
Time points indicate when progression may be considered, not automatic clearance. Progression requires functional criteria and no deterioration by the following day. Specific restrictions prescribed by the surgeon take precedence. Tape alone does not shorten the schedule.
Brace, crutches, weight bearing and patellar protection
Hinged knee brace: usually 4–6 weeks. Lock in extension for walking during the first 2 weeks. Unlock for walking during weeks 2–4 following clinician review: no buckling, active extension and 10 straight-leg raises without an extension lag. Exercise settings follow the current flexion limit. Keep locked in extension for sleep during the first 2 weeks; further night use depends on review. Remove for hygiene and exercises in a safe position.
Weight bearing as tolerated from the outset, after motor block resolves, with supervision, brace and two crutches. Tolerance means no increasing pain, effusion or uncontrolled knee flexion. Do not force full loading on day one. Discharge weight-bearing restrictions apply regardless of pain. Usually reduce crutches during weeks 2–4; use a single crutch on the opposite side. Discontinue when walking normally without a limp. Usually discontinue the brace at weeks 4–6 after strength and gait review.
No pivoting on a planted foot, sudden valgus loading, hopping or forced flexion. Do not stretch the patella laterally. After lateral retinacular lengthening, also avoid forceful medial patellar mobilisation. A physiotherapist may use gentle superior and inferior glides after assessing healing. Transverse mobilisation requires agreed instructions; no patient-led patellar stretching.
Stages and progression criteria
Phase I: surgery to the end of week 2
Goals: wound, pain and effusion control; restore extension; activate quadriceps; safe walking.
Start movement within the first few days. Aim for 0° extension without forcing hyperextension. Gradually increase flexion towards 60–90° by the end of week 2, within the range permitted at surgery. This is a goal, not a first-session requirement. Support the calf and heel at rest; do not keep a pillow permanently under a flexed knee.
Ankle pumps, quadriceps isometrics, assisted heel slides, hip and trunk exercises. Straight-leg raises require maintained knee extension; if there is a lag, provide assistance and lock the brace in extension. Quadriceps electrical stimulation may be added for poor activation after screening for contraindications. Several short walks daily; avoid distances that increase swelling.
Review at days 10–14: wound, brace settings, extension, flexion and muscle activation. Progress when the wound is satisfactory, effusion is decreasing, extension is improving and assisted walking is safe.
Phase II: weeks 2–6
Goals: full extension, quadriceps control, gradual withdrawal of aids and protected mobility.
Gradually achieve 90° flexion by week 4 and maintain a 90° limit through the end of week 6 unless the surgeon individually permits more. Do not press on the patella or force flexion. Continue isometrics, straight-leg raises, hip and trunk exercises and supported double-leg heel raises when walking and loading are well tolerated.
Begin proprioceptive training with gentle double-leg weight shifts on firm ground in the prescribed brace. No unstable platforms, knee twisting or unsupported balance challenges. Following hamstring graft harvest, avoid strong resisted knee flexion at this stage; after quadriceps graft harvest, dose extensor loading according to pain and control.
Review around week 6. Progression criteria: healed wound, 0° extension, approximately 90° flexion, minimal effusion, straight-leg raise without lag and walking without buckling. Failure to regain extension or a clear flexion plateau requires earlier contact rather than harder stretching.
Phase III: weeks 6–12
Goals: regain mobility, normal stair function, strength and lower-limb alignment control.
After review, gradually increase flexion: approximately 110° by week 8, 120° by week 10 and full functional motion around weeks 10–12. Do not force end range. Start stationary cycling without resistance once flexion permits a smooth revolution; adjust saddle height to available motion.
Introduce mini-squats and leg press, initially 0–45°, then approximately 60°; low step-ups followed by controlled step-downs. Begin light resisted knee extension in the 90–45° range without anterior knee pain; progressively expand range and resistance. Strengthen the hip, calf and trunk. Increase donor-site resistance according to healing and tolerance.
Balance: double-leg, then supported single-leg stance on firm ground, followed by reaching tasks. Introduce unstable surfaces only after good alignment control. No running, jumping or sudden changes of direction.
Progression criteria: full or nearly full pain-free motion, no significant effusion, normal gait and controlled squat and low step tasks without valgus, pelvic drop or apprehension.
Phase IV: weeks 12–20 and starting running
Develop strength, endurance and single-leg control. Gradually increase squat depth, resistance and step height. Do not increase all parameters at once. Resistance training 2–3 times weekly with recovery between sessions.
Walk–jog training usually starts at weeks 16–20, after surgeon clearance and all criteria are met: full pain-free motion; no effusion or instability; 30 minutes of brisk walking without next-day reaction; 10 controlled single-leg squats to approximately 45° and step-downs from 15–20 cm; quadriceps strength at least 80% of the opposite limb on dynamometry.
Start on level ground with 1 minute jogging alternating with 2 minutes walking, 10–15 minutes total, on alternate days. Increase duration before speed. Pain, effusion, limping or loss of control require a reduction in load. Introduce gentle double-leg jumps and landing practice around months 4–5 after meeting criteria, then single-leg tasks. Pivoting and changes of direction require separate progression.
Phase V: return to sport, usually months 6–9
Progress through individual training, non-contact sport practice, full training and competition. Sports involving cutting, landing or contact usually require at least 6–9 months, and longer when deficits persist.
Full return criteria: no pain, effusion, instability or significant apprehension; full motion; quadriceps strength and hamstring and hip muscle function at least 90% of the opposite side; single-leg hop test battery at least 90%; good landing, deceleration and cutting quality, including under fatigue; full training tolerated without next-day reaction; clearance from surgeon and physiotherapist.
For strength and distance, the limb symmetry index (LSI) is operated-limb result / opposite-limb result × 100%. Reverse the ratio for timed tests. Symmetry alone is insufficient: both limbs may be weak. Consider conditioning, sport demands and movement quality. A prescribed sports brace does not replace these criteria.
Daily activities and follow-up
Progress in everyday activities follows the permitted loading and motion for your procedure. Walking without aids requires a controlled gait; returning to driving requires safe vehicle control and no impairing medication. The detailed recommendations below explain the criteria and exceptions.
Daily activity, stairs, cycling and work
Level walking: protected walking from the outset; increase distance after gait normalises. Stairs: initially one step at a time with rail and crutch; lead up with the non-operated leg and down with the crutch and operated leg. Reciprocal stairs usually return during weeks 6–12 after mastering step exercises; descending requires greater control and may return later.
Stationary cycling: usually weeks 6–8 when smooth revolutions are possible without compensation; start with 5–10 minutes without resistance. Outdoor cycling: usually from week 12, after recovering balance, safe stopping and rapid foot placement; begin on a quiet, level route without clipless pedals. Pool: after complete wound healing and clearance, usually from week 6; no jumping into water or early breaststroke kicking.
Desk work: usually 1–3 weeks, with opportunities to change position and elevate the limb. Standing work usually 6–12 weeks; heavy manual work, kneeling and uneven-ground work commonly 3–6 months, depending on function. Driving: after discontinuing the movement-limiting brace, without impairing medication and with reliable emergency braking; particularly after right-sided surgery, often no earlier than 6–8 weeks. Function, not time alone, determines readiness.
Warning signs
Pain, swelling and warning signs
Follow discharge instructions for analgesia and thrombosis prevention. Apply cooling through a protective layer for 10–15 minutes and check the skin; impaired sensation requires supervision. Elevation and prescribed compression assist swelling control. Do not increase medication doses to force exercises.
Urgent review: increasing redness, drainage or fever; new calf pain and swelling; sudden post-traumatic pain, patellar displacement, loss of active extension or new instability. Stop exercises; do not attempt self-reduction. Sudden breathlessness, chest pain or collapse: call emergency services.
Persistent effusion, progressive loss of extension, locking or stalled motion recovery require reassessment rather than waiting for the next scheduled phase.
Additional scope notes
Select an illustration to enlarge. Full recommendations are also provided as text below.
References
References
- Hurley ET, Sherman SL, Chahla J, et al. A modified Delphi consensus statement on patellar instability: part II. Bone Joint J. 2023;105-B(12). Source
- Magnussen RA, Peters NJ, Long J, et al. Accelerated rehabilitation program following medial patellofemoral ligament reconstruction does not increase risk of recurrent instability. Knee. 2022;38:178–183. Source
- Hopper GP, Heusdens CHW, Dossche L, Mackay GM. Medial Patellofemoral Ligament Repair With Suture Tape Augmentation. Arthrosc Tech. 2019;8(1):e1–e5. Source
- Luczak SB, Stelzer JW, Fitzsimmons KP, Pace JL. Medial Patellofemoral Ligament Reconstruction and Lateral Retinacular Lengthening from a Lateral Approach. Arthrosc Tech. 2021;10(4):e987–e994. Source
- Saper MG, Fantozzi P, Bompadre V, Racicot M, Schmale GA. Return-to-Sport Testing After Medial Patellofemoral Ligament Reconstruction in Adolescent Athletes. Orthop J Sports Med. 2019;7(3):2325967119828953. Source
- Hysing-Dahl T, et al. Feasibility of return to sports assessment 6 months after patellar instability surgery. BMC Musculoskelet Disord. 2023. Source
- Ebied WF, Ashry M, Hemida MA, Khater AH, Sobhy MH, Haroun Y. Medial patellofemoral ligament reconstruction with a synthetic polyester suture tape graft and knotless anchors: Five-year clinical and functional outcomes. SICOT-J. 2026;12:14. Source
- University of Virginia Sports Medicine. Medial Patellofemoral Ligament (MPFL) Reconstruction: Post-operative Rehabilitation Protocol. Source
- Sanford Health. MPFL Reconstruction Rehabilitation Guideline. Revision 2024. Source
Clinical commentary and terms of use
Commentary
Protection of the restored stabilisers should accompany recovery of motion and strength. Do not prolong immobilisation without a reason, and do not accelerate rehabilitation solely because tape was used.
The same schedule covers the specified medial reconstructions and lateral retinacular lengthening when the surgeon confirms stability and suitability for this rehabilitation. Knee response, movement quality and strength measurements determine progression. Pain-free walking does not establish readiness for running, pivoting or contact sport.
Use of this protocol
Educational material for physicians and physiotherapists. Use requires assessment of the patient, operative records and postoperative instructions. It does not replace an individual treatment plan. Restrictions and progression should be documented and updated according to healing.
© 2026 Tomasz Poboży - orthopaedic surgeon · pobozy.org