 Skip to content
FOR CLINICIANS AND PHYSIOTHERAPISTS
Partial meniscectomy — rehabilitation protocol
After uncomplicated partial meniscectomy, recovery is guided by symptoms, motion and strength. There is no repaired meniscus requiring the same protection as after repair, but effusion and limping still limit progression.
Using and loading the limb
After isolated partial meniscectomy, load as tolerated. Use crutches until limb control and gait without limping are restored.
Full guidance ↓Brace or immobilisation
A brace is not routinely required after uncomplicated isolated meniscectomy. Meniscal repair requires a different programme.
Full guidance ↓Permitted movement
Move through the full tolerated range without forcing through pain or effusion. Return to sport follows criteria, not weeks alone.
Full guidance ↓Permitted movement, loading and removal of a brace are separate decisions. Additional repairs may require a more protective programme.
Rehabilitation at a glance
Progression follows healing and functional criteria, not dates alone.
Rehabilitation boards
Exercises — a closer look
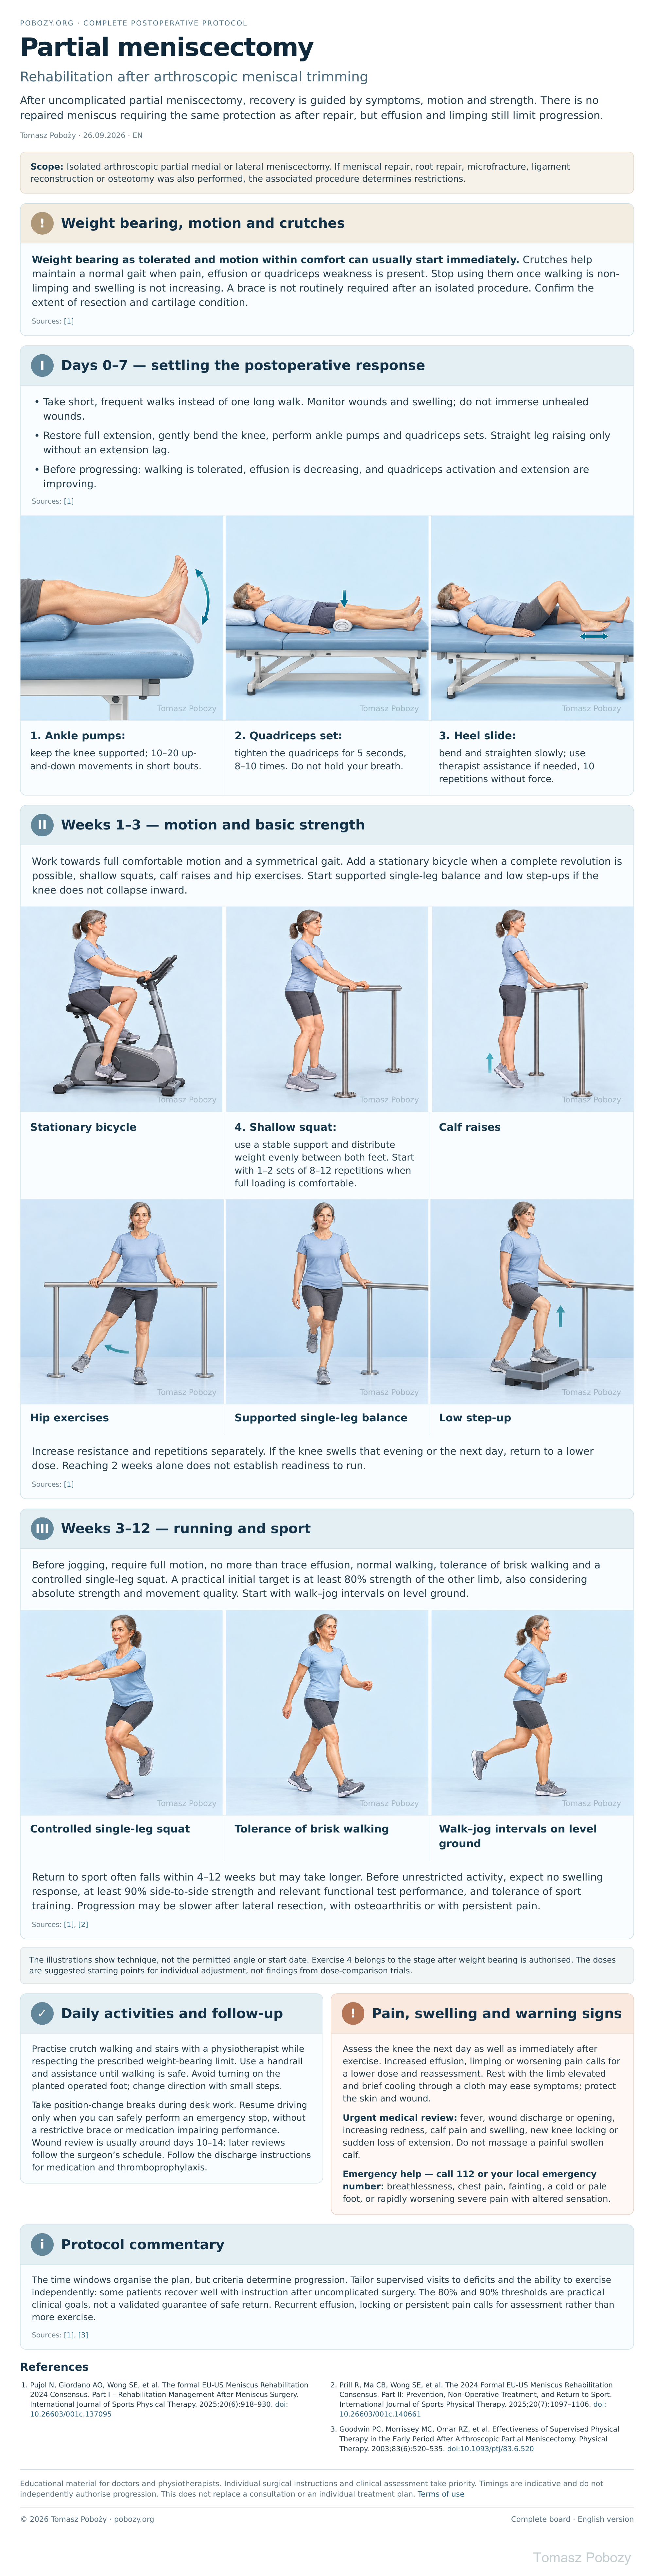
Use the complete boards above together with the instructions for the chosen stage. An exercise shown for a later stage is not permitted early.
Open the relevant complete board and zoom in. The viewer retains all stages and captions.
5. How to perform the exercises
- 1. Ankle pumps: keep the knee supported; 10–20 up-and-down movements in short bouts.
- 2. Quadriceps set: tighten the quadriceps for 5 seconds, 8–10 times. Do not hold your breath.
- 3. Heel slide: bend and straighten slowly; use therapist assistance if needed, 10 repetitions without force.
- 4. Shallow squat: use a stable support and distribute weight evenly between both feet. Start with 1–2 sets of 8–12 repetitions when full loading is comfortable.
The illustrations show technique, not the permitted angle or start date. Exercise 4 belongs to the stage after weight bearing is authorised. The doses are suggested starting points for individual adjustment, not findings from dose-comparison trials.
Scope and protection — decisions for the orthopaedic surgeon
1. Weight bearing, motion and crutches
Weight bearing as tolerated and motion within comfort can usually start immediately. Crutches help maintain a normal gait when pain, effusion or quadriceps weakness is present. Stop using them once walking is non-limping and swelling is not increasing. A brace is not routinely required after an isolated procedure. Confirm the extent of resection and cartilage condition.
Sources: [1]
Stages and progression criteria
2. Days 0–7 — settling the postoperative response
- Take short, frequent walks instead of one long walk. Monitor wounds and swelling; do not immerse unhealed wounds.
- Restore full extension, gently bend the knee, perform ankle pumps and quadriceps sets. Straight leg raising only without an extension lag.
- Before progressing: walking is tolerated, effusion is decreasing, and quadriceps activation and extension are improving.
Sources: [1]
3. Weeks 1–3 — motion and basic strength
Work towards full comfortable motion and a symmetrical gait. Add a stationary bicycle when a complete revolution is possible, shallow squats, calf raises and hip exercises. Start supported single-leg balance and low step-ups if the knee does not collapse inward.
Increase resistance and repetitions separately. If the knee swells that evening or the next day, return to a lower dose. Reaching 2 weeks alone does not establish readiness to run.
Sources: [1]
4. Weeks 3–12 — running and sport
Before jogging, require full motion, no more than trace effusion, normal walking, tolerance of brisk walking and a controlled single-leg squat. A practical initial target is at least 80% strength of the other limb, also considering absolute strength and movement quality. Start with walk–jog intervals on level ground.
Return to sport often falls within 4–12 weeks but may take longer. Before unrestricted activity, expect no swelling response, at least 90% side-to-side strength and relevant functional test performance, and tolerance of sport training. Progression may be slower after lateral resection, with osteoarthritis or with persistent pain.
Daily activities and follow-up
Progress in everyday activities follows the permitted loading and motion for your procedure. Walking without aids requires a controlled gait; returning to driving requires safe vehicle control and no impairing medication. The detailed recommendations below explain the criteria and exceptions.
6. Daily activities and follow-up
Practise crutch walking and stairs with a physiotherapist while respecting the prescribed weight-bearing limit. Use a handrail and assistance until walking is safe. Avoid turning on the planted operated foot; change direction with small steps.
Take position-change breaks during desk work. Resume driving only when you can safely perform an emergency stop, without a restrictive brace or medication impairing performance. Wound review is usually around days 10–14; later reviews follow the surgeon’s schedule. Follow the discharge instructions for medication and thromboprophylaxis.
Warning signs
7. Pain, swelling and warning signs
Assess the knee the next day as well as immediately after exercise. Increased effusion, limping or worsening pain calls for a lower dose and reassessment. Rest with the limb elevated and brief cooling through a cloth may ease symptoms; protect the skin and wound.
Urgent medical review: fever, wound discharge or opening, increasing redness, calf pain and swelling, new knee locking or sudden loss of extension. Do not massage a painful swollen calf.
Emergency help — call 112 or your local emergency number: breathlessness, chest pain, fainting, a cold or pale foot, or rapidly worsening severe pain with altered sensation.
References
References
- Pujol N, Giordano AO, Wong SE, et al. The formal EU-US Meniscus Rehabilitation 2024 Consensus. Part I – Rehabilitation Management After Meniscus Surgery. International Journal of Sports Physical Therapy. 2025;20(6):918–930. doi:10.26603/001c.137095
- Prill R, Ma CB, Wong SE, et al. The 2024 Formal EU-US Meniscus Rehabilitation Consensus. Part II: Prevention, Non-Operative Treatment, and Return to Sport. International Journal of Sports Physical Therapy. 2025;20(7):1097–1106. doi:10.26603/001c.140661
- Goodwin PC, Morrissey MC, Omar RZ, et al. Effectiveness of Supervised Physical Therapy in the Early Period After Arthroscopic Partial Meniscectomy. Physical Therapy. 2003;83(6):520–535. doi:10.1093/ptj/83.6.520
Clinical commentary and terms of use
8. Protocol commentary
The time windows organise the plan, but criteria determine progression. Tailor supervised visits to deficits and the ability to exercise independently: some patients recover well with instruction after uncomplicated surgery. The 80% and 90% thresholds are practical clinical goals, not a validated guarantee of safe return. Recurrent effusion, locking or persistent pain calls for assessment rather than more exercise.