 Skip to content
FOR CLINICIANS AND PHYSIOTHERAPISTS
Knee cartilage repair procedures — rehabilitation protocol
Cartilage recovery requires graded motion and loading. This protocol distinguishes techniques and defect locations: a schedule for the weight-bearing femoral condyle does not automatically suit the patella or trochlea.
Using and loading the limb
Choose the pathway by technique and defect location. Weight-bearing surfaces and patellofemoral lesions may have different walking and loaded-flexion limits.
Full guidance ↓Brace or immobilisation
Brace and any extension lock depend on repair location. Microfracture, OAT/OCA and ACI/MACI programmes are not interchangeable.
Full guidance ↓Permitted movement
Unloaded range does not permit a squat at the same angle. Flexion and resistance progression require the selected pathway and healing assessment.
Full guidance ↓Permitted movement, loading and removal of a brace are separate decisions. Additional repairs may require a more protective programme.
Rehabilitation at a glance
Progression follows healing and functional criteria, not dates alone.
Rehabilitation boards
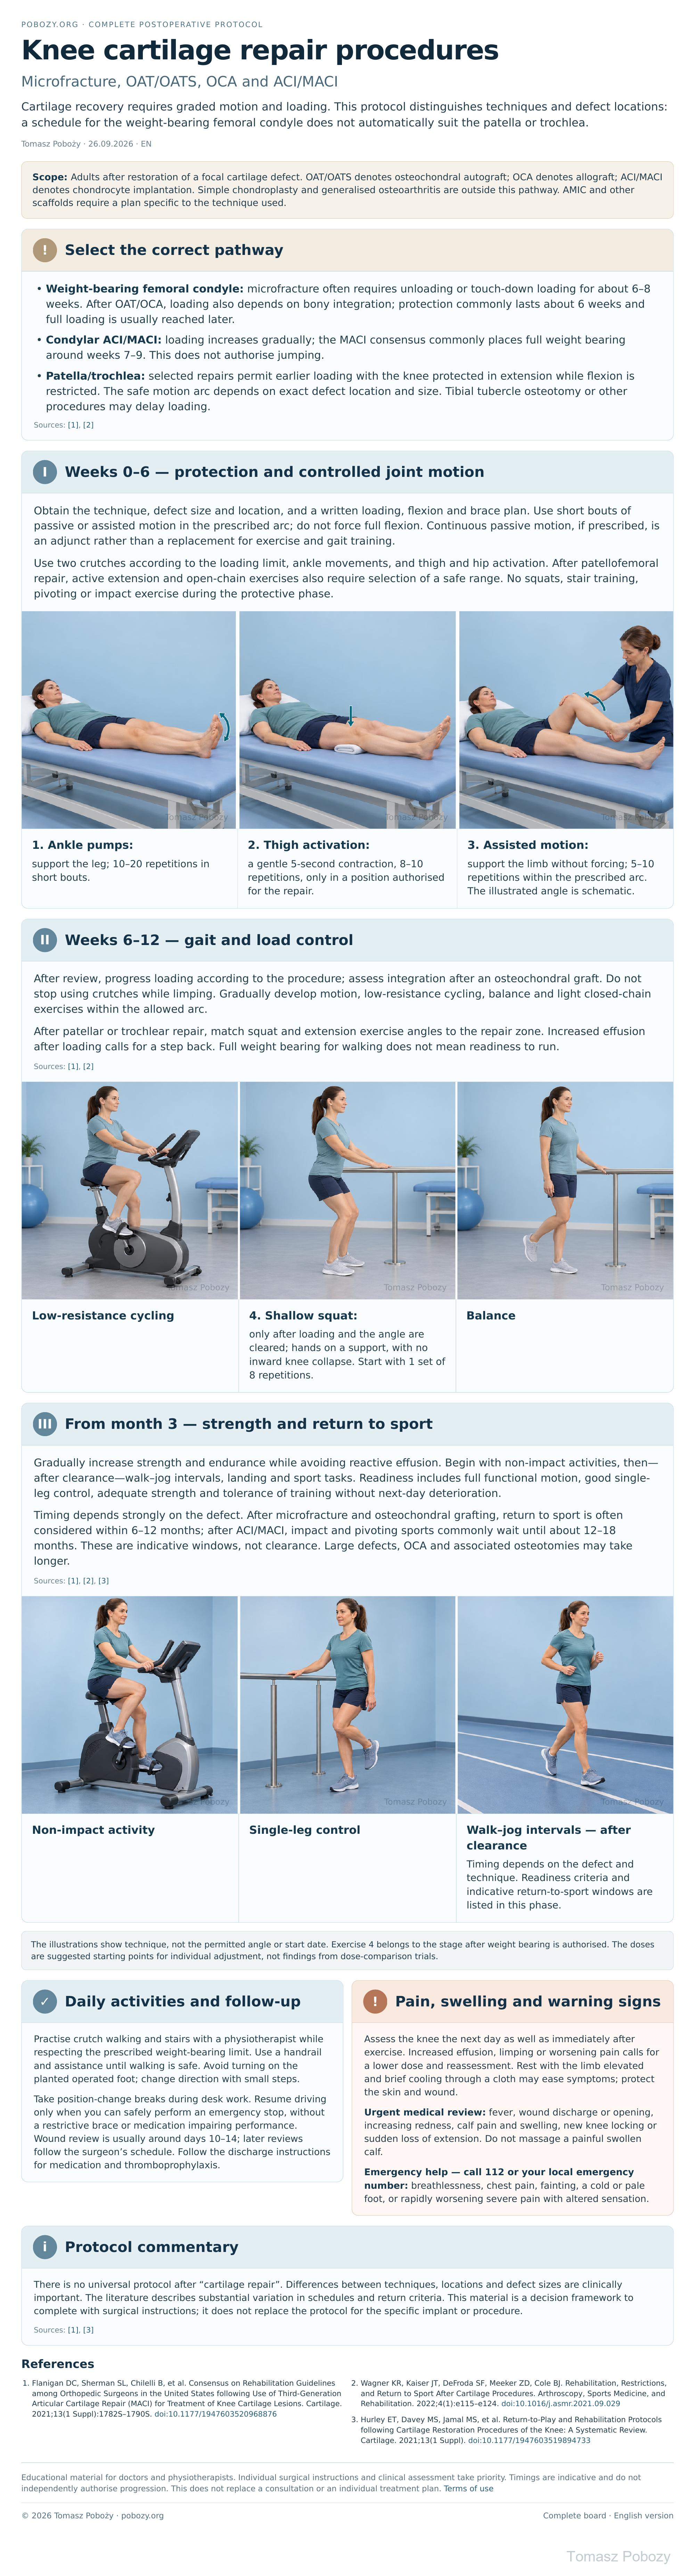
Exercises — a closer look
Use the complete boards above together with the instructions for the chosen stage. An exercise shown for a later stage is not permitted early.
Open the relevant complete board and zoom in. The viewer retains all stages and captions.
5. How to perform the exercises
- 1. Ankle pumps: support the leg; 10–20 repetitions in short bouts.
- 2. Thigh activation: a gentle 5-second contraction, 8–10 repetitions, only in a position authorised for the repair.
- 3. Assisted motion: support the limb without forcing; 5–10 repetitions within the prescribed arc. The illustrated angle is schematic.
- 4. Shallow squat: only after loading and the angle are cleared; hands on a support, with no inward knee collapse. Start with 1 set of 8 repetitions.
The illustrations show technique, not the permitted angle or start date. Exercise 4 belongs to the stage after weight bearing is authorised. The doses are suggested starting points for individual adjustment, not findings from dose-comparison trials.
Scope and protection — decisions for the orthopaedic surgeon
1. Select the correct pathway
- Weight-bearing femoral condyle: microfracture often requires unloading or touch-down loading for about 6–8 weeks. After OAT/OCA, loading also depends on bony integration; protection commonly lasts about 6 weeks and full loading is usually reached later.
- Condylar ACI/MACI: loading increases gradually; the MACI consensus commonly places full weight bearing around weeks 7–9. This does not authorise jumping.
- Patella/trochlea: selected repairs permit earlier loading with the knee protected in extension while flexion is restricted. The safe motion arc depends on exact defect location and size. Tibial tubercle osteotomy or other procedures may delay loading.
Stages and progression criteria
2. Weeks 0–6 — protection and controlled joint motion
Obtain the technique, defect size and location, and a written loading, flexion and brace plan. Use short bouts of passive or assisted motion in the prescribed arc; do not force full flexion. Continuous passive motion, if prescribed, is an adjunct rather than a replacement for exercise and gait training.
Use two crutches according to the loading limit, ankle movements, and thigh and hip activation. After patellofemoral repair, active extension and open-chain exercises also require selection of a safe range. No squats, stair training, pivoting or impact exercise during the protective phase.
3. Weeks 6–12 — gait and load control
After review, progress loading according to the procedure; assess integration after an osteochondral graft. Do not stop using crutches while limping. Gradually develop motion, low-resistance cycling, balance and light closed-chain exercises within the allowed arc.
After patellar or trochlear repair, match squat and extension exercise angles to the repair zone. Increased effusion after loading calls for a step back. Full weight bearing for walking does not mean readiness to run.
4. From month 3 — strength and return to sport
Gradually increase strength and endurance while avoiding reactive effusion. Begin with non-impact activities, then—after clearance—walk–jog intervals, landing and sport tasks. Readiness includes full functional motion, good single-leg control, adequate strength and tolerance of training without next-day deterioration.
Timing depends strongly on the defect. After microfracture and osteochondral grafting, return to sport is often considered within 6–12 months; after ACI/MACI, impact and pivoting sports commonly wait until about 12–18 months. These are indicative windows, not clearance. Large defects, OCA and associated osteotomies may take longer.
Daily activities and follow-up
Progress in everyday activities follows the permitted loading and motion for your procedure. Walking without aids requires a controlled gait; returning to driving requires safe vehicle control and no impairing medication. The detailed recommendations below explain the criteria and exceptions.
6. Daily activities and follow-up
Practise crutch walking and stairs with a physiotherapist while respecting the prescribed weight-bearing limit. Use a handrail and assistance until walking is safe. Avoid turning on the planted operated foot; change direction with small steps.
Take position-change breaks during desk work. Resume driving only when you can safely perform an emergency stop, without a restrictive brace or medication impairing performance. Wound review is usually around days 10–14; later reviews follow the surgeon’s schedule. Follow the discharge instructions for medication and thromboprophylaxis.
Warning signs
7. Pain, swelling and warning signs
Assess the knee the next day as well as immediately after exercise. Increased effusion, limping or worsening pain calls for a lower dose and reassessment. Rest with the limb elevated and brief cooling through a cloth may ease symptoms; protect the skin and wound.
Urgent medical review: fever, wound discharge or opening, increasing redness, calf pain and swelling, new knee locking or sudden loss of extension. Do not massage a painful swollen calf.
Emergency help — call 112 or your local emergency number: breathlessness, chest pain, fainting, a cold or pale foot, or rapidly worsening severe pain with altered sensation.
References
References
- Flanigan DC, Sherman SL, Chilelli B, et al. Consensus on Rehabilitation Guidelines among Orthopedic Surgeons in the United States following Use of Third-Generation Articular Cartilage Repair (MACI) for Treatment of Knee Cartilage Lesions. Cartilage. 2021;13(1 Suppl):1782S–1790S. doi:10.1177/1947603520968876
- Wagner KR, Kaiser JT, DeFroda SF, Meeker ZD, Cole BJ. Rehabilitation, Restrictions, and Return to Sport After Cartilage Procedures. Arthroscopy, Sports Medicine, and Rehabilitation. 2022;4(1):e115–e124. doi:10.1016/j.asmr.2021.09.029
- Hurley ET, Davey MS, Jamal MS, et al. Return-to-Play and Rehabilitation Protocols following Cartilage Restoration Procedures of the Knee: A Systematic Review. Cartilage. 2021;13(1 Suppl). doi:10.1177/1947603519894733
Clinical commentary and terms of use
8. Protocol commentary
There is no universal protocol after “cartilage repair”. Differences between techniques, locations and defect sizes are clinically important. The literature describes substantial variation in schedules and return criteria. This material is a decision framework to complete with surgical instructions; it does not replace the protocol for the specific implant or procedure.