 Skip to content
FOR CLINICIANS AND PHYSIOTHERAPISTS
Knee extensor mechanism repair — rehabilitation protocol
After extensor mechanism repair, protect the tendon from excessive stretch and premature resisted contraction. Flexion, active extension and walking without a locked brace are separate decisions.
Using and loading the limb
Walking load is permitted only for an appropriately cleared stable repair in a locked brace. No active extension or straight-leg raise until separately cleared.
Full guidance ↓Brace or immobilisation
Use an extension-locked brace for walking. Exercise settings and weaning depend on the repair and active extension control.
Full guidance ↓Permitted movement
Progress passive flexion within prescribed limits. The 30°/60°/90° example is a protective pathway, not a forced target. Extensor resistance comes much later.
Full guidance ↓Permitted movement, loading and removal of a brace are separate decisions. Additional repairs may require a more protective programme.
Rehabilitation at a glance
Progression follows healing and functional criteria, not dates alone.
Rehabilitation boards
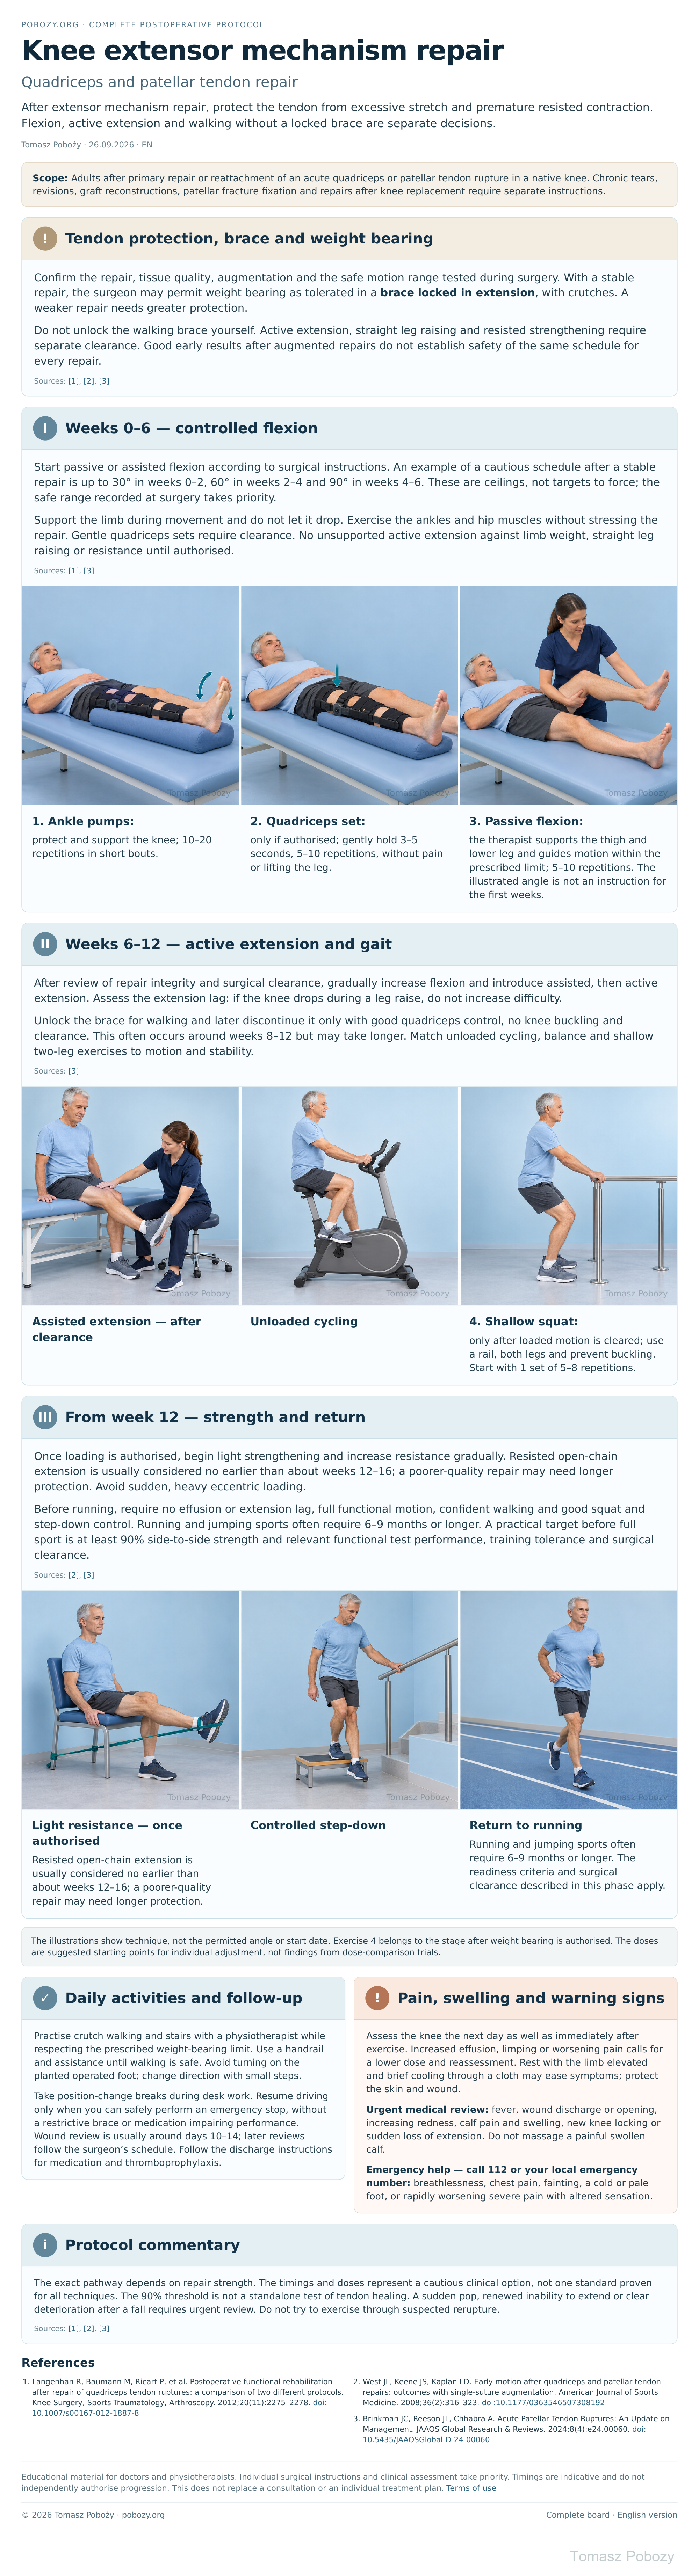
Exercises — a closer look
Use the complete boards above together with the instructions for the chosen stage. An exercise shown for a later stage is not permitted early.
Open the relevant complete board and zoom in. The viewer retains all stages and captions.
5. How to perform the exercises
- 1. Ankle pumps: protect and support the knee; 10–20 repetitions in short bouts.
- 2. Quadriceps set: only if authorised; gently hold 3–5 seconds, 5–10 repetitions, without pain or lifting the leg.
- 3. Passive flexion: the therapist supports the thigh and lower leg and guides motion within the prescribed limit; 5–10 repetitions. The illustrated angle is not an instruction for the first weeks.
- 4. Shallow squat: only after loaded motion is cleared; use a rail, both legs and prevent buckling. Start with 1 set of 5–8 repetitions.
The illustrations show technique, not the permitted angle or start date. Exercise 4 belongs to the stage after weight bearing is authorised. The doses are suggested starting points for individual adjustment, not findings from dose-comparison trials.
Scope and protection
1. Tendon protection, brace and weight bearing
Confirm the repair, tissue quality, augmentation and the safe motion range tested during surgery. With a stable repair, the orthopaedic surgeon may permit weight bearing as tolerated in a brace locked in extension, with crutches. A weaker repair needs greater protection.
Do not unlock the walking brace yourself. Active extension, straight leg raising and resisted strengthening require separate clearance. Good early results after augmented repairs do not establish safety of the same schedule for every repair.
Stages and progression criteria
2. Weeks 0–6 — controlled flexion
Start passive or assisted flexion according to surgical instructions. An example of a cautious schedule after a stable repair is up to 30° in weeks 0–2, 60° in weeks 2–4 and 90° in weeks 4–6. These are ceilings, not targets to force; the safe range recorded at surgery takes priority.
Support the limb during movement and do not let it drop. Exercise the ankles and hip muscles without stressing the repair. Gentle quadriceps sets require clearance. No unsupported active extension against limb weight, straight leg raising or resistance until authorised.
3. Weeks 6–12 — active extension and gait
After review of repair integrity and surgical clearance, gradually increase flexion and introduce assisted, then active extension. Assess the extension lag: if the knee drops during a leg raise, do not increase difficulty.
Unlock the brace for walking and later discontinue it only with good quadriceps control, no knee buckling and clearance. This often occurs around weeks 8–12 but may take longer. Match unloaded cycling, balance and shallow two-leg exercises to motion and stability.
Sources: [3]
4. From week 12 — strength and return
Once loading is authorised, begin light strengthening and increase resistance gradually. Resisted open-chain extension is usually considered no earlier than about weeks 12–16; a poorer-quality repair may need longer protection. Avoid sudden, heavy eccentric loading.
Before running, require no effusion or extension lag, full functional motion, confident walking and good squat and step-down control. Running and jumping sports often require 6–9 months or longer. A practical target before full sport is at least 90% side-to-side strength and relevant functional test performance, training tolerance and surgical clearance.
Daily activities and follow-up
Progress in everyday activities follows the permitted loading and motion for your procedure. Walking without aids requires a controlled gait; returning to driving requires safe vehicle control and no impairing medication. The detailed recommendations below explain the criteria and exceptions.
6. Daily activities and follow-up
Practise crutch walking and stairs with a physiotherapist while respecting the prescribed weight-bearing limit. Use a handrail and assistance until walking is safe. Avoid turning on the planted operated foot; change direction with small steps.
Take position-change breaks during desk work. Resume driving only when you can safely perform an emergency stop, without a restrictive brace or medication impairing performance. Wound review is usually around days 10–14; later reviews follow the surgeon’s schedule. Follow the discharge instructions for medication and thromboprophylaxis.
Warning signs
7. Pain, swelling and warning signs
Assess the knee the next day as well as immediately after exercise. Increased effusion, limping or worsening pain calls for a lower dose and reassessment. Rest with the limb elevated and brief cooling through a cloth may ease symptoms; protect the skin and wound.
Urgent medical review: fever, wound discharge or opening, increasing redness, calf pain and swelling, new knee locking or sudden loss of extension. Do not massage a painful swollen calf.
Emergency help — call 112 or your local emergency number: breathlessness, chest pain, fainting, a cold or pale foot, or rapidly worsening severe pain with altered sensation.
References
References
- Langenhan R, Baumann M, Ricart P, et al. Postoperative functional rehabilitation after repair of quadriceps tendon ruptures: a comparison of two different protocols. Knee Surgery, Sports Traumatology, Arthroscopy. 2012;20(11):2275–2278. doi:10.1007/s00167-012-1887-8
- West JL, Keene JS, Kaplan LD. Early motion after quadriceps and patellar tendon repairs: outcomes with single-suture augmentation. American Journal of Sports Medicine. 2008;36(2):316–323. doi:10.1177/0363546507308192
- Brinkman JC, Reeson JL, Chhabra A. Acute Patellar Tendon Ruptures: An Update on Management. JAAOS Global Research & Reviews. 2024;8(4):e24.00060. doi:10.5435/JAAOSGlobal-D-24-00060
Clinical commentary and terms of use
8. Protocol commentary
The exact pathway depends on repair strength. The timings and doses represent a cautious clinical option, not one standard proven for all techniques. The 90% threshold is not a standalone test of tendon healing. A sudden pop, renewed inability to extend or clear deterioration after a fall requires urgent review. Do not try to exercise through suspected rerupture.