 Skip to content
FOR CLINICIANS AND PHYSIOTHERAPISTS
Acromioclavicular joint dislocation — hook plate fixation
Tomasz Poboży — orthopaedic surgeon · Evidence review: 30 September 2026
Using and loading the limb
Until plate removal and loading clearance, avoid lifting, carrying bags, support, push-ups and hanging. Removal alone does not permit unrestricted use.
Full guidance ↓Brace or immobilisation
Sling about 4 weeks in this protective pathway; weaning usually during weeks 4–6 after review. Obtain new instructions after plate removal.
Full guidance ↓Permitted movement
With the plate in place, elevation and abduction are limited to 90° in this pathway. Reaching week 6 or 12 does not remove that limit.
Full guidance ↓Permitted movement, loading and removal of a brace are separate decisions. Additional repairs may require a more protective programme.
Rehabilitation at a glance
Progression follows healing and functional criteria, not dates alone.
Rehabilitation boards
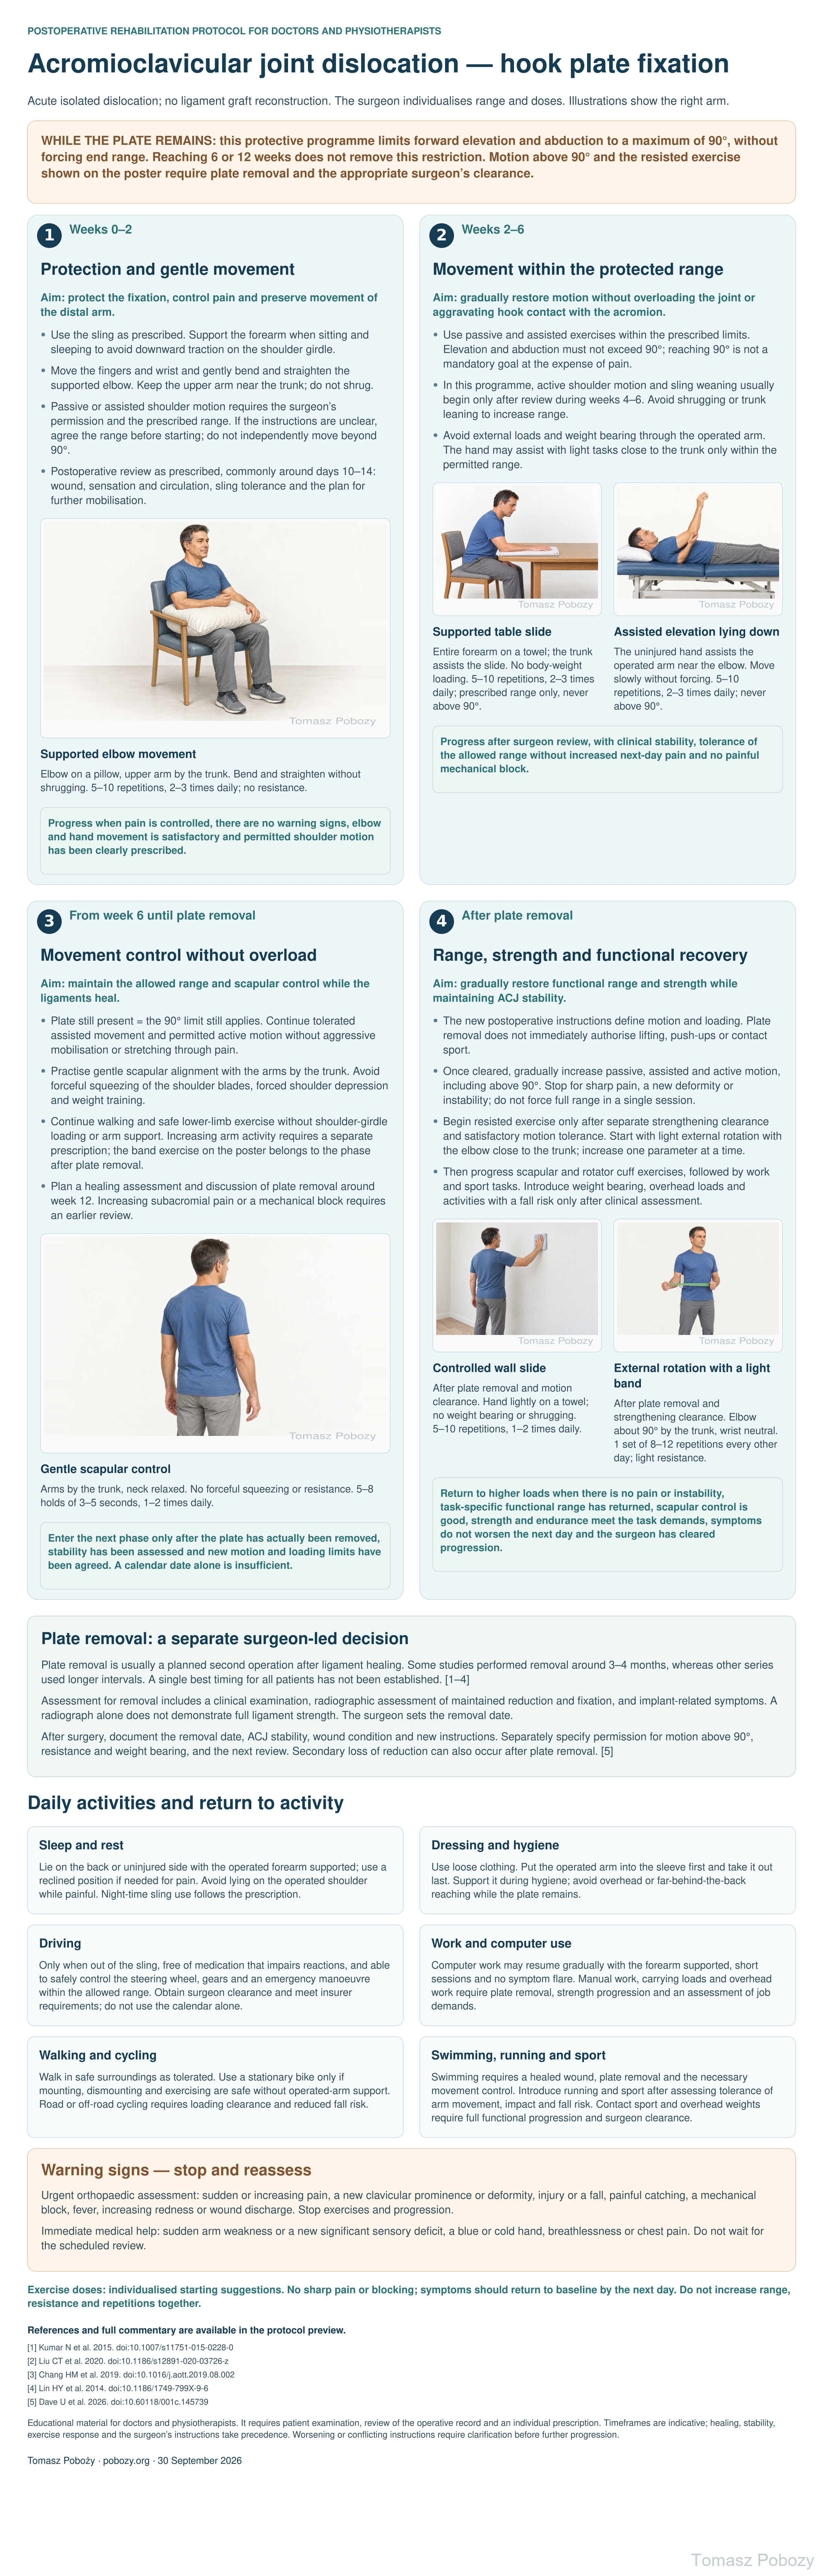
Open the poster at full resolution
Exercises — a closer look
Use the complete boards above together with the instructions for the chosen stage. An exercise shown for a later stage is not permitted early.
Open the relevant complete board and zoom in. The viewer retains all stages and captions.
Exercise instructions and progression are contained in the stage descriptions linked above.
Scope and protection
1. Scope and individualisation
Adults after isolated hook plate fixation of an acute ACJ dislocation without additional ligament graft reconstruction. Before starting, review the operative report, fixation stability and the orthopaedic surgeon’s instructions. Ligament or capsular repair may require additional protection. Reconstruction for chronic instability, revision, a clavicular or acromial fracture, and concomitant rotator cuff or labral repair require a separate programme.
WHILE THE PLATE REMAINS: this protective programme limits forward elevation and abduction to a maximum of 90°, without forcing end range. Reaching 6 or 12 weeks does not remove this restriction. Motion above 90° and the resisted exercise shown on the poster require plate removal and the appropriate surgeon’s clearance.
2. Protection, sling and dosing
Sling: the selected protective programme uses approximately 4 weeks of protection, usually weaning during weeks 4–6 after review. Remove it for approved exercises and hygiene with the arm supported. The surgeon determines any shorter or longer period.
Until plate removal and loading clearance: avoid lifting, carrying bags with the operated arm, pushing up from a chair, push-ups, planks, hanging and sports with a risk of falling. Do not pull on the arm or force stretches across the chest or behind the back.
Exercise gently, without sharp pain, painful catching or a mechanical block. Any mild discomfort should settle promptly, and symptoms should return to their pre-session level by the next day. Persistent worsening requires a reduced dose and reassessment.
The starting doses below are practical suggestions to individualise, rather than a regimen validated for every implant. Do not increase range, resistance and repetitions at the same time.
6. Plate removal — the transition point
Plate removal is usually a planned second operation after ligament healing. Some studies performed removal around 3–4 months, whereas other series used longer intervals. A single best timing for all patients has not been established. [1–4]
Assessment for removal includes a clinical examination, radiographic assessment of maintained reduction and fixation, and implant-related symptoms. A radiograph alone does not demonstrate full ligament strength. The surgeon sets the removal date.
After surgery, document the removal date, ACJ stability, wound condition and new instructions. Separately specify permission for motion above 90°, resistance and weight bearing, and the next review. Secondary loss of reduction can also occur after plate removal. [5]
8. Daily tasks and return to activity
Sleep and rest
Lie on the back or uninjured side with the operated forearm supported; use a reclined position if needed for pain. Avoid lying on the operated shoulder while painful. Night-time sling use follows the prescription.
Dressing and hygiene
Use loose clothing. Put the operated arm into the sleeve first and take it out last. Support it during hygiene; avoid overhead or far-behind-the-back reaching while the plate remains.
Driving
Only when out of the sling, free of medication that impairs reactions, and able to safely control the steering wheel, gears and an emergency manoeuvre within the allowed range. Obtain surgeon clearance and meet insurer requirements; do not use the calendar alone.
Work and computer use
Computer work may resume gradually with the forearm supported, short sessions and no symptom flare. Manual work, carrying loads and overhead work require plate removal, strength progression and an assessment of job demands.
Walking and cycling
Walk in safe surroundings as tolerated. Use a stationary bike only if mounting, dismounting and exercising are safe without operated-arm support. Road or off-road cycling requires loading clearance and reduced fall risk.
Swimming, running and sport
Swimming requires a healed wound, plate removal and the necessary movement control. Introduce running and sport after assessing tolerance of arm movement, impact and fall risk. Contact sport and overhead weights require full functional progression and surgeon clearance.
Stages and progression criteria
3. Phase 1: Weeks 0–2
Aim: protect the fixation, control pain and preserve movement of the distal arm.
- Use the sling as prescribed. Support the forearm when sitting and sleeping to avoid downward traction on the shoulder girdle.
- Move the fingers and wrist and gently bend and straighten the supported elbow. Keep the upper arm near the trunk; do not shrug.
- Passive or assisted shoulder motion requires the surgeon’s permission and the prescribed range. If the instructions are unclear, agree the range before starting; do not independently move beyond 90°.
- Postoperative review as prescribed, commonly around days 10–14: wound, sensation and circulation, sling tolerance and the plan for further mobilisation.
Supported elbow movement
Sit with the elbow and forearm supported on a pillow and the upper arm by the trunk. Slowly bend and straighten the elbow without lifting the shoulder. Add gentle finger and wrist movement.
Start with 5–10 repetitions, 2–3 times daily, without resistance.
Progress when pain is controlled, there are no warning signs, elbow and hand movement is satisfactory and permitted shoulder motion has been clearly prescribed.
4. Phase 2: Weeks 2–6
Aim: gradually restore motion without overloading the joint or aggravating hook contact with the acromion.
- Use passive and assisted exercises within the prescribed limits. Elevation and abduction must not exceed 90°; reaching 90° is not a mandatory goal at the expense of pain.
- In this programme, active shoulder motion and sling weaning usually begin only after review during weeks 4–6. Avoid shrugging or trunk leaning to increase range.
- Avoid external loads and weight bearing through the operated arm. The hand may assist with light tasks close to the trunk only within the permitted range.
Supported table slide
Rest the entire forearm and hand on a towel on the table. Lean the trunk slightly forward to slide the towel forward. Do not actively lift the arm or transfer body weight through it. Return to the starting position.
Start with 5–10 repetitions, 2–3 times daily, within the prescribed range and no more than 90°.
Assisted elevation lying down
Lie on your back. Support the operated arm near the elbow with the uninjured hand. Keep the elbow slightly bent. Assist forward elevation only within the permitted range, without jerking, forcing or shrugging.
Start with 5–10 repetitions, 2–3 times daily; a maximum of 90° while the plate remains.
Progress after surgeon review, with clinical stability, tolerance of the allowed range without increased next-day pain and no painful mechanical block.
5. Phase 3: From week 6 until plate removal
Aim: maintain the allowed range and scapular control while the ligaments heal.
- Plate still present = the 90° limit still applies. Continue tolerated assisted movement and permitted active motion without aggressive mobilisation or stretching through pain.
- Practise gentle scapular alignment with the arms by the trunk. Avoid forceful squeezing of the shoulder blades, forced shoulder depression and weight training.
- Continue walking and safe lower-limb exercise without shoulder-girdle loading or arm support. Increasing arm activity requires a separate prescription; the band exercise on the poster belongs to the phase after plate removal.
- Plan a healing assessment and discussion of plate removal around week 12. Increasing subacromial pain or a mechanical block requires an earlier review.
Gentle scapular control
Stand or sit upright with the arms by the trunk. Relax the neck and gently align the shoulder blades with the ribcage. Do not squeeze them forcefully, force the shoulders down or add resistance.
Start with 5–8 gentle holds of 3–5 seconds, 1–2 times daily.
Enter the next phase only after the plate has actually been removed, stability has been assessed and new motion and loading limits have been agreed. A calendar date alone is insufficient.
7. Phase 4: after plate removal
Aim: gradually restore functional range and strength while maintaining ACJ stability.
- The new postoperative instructions define motion and loading. Plate removal does not immediately authorise lifting, push-ups or contact sport.
- Once cleared, gradually increase passive, assisted and active motion, including above 90°. Stop for sharp pain, a new deformity or instability; do not force full range in a single session.
- Begin resisted exercise only after separate strengthening clearance and satisfactory motion tolerance. Start with light external rotation with the elbow close to the trunk; increase one parameter at a time.
- Then progress scapular and rotator cuff exercises, followed by work and sport tasks. Introduce weight bearing, overhead loads and activities with a fall risk only after clinical assessment.
Controlled wall slide
Only after plate removal and clearance to increase range. Stand by a wall and rest the hand lightly on a towel. Slide gradually upwards and return without body-weight pressure, shrugging or painful end range.
Start with 5–10 repetitions, 1–2 times daily; gradually increase range according to tolerance and the prescription.
External rotation with a light band
Only after plate removal and separate strengthening clearance. Keep the elbow bent about 90° by the trunk, with a small towel between upper arm and trunk. The uninjured hand holds the band. Rotate the operated forearm outwards without moving the elbow away or bending the wrist back.
Start with 1 set of 8–12 repetitions every other day, with light resistance. Increase the dose only with good movement quality and no next-day worsening.
Return to higher loads when there is no pain or instability, task-specific functional range has returned, scapular control is good, strength and endurance meet the task demands, symptoms do not worsen the next day and the surgeon has cleared progression.
Daily activities
Support the forearm during rest, sleep and hygiene; follow the prescribed sling schedule. Dress the operated arm first and undress it last. Do not push out of a chair through the operated hand during the protection period. Desk work requires a supported arm, breaks and compliance with motion limits. Driving requires removal of the sling, permitted active control sufficient for emergency manoeuvres and no impairing medication. Heavy work and sport require procedure-specific progression and assessment.
Warning signs
9. Warning signs
Urgent orthopaedic assessment: sudden or increasing pain, a new clavicular prominence or deformity, injury or a fall, painful catching, a mechanical block, fever, increasing redness or wound discharge. Stop exercises and progression.
Immediate medical help: sudden arm weakness or a new significant sensory deficit, a blue or cold hand, breathlessness or chest pain. Do not wait for the scheduled review.
For a life-threatening emergency, call your local emergency number immediately — 112 in the European Union. On the boards, 112 refers to the EU.
Additional scope notes
Protection of healing ligaments, controlled restoration of movement and gradual functional recovery after hook plate fixation of an acute acromioclavicular joint (ACJ) dislocation. Rehabilitation with the plate in place and rehabilitation after its removal require separate rules.
Adults after isolated hook plate fixation of an acute ACJ dislocation without additional ligament graft reconstruction. Before starting, review the operative report, fixation stability and the orthopaedic surgeon’s instructions. Ligament or capsular repair may require additional protection. Reconstruction for chronic instability, revision, a clavicular or acromial fracture, and concomitant rotator cuff or labral repair require a separate programme.
WHILE THE PLATE REMAINS: this protective programme limits forward elevation and abduction to a maximum of 90°, without forcing end range. Reaching 6 or 12 weeks does not remove this restriction. Motion above 90° and the resisted exercise shown on the poster require plate removal and the appropriate surgeon’s clearance.
References
11. References
- Kumar N, Sharma V. Hook plate fixation for acute acromioclavicular dislocations without coracoclavicular ligament reconstruction: a functional outcome study in military personnel. Strategies in Trauma and Limb Reconstruction. 2015;10:79–85. doi:10.1007/s11751-015-0228-0
- Liu CT, Yang TF. Hook plate with or without coracoclavicular ligament augmentation in the treatment of acute acromioclavicular separation. BMC Musculoskeletal Disorders. 2020;21:701. doi:10.1186/s12891-020-03726-z
- Chang HM, Hong CK, Su WR, Wang TH, Chang CW, Tai TW. Comparison of clavicular hook plate with and without coracoclavicular suture fixation for acute acromioclavicular joint dislocation. Acta Orthopaedica et Traumatologica Turcica. 2019;53:408–413. doi:10.1016/j.aott.2019.08.002
- Lin HY, Wong PK, Ho WP, Chuang TY, Liao YS, Wong CC. Clavicular hook plate may induce subacromial shoulder impingement and rotator cuff lesion — dynamic sonographic evaluation. Journal of Orthopaedic Surgery and Research. 2014;9:6. doi:10.1186/1749-799X-9-6
- Dave U, Adeagbo AT, Owusu-Ansah GE, Saraf SM, Rumps MV, Mulcahey M. Complications following Hook Plate Fixation of Acromioclavicular Joint Injuries: A Systematic Review. Journal of Orthopaedic Experience & Innovation. 2026;7(1). doi:10.60118/001c.145739
Clinical commentary and terms of use
10. Clinical commentary
Hook plate studies use different sling durations, timings for active motion and strengthening, and implant removal schedules. A 90° limit until removal is used in one reported regimen, but is not a uniform standard across all studies. This protocol selects a protective programme; it does not establish superiority over less restrictive rehabilitation. [1–3]
The hook sits beneath the acromion, so pain and a mechanical block may indicate an implant-related problem. Impingement, osteolysis, peri-implant fracture and loss of reduction require monitoring rather than forcing movement through a block. Findings from studies mixing clavicular fractures with ACJ injuries must not be directly applied to isolated ACJ dislocation. [4,5]