 Skip to content
FOR CLINICIANS AND PHYSIOTHERAPISTS
Latarjet procedure — rehabilitation protocol
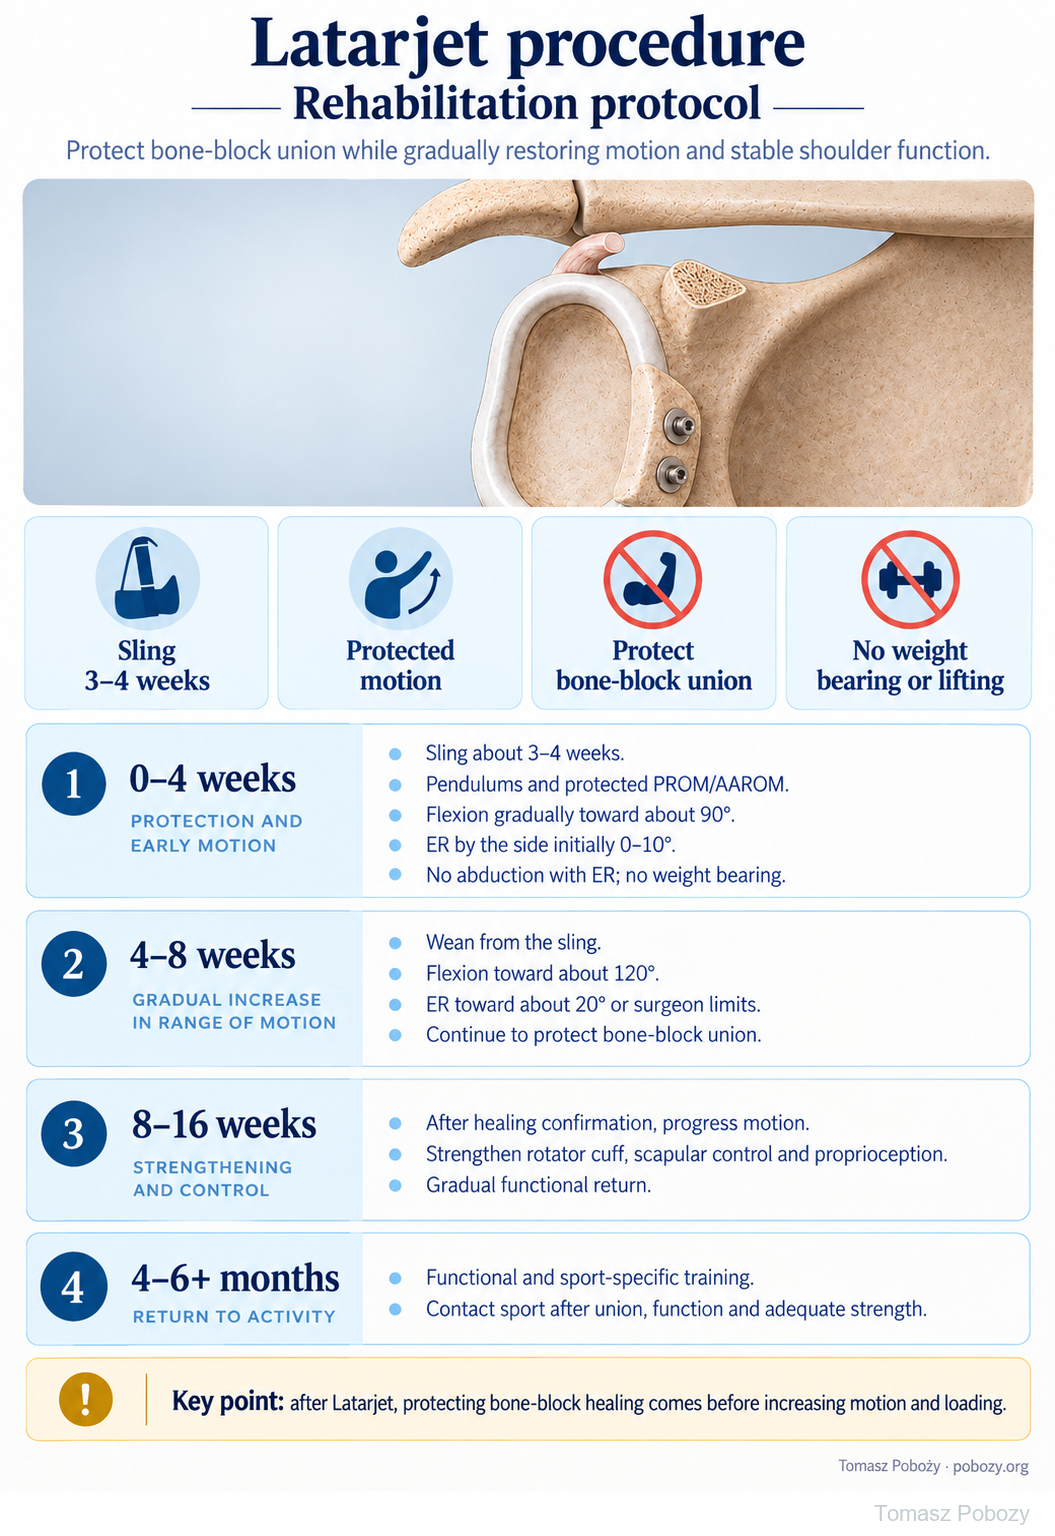
Protect coracoid bone-block union while gradually restoring motion and stable shoulder function. The poster outlines four rehabilitation phases; expandable details, exercise guidance, commentary and references follow below.
Using and loading the limb
During protection, avoid lifting, support and resisted elbow-flexor work. Progression considers bone-block healing and soft-tissue protection.
Full guidance ↓Brace or immobilisation
Sling about 3–4 weeks in this pathway; a longer individual prescription takes priority.
Full guidance ↓Permitted movement
Protective pathway: flexion toward 90° and ER at the side 0–10° during the first 4 weeks, then gradual permitted progression.
Full guidance ↓Permitted movement, loading and removal of a brace are separate decisions. Additional repairs may require a more protective programme.
Rehabilitation at a glance
Progression follows healing and functional criteria, not dates alone.
Rehabilitation boards
The stated ranges and 3–4 weeks of sling use describe this page’s variant. Assisted motion requires clearance; if ER is limited to neutral, do not progress to 10°. Healing and tissue status govern resistance.
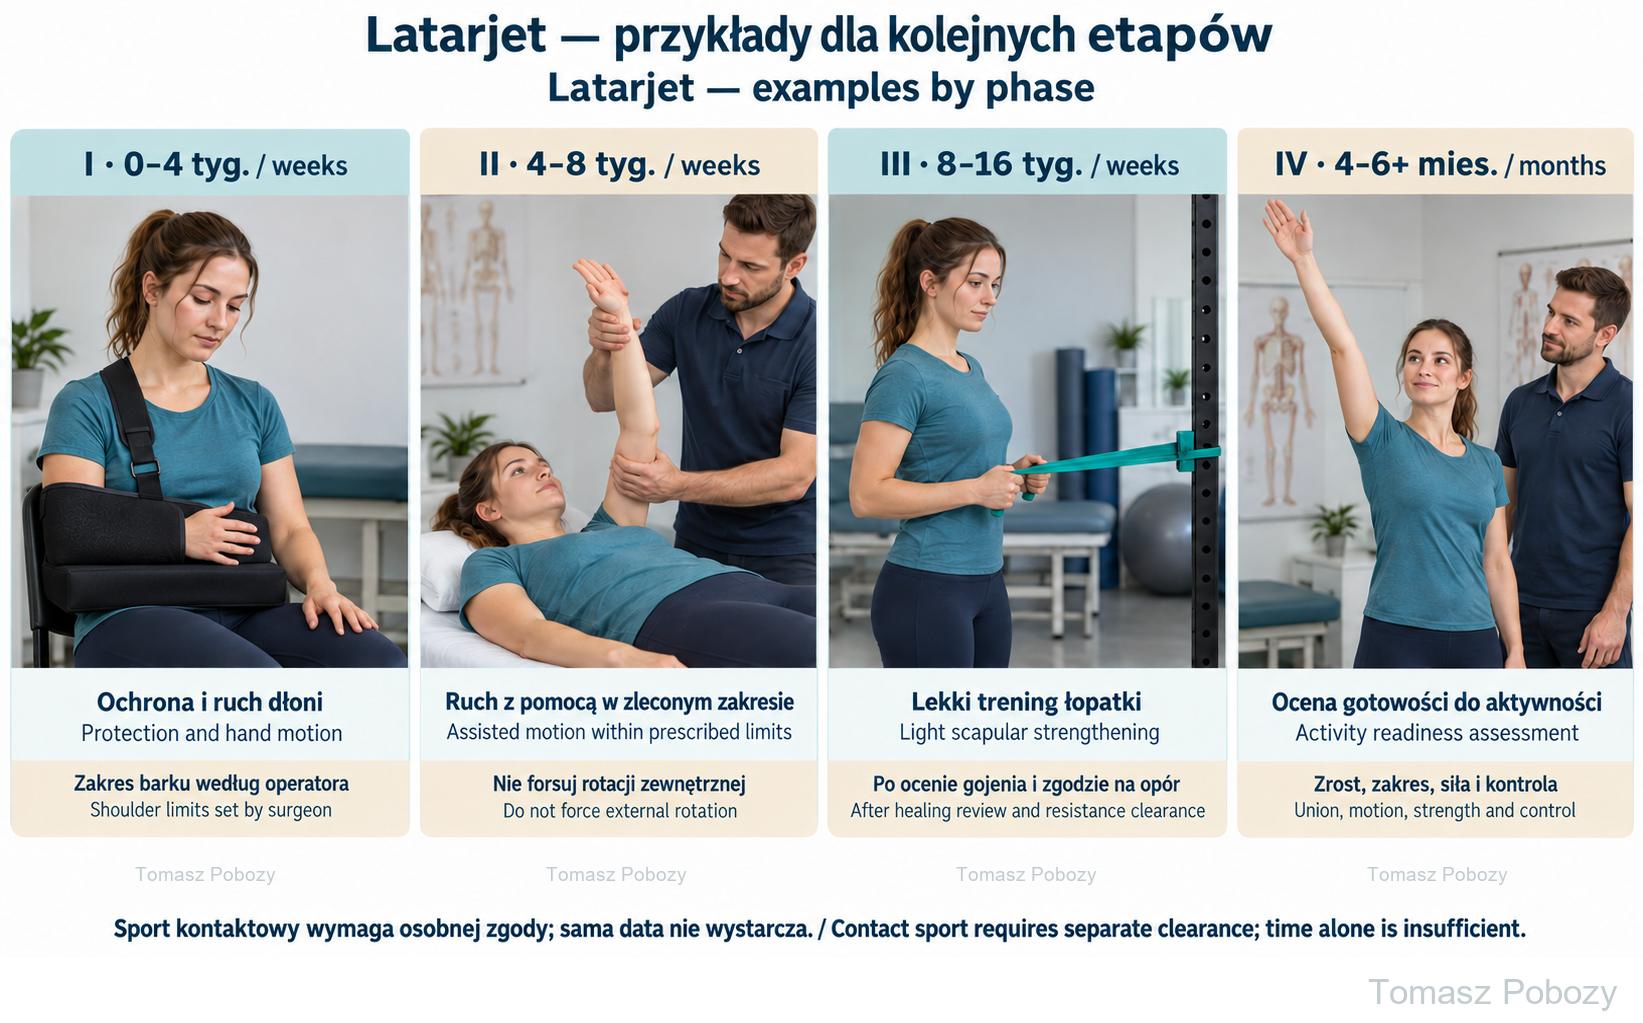
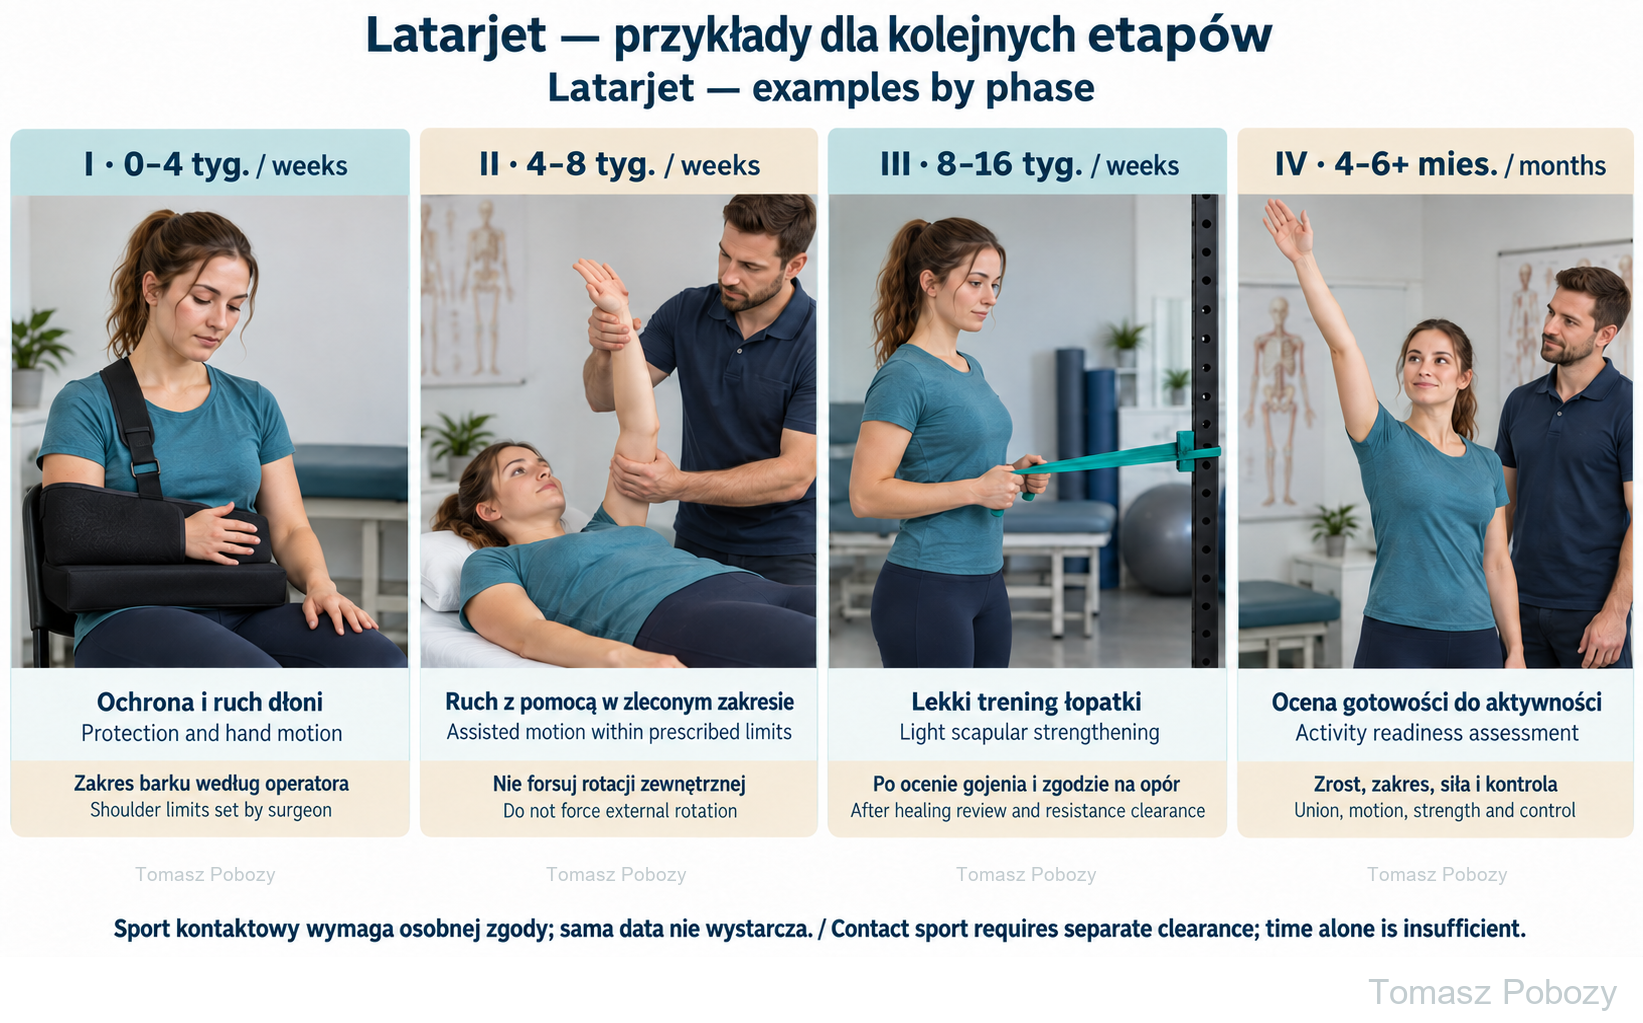
I, weeks 0–4: sling protection and hand motion; the surgeon sets shoulder limits. II, weeks 4–8: assisted motion within prescribed limits, without forcing external rotation. III, weeks 8–16: light scapular strengthening after healing review and resistance clearance. IV, months 4–6 or later: assess union, motion, strength and control before returning to tasks. Contact sport requires separate clearance.
Exercises — a closer look
Use the complete boards above together with the instructions for the chosen stage. An exercise shown for a later stage is not permitted early.
I, weeks 0–4: sling protection and hand motion; the surgeon sets shoulder limits. II, weeks 4–8: assisted motion within prescribed limits, without forcing external rotation. III, weeks 8–16: light scapular strengthening after healing review and resistance clearance. IV, months 4–6 or later: assess union, motion, strength and control before returning to tasks. Contact sport requires separate clearance.
Open the relevant complete board and zoom in. The viewer retains all stages and captions.
Exercise instructions and progression are contained in the stage descriptions linked above.
Scope and protection
Scope, movement precautions and loading
Who is this for?
Adults after a Latarjet procedure with a typical postoperative course. The protocol does not automatically cover revision surgery, unstable fixation, graft fracture or additional tendon repair. Information is needed about bone-block fixation, bone quality, management of the subscapularis and capsule, and planned follow-up.
What requires protection?
A segment of the coracoid is transferred to the anteroinferior glenoid rim with its attached conjoint tendon. Rehabilitation must consider healing of both the bony interface and the soft tissues. Screw fixation alone does not mean that union has occurred.2
Range of motion is not a strength test
In this programme, flexion progresses towards approximately 90° during the first 4 weeks, while initial external rotation with the arm by the side remains within approximately 0–10°. During weeks 4–8, flexion progresses towards approximately 120° and external rotation towards approximately 20°, unless the orthopaedic surgeon specifies otherwise.
These are the parameters of this guide, not targets for the first session. Do not force end range. If the surgeon has prescribed remaining at neutral, the “0–10°” range does not authorise going beyond neutral. Rotation must always be interpreted in relation to the position of the upper arm.
Movement and loading are separate decisions
In the early period, do not bear body weight through the operated arm, lift heavy objects or perform forceful pushing or pulling. Avoid excessive shoulder extension and combined abduction with external rotation. Greater freedom of movement does not yet authorise higher forces across the reconstruction.1
Unloaded hand, wrist and elbow movement must be distinguished from resisted elbow flexion and supination. The latter also loads the attachment to the transferred coracoid and requires separate clearance.2
Exercises and the home programme
What do the poster’s abbreviations mean?
PROM means passive range of motion; AAROM, active-assisted range of motion; AROM, active range of motion; and ER, external rotation. During passive movement the operated arm remains relaxed and is guided externally; during assisted movement the patient contributes. Assistance from a stick or the unaffected hand does not by itself make an exercise entirely passive.
Pendulums
The patient supports themselves with the unaffected hand and leans forwards. The operated arm hangs freely. Small trunk movements produce a gentle swing. Do not use a weight, large swings or active shoulder elevation. Stay within the permitted range.
Elevation and external rotation
Start elevation in a supported position, such as lying on the back. A therapist or the unaffected hand helps guide the arm according to the rehabilitation phase. For external rotation, keep the upper arm close to the trunk and the elbow bent and supported. Do not move the elbow away from the body, twist the trunk or use a stick as a lever to force past the restriction.
Scapular control and later strengthening
First teach controlled scapular positioning and movement. Once resistance is permitted, select light rotation and scapular exercises, followed by more demanding positions and weight-bearing tasks. It is not necessary to perform every example or begin with the strongest available resistance.
A daily programme and separate resistance training
The physiotherapist specifies permitted movements, range, repetitions, frequency and stopping criteria. Resistance training requires its own dosage and recovery time. Increased pain or reduced movement quality after a session calls for dose adjustment, not additional sets. Exercise examples in the sources do not form a compulsory programme for every patient.1, 2
Stages and progression criteria
Phases I–II: surgery to week 8
Phase I — weeks 0–4: protection and safe movement
Goals: protect fixation and the soft tissues, control pain and prevent unnecessary stiffness within permitted limits.
In this programme, a sling is used for approximately 3–4 weeks and removed for hygiene and prescribed exercises. If the discharge instructions specify a longer protective period, those instructions remain binding. The arm should be comfortably supported, including at rest.
Begin unloaded hand, wrist and elbow movement, gentle pendulums and protected passive shoulder movement. Add active-assisted movement once it is permitted. Do not perform all movements independently simply because the arm can be raised.
Flexion progresses towards approximately 90°. Initial external rotation by the side remains within the prescribed range of approximately 0–10°. Continue to avoid weight bearing, lifting, excessive extension and combined abduction with external rotation.
Progression: controlled pain, no concerning wound findings, good tolerance of permitted movement and confirmation that the programme can advance. Do not accelerate a phase solely because there is no pain.
Phase II — weeks 4–8: restoring movement
Gradually wean from the sling as instructed. Develop active-assisted and then active movement, focusing on smooth motion and scapular control. Avoid substituting trunk leaning or abrupt shoulder shrugging for arm elevation.
Towards the end of this phase, progress flexion to approximately 120° and external rotation to approximately 20°, or to the individual limit set by the surgeon. Do not aggressively stretch the front of the shoulder. Continue to protect bone-block healing.
Progression: good quality of available movement, improving function and a healing assessment that permits the next level of loading. If the surgeon requires imaging review, a calendar date does not replace its result.
Phases III–IV: from week 8 and return to activity
Phase III — weeks 8–16: strength and control
Following assessment of healing, gradually restore full functional range of motion. Introduce and progress rotator cuff and scapular strengthening. Select joint-position sense and stabilisation exercises according to current function, without provoking instability.
Once weight bearing is permitted, begin with a small load, such as supported work at a wall, rather than a full floor push-up. Increase resistance, range, repetitions and positional difficulty separately. The anterior shoulder should not be forcefully stretched during strengthening.1, 2
Progression: functional range of motion, good scapulohumeral control, improving strength, no sensation of the shoulder slipping out and tolerance of the previous exercise level.
Phase IV — from approximately months 4–6 and beyond
Develop strength, endurance and tasks specific to work or sport. Progress from simple exercises to overhead movement, faster tasks and sports training. Returning to non-contact training is not the same as returning to full contact or competition.
Consider contact sport after confirmation of union, recovery of functional mobility and adequate strength, and clearance from the surgeon — in this programme, usually around month 6 or later. Reviews describe variable return-to-sport timelines; six months since surgery alone does not establish readiness.4
Criteria: a stable shoulder, task-appropriate range and strength, good movement quality and tolerance of progressively reproduced loads. The patient’s readiness to resume the activity is also assessed.2
Daily activities and follow-up
Daily activities follow the permitted shoulder and elbow motion, lifting and arm support for your procedure. Sling removal is not clearance for lifting or driving. The detailed guidance below explains the criteria and exceptions.
Daily activities and monitoring progress
During the protective phase, do not push up from a chair using the operated hand, carry heavy objects or make sudden movements behind the back. Avoid situations in which the arm could be abruptly pulled or loaded.
Assess not only range but also movement quality, strength, stability and tolerance of the current programme. Compare rotation measurements with the upper arm in the same position. A larger measurement achieved through compensation does not necessarily represent improvement.
Decisions on greater loading are based on clinical assessment and the healing review arranged by the surgeon. The doctor determines whether imaging is needed and which examination is appropriate; an identical imaging schedule is not prescribed for everyone.
Marked deterioration the next day, a new sensation of instability or loss of previously regained function requires reassessment rather than automatic progression to the next phase.
Warning signs
Pain management and warning signs
Take pain medicines according to the postoperative instructions. Pain management should support rest and permitted exercise, not enable forced movement beyond protective limits. Pain is not the only measure of safe loading.
Prompt medical contact: fever, wound discharge, increasing redness, uncontrolled pain, persistent sensory changes or new loss of strength.1 Sudden pain after a jerk, deformity or a renewed sensation of the shoulder slipping out also requires assessment. Stop exercising and do not attempt self-reduction.
Immediate emergency help: sudden shortness of breath, chest pain or fainting. Do not wait for the next rehabilitation session.
For a life-threatening emergency, call your local emergency number immediately — 112 in the European Union. On the boards, 112 refers to the EU.
References
References
The four-phase structure and the 90°/120° flexion and 0–10°/20° external rotation parameters describe the programme adopted in this guide. They are not a verbatim institutional schedule. For example, Mass General Brigham specifies sling use until week 6 and no external rotation beyond neutral until week 5, while Bradley and colleagues describe a different early progression. Such differences do not justify selecting the most permissive element from several protocols.1, 2
Beletsky and colleagues document substantial variation among published protocols. Hurley and colleagues address return to sport rather than establishing a uniform early movement schedule. Progression must reflect the specific operation and the patient’s function.3, 4
- Mass General Brigham. Rehabilitation Protocol for Latarjet Repair. Revised December 2021. Source protocol. [historical link — PDF currently unavailable at this address]
- Bradley H, Lacheta L, Goldenberg BT, Rosenberg SI, Provencher MT, Millett PJ. Latarjet Procedure for the Treatment of Anterior Glenohumeral Instability in the Athlete – Key Considerations for Rehabilitation. Int J Sports Phys Ther. 2021;16(1):259–269. doi:10.26603/001c.18707.
- Beletsky A, Cancienne JM, Manderle BJ, Mehta N, Wilk KE, Verma NN. A Comparison of Physical Therapy Protocols Between Open Latarjet Coracoid Transfer and Arthroscopic Bankart Repair. Sports Health. 2020;12(2):124–131. doi:10.1177/1941738119887396.
- Hurley ET, Montgomery C, Jamal MS et al. Return to Play After the Latarjet Procedure for Anterior Shoulder Instability: A Systematic Review. Am J Sports Med. 2019;47(12):3002–3008. doi:10.1177/0363546519831005.
Clinical commentary and terms of use
Commentary
A specific case, a specific patient, a specific surgeon
After a Latarjet procedure, neither complete immobilisation nor rapid recovery of full range is an end in itself. Protected movement should limit stiffness without overloading the healing reconstruction. Restoring range and increasing loads are related, but they are not identical decisions.
Fixation stability, bone quality, management of the subscapularis and capsule, and associated procedures all matter. Do not automatically replace Latarjet instructions with a Bankart repair protocol or an isolated biceps tenodesis programme.
Cooperation between surgeon and physiotherapist
The physiotherapist assesses function, selects exercises, teaches technique and adjusts dosage. The surgeon supplies information about the reconstruction, its stability and the protection required. Information should flow in both directions — including progress and proposed changes, not only problems.
When there is insufficient information to agree variations, follow the postoperative instructions. Absence of pain does not authorise testing fixation through a forceful manoeuvre or by provoking instability.