 Skip to content
FOR CLINICIANS AND PHYSIOTHERAPISTS
Proximal humerus fracture fixation — rehabilitation protocol
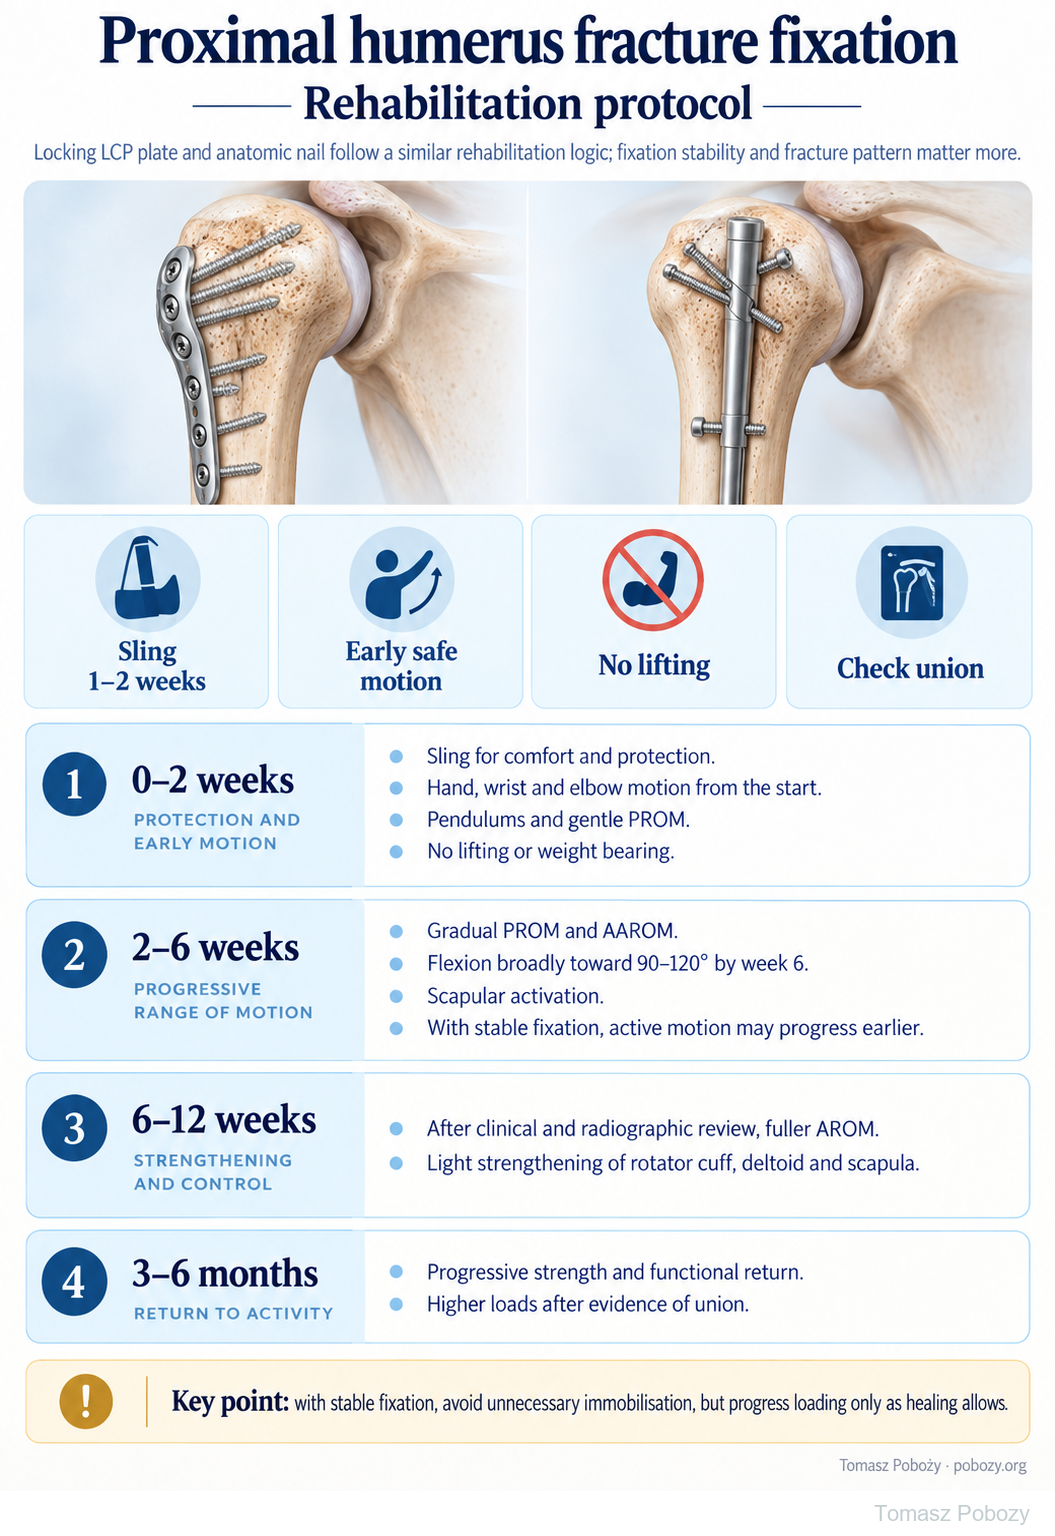
Locking LCP plate or anatomic intramedullary nail — shared principles of protection, restoring movement and later strengthening. The poster outlines four rehabilitation phases; expandable details, exercise guidance, commentary and references follow below.
Using and loading the limb
No lifting or body-weight support until cleared. Greater resistance depends on fracture, tuberosity and any tendon-repair healing.
Full guidance ↓Brace or immobilisation
Comfort sling usually 1–2 weeks in this pathway; use longer protection when the repair requires it.
Full guidance ↓Permitted movement
Begin with permitted passive motion, then assisted and active motion. Approximate 90–120° by week 6 is not a first-session target or a universal fixation limit.
Full guidance ↓Permitted movement, loading and removal of a brace are separate decisions. Additional repairs may require a more protective programme.
Rehabilitation at a glance
Progression follows healing and functional criteria, not dates alone.
Rehabilitation boards
Sling use for 1–2 weeks is a variant after stable fixation. Week six does not automatically permit active motion or strengthening: healing, tuberosity repair and tendons need assessment.
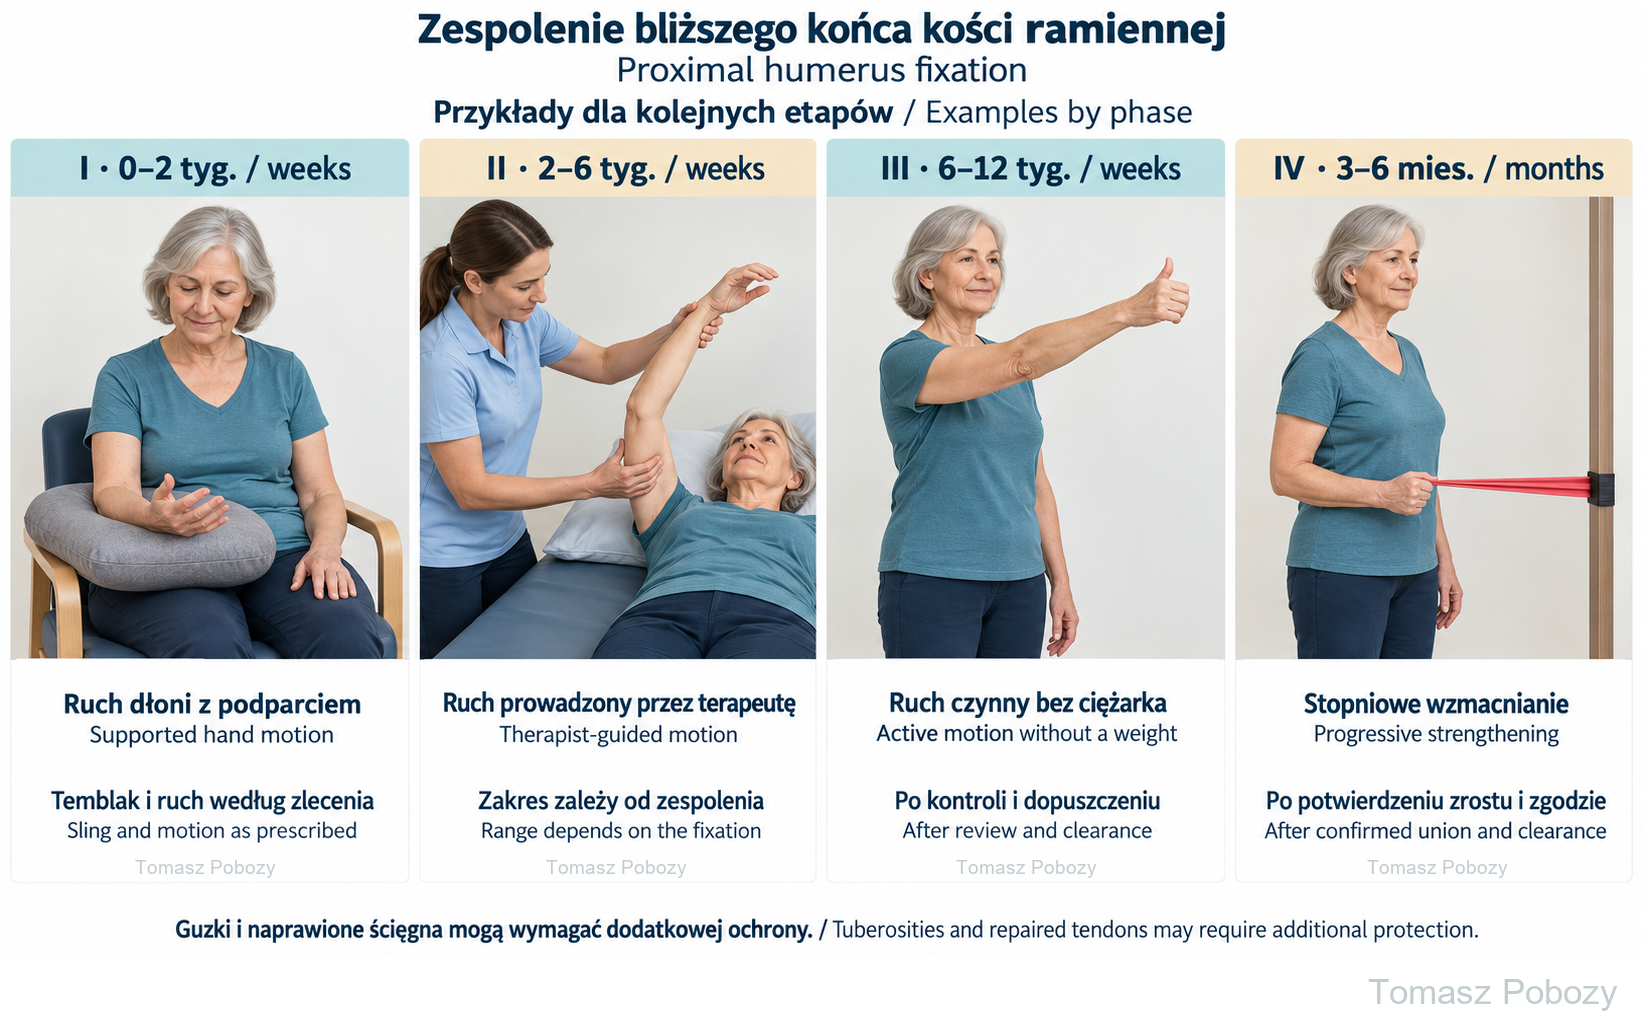
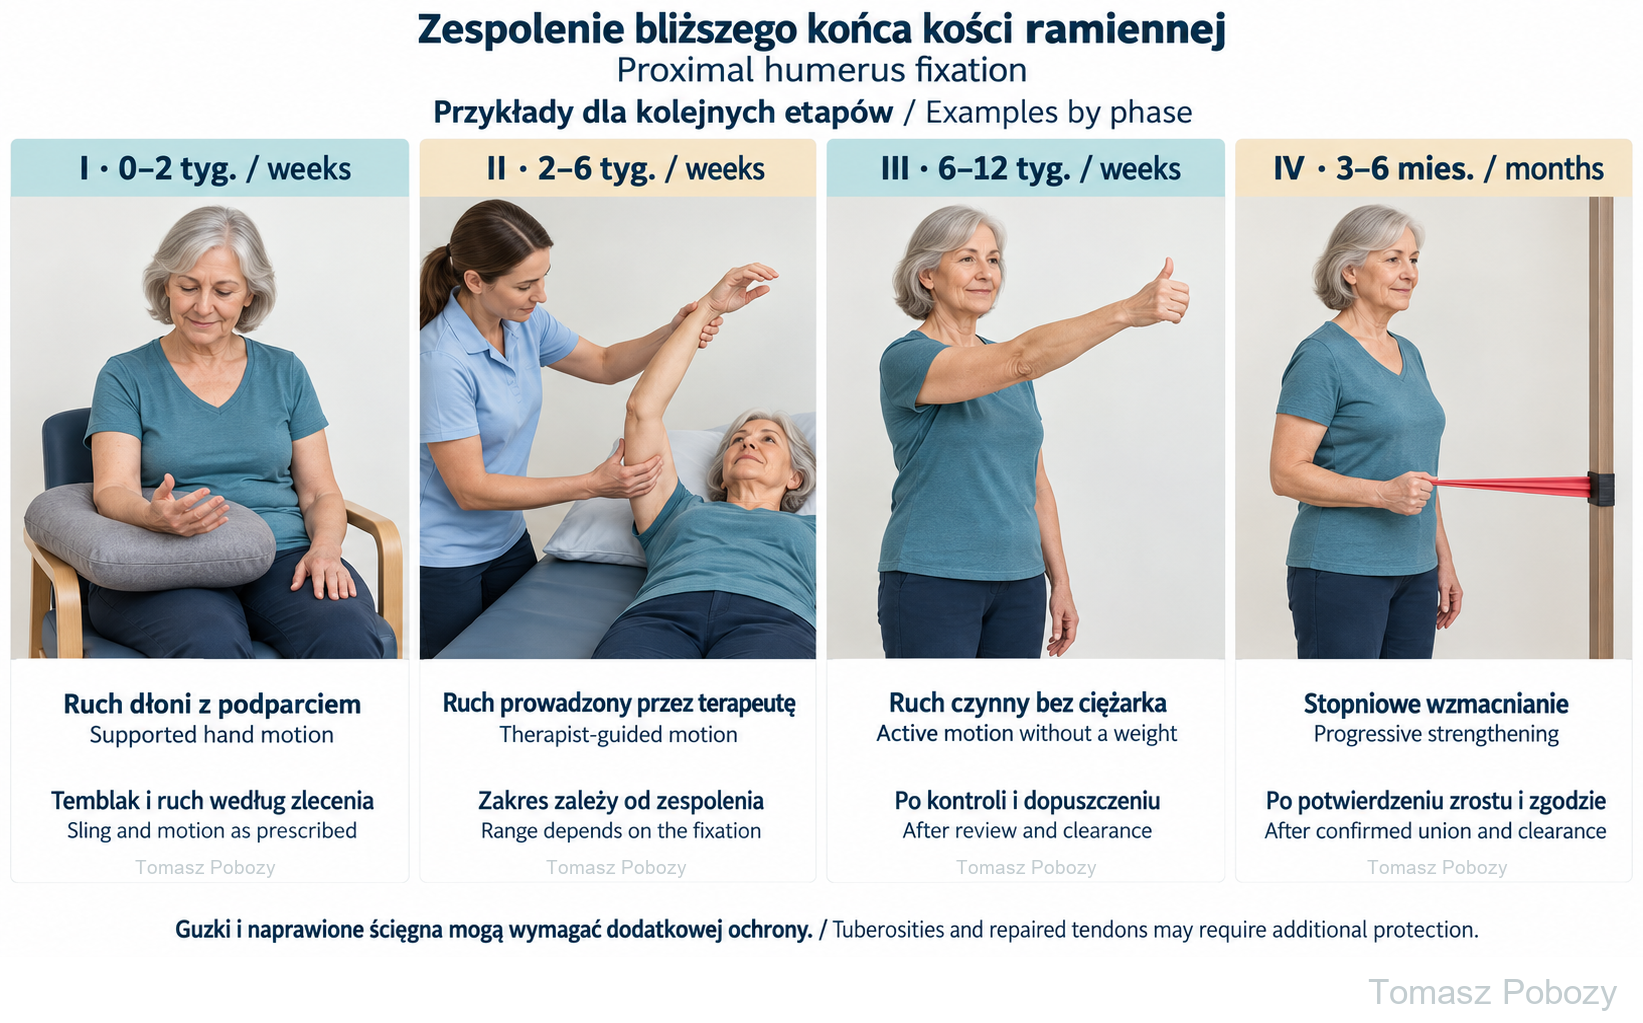
I, weeks 0–2: hand motion with forearm support; sling as prescribed. II, weeks 2–6: therapist-guided motion within limits appropriate for the fixation. III, weeks 6–12: active motion without a weight after review and clearance. IV, months 3–6: progressive strengthening after confirmed union and clearance. Tuberosities and repaired tendons may need additional protection.
Exercises — a closer look
Use the complete boards above together with the instructions for the chosen stage. An exercise shown for a later stage is not permitted early.
I, weeks 0–2: hand motion with forearm support; sling as prescribed. II, weeks 2–6: therapist-guided motion within limits appropriate for the fixation. III, weeks 6–12: active motion without a weight after review and clearance. IV, months 3–6: progressive strengthening after confirmed union and clearance. Tuberosities and repaired tendons may need additional protection.
Open the relevant complete board and zoom in. The viewer retains all stages and captions.
Exercise instructions and progression are contained in the stage descriptions linked above.
Scope and protection
Scope, fixation type and protection
Who is this for?
Adults after stable proximal humerus fracture fixation with a locking LCP plate or anatomic intramedullary nail, with a typical postoperative course. This programme does not automatically apply to arthroplasty for a fracture, nonunion surgery or an unstable reconstruction.
Option 1 — locking LCP plate
The plan reflects the fragments actually reconstructed, fixation stability and bone quality. Having a plate does not authorise unrestricted movement or immediate lifting. If the tuberosities were fixed or rotator cuff tendons repaired, protecting them is part of the programme.2
Option 2 — anatomic intramedullary nail
Use the same main stages: protection, progressive restoration of movement and strengthening after assessment of healing. The operative report should also be checked for management of the rotator cuff at the nail entry site and any tuberosity fixation. A nail does not automatically justify faster rehabilitation than a plate.3
Movement is not the same as loading
Permission for passive or assisted movement does not authorise weight bearing, lifting objects or forceful pulling. Active movement also requires muscle work, even without a weight. Following tuberosity or tendon repair, rotation limits and the timing of active cuff work depend on individual instructions.2, 3
Do not prescribe the same range for everyone from the implant name alone. The fracture pattern, fixation stability, soft-tissue condition and follow-up schedule must be known. Clarify unclear instructions with the orthopaedic surgeon.
Exercises and the home programme
What do the poster’s abbreviations mean?
PROM means passive range of motion; AAROM, active-assisted range of motion; and AROM, active range of motion. During passive movement, a therapist or an appropriate aid guides the relaxed arm. In assisted movement, the patient contributes, so it is not the same as passive movement.
Pendulums
After instruction, the patient supports themselves with the non-operated hand and leans forwards. The operated arm remains relaxed; small trunk movements produce a gentle swing. Do not use weights, large swings or active jerking of the shoulder. Pendulums do not replace the whole mobility programme.
Assisted elevation
Choose a supported position and a range appropriate to the phase. A physiotherapist or the unaffected hand provides assistance. Once assisted movement is permitted, a suitably selected table slide may be used. Do not try to gain range through excessive trunk leaning or abrupt scapular elevation.1
Active movement and later strengthening
Reduce assistance gradually. Add resistance only when permitted, starting low. Rotation, abduction and weight-bearing exercises are not interchangeable: they may load the fixed fragments and repaired tendons differently. Selection depends on the operative report and patient assessment.
A daily programme and separate resistance training
The physiotherapist specifies exercises, permitted range, repetitions and frequency. Not every example needs to be performed at every session. Later resistance training has its own dosage and recovery intervals. Increase one element at a time and do not compensate for missed exercises with heavier loading.
Stages and progression criteria
Phases I–II: surgery to week 6
Phase I — weeks 0–2: protection and early movement
Goals: protect fixation, control pain, maintain mobility of the distal joints and begin safe shoulder movement.
The sling provides comfort and support, usually for 1–2 weeks in this programme or for the period prescribed by the surgeon. Remove it for hygiene and prescribed exercises. If the fracture or tissue repair requires longer protection, do not shorten it based on the poster.
From the first days, introduce hand, wrist and elbow movement, gentle pendulums and gentle passive shoulder movement within permitted limits. Do not lift or bear body weight through the operated arm. With stable fixation, avoid unnecessary prolonged immobilisation, but do not force end range.
Progression: pain permits the prescribed exercises, the wound is satisfactory, and the patient can reproduce the permitted movements without jerking or overloading the arm.
Phase II — weeks 2–6: restoring mobility
Gradually increase passive and active-assisted movement. Progress flexion as tolerated, broadly towards 90–120° by the end of week 6. This is a reference point for this programme, not a required result at the first session or a fixed limit for every operation.
Develop scapular control. With stable fixation and the surgeon’s approval, active movement may progress earlier. Do not introduce it solely because pain has decreased. Continue to respect separate restrictions on rotation, lifting and weight bearing arising from the repair.
Progression: improving mobility and movement quality, good tolerance of the existing programme, and clinical and radiographic review permitting rehabilitation to advance.
Phases III–IV: from week 6 and return to activity
Phase III — weeks 6–12: active movement and light resistance
Following clinical and radiographic review, progress towards fuller active movement. As adequate healing is achieved and loading is permitted, introduce light strengthening of the rotator cuff, deltoid and scapular muscles.
The start of week 6 does not automatically authorise resistance exercise. Its introduction depends on fixation, the condition of the tuberosities and tendons, and the surgeon’s assessment. Initially, controlled technique and tolerance of low resistance matter more than the weight used.
Progression: advancing healing, better control of active elevation, tolerance of the current load and improving ability in daily activities.
Phase IV — approximately months 3–6: strength and function
Develop strength, endurance and tasks required for work and recreation. Introduce higher loads after confirmation of union and recovery of appropriate arm control. Do not begin with maximal lifting or full overhead loading.
A locking LCP plate and anatomic nail follow the same overall progression. Differences in timing reflect the specific fracture and repair achieved. The 3–6-month period does not guarantee complete recovery for every patient.
Criteria: confirmed healing sufficient for the proposed load, range adequate for the task, good shoulder control and tolerance of activity without significant deterioration after exercise.
Daily activities and follow-up
Daily activities follow the permitted shoulder and elbow motion, lifting and arm support for your procedure. Sling removal is not clearance for lifting or driving. The detailed guidance below explains the criteria and exceptions.
Daily activities and assessment of union
During the protective phase, do not push up from a chair using the operated hand, carry heavy shopping or suddenly catch falling objects. Introduce light activities within permitted limits gradually. Discontinuing the sling does not remove the lifting restriction.
Clinical reviews and radiographs assess maintenance of fragment alignment and progress towards union. The surgeon sets the timing and required examinations. Less pain does not replace follow-up, and a date in the schedule does not confirm union.
Monitor active and passive movement, strength, elevation quality and everyday function. New weakness, loss of previously regained range or marked deterioration after increased activity requires reassessment rather than automatically adding more exercises.
Warning signs
Pain management and warning signs
Use pain medicines according to the postoperative instructions. They should enable rest and permitted movement, not forced range or premature lifting. A marked increase in pain after a session and the following day calls for dose adjustment and reassessment.
Prompt medical contact: fever, increasing wound drainage, worsening redness, uncontrolled pain, persistent sensory changes or new loss of strength.1 Following a fall, sudden pull or new deformity, stop exercising until assessed.
Immediate emergency help: sudden shortness of breath, chest pain or fainting. Do not wait for the next rehabilitation appointment.
For a life-threatening emergency, call your local emergency number immediately — 112 in the European Union. On the boards, 112 refers to the EU.
References
References
The poster and four phases describe the early rehabilitation programme adopted here for stable fixation. Sling use for 1–2 weeks and flexion broadly towards 90–120° by week 6 are not a verbatim Mass General Brigham schedule. That institution recommends a sling for at least 3 weeks, active shoulder movement from week 6 and an initial shoulder-strengthening phase during weeks 8–12.1
AO Surgery Reference emphasises adjusting movement and loading to stability and the healing of bone and soft tissues. Its descriptions concern specific fracture patterns and should not be applied mechanically to every case.2, 3 The review by Budharaju and colleagues documents substantial variation in programmes, including plate and nail fixation; it does not identify one best schedule.4
- Mass General Brigham. Rehabilitation Protocol for Proximal Humeral Fracture Open Reduction Internal Fixation (ORIF). Revised October 2021. Source protocol. [historical link — PDF currently unavailable at this address]
- Jaeger M, Leung F, Li W. AO Surgery Reference. ORIF — Plate fixation for 4-part, marked displacement, intact articular, valgus malalignment. Principles and rehabilitation. Source guidance.
- Jaeger M, Leung F, Li W. AO Surgery Reference. Nailing for extraarticular 3-part, surgical neck and tuberosity, no impaction. Principles and rehabilitation. Source guidance.
- Budharaju A, Hones KM, Hao KA et al. Rehabilitation protocols in proximal humerus fracture management: A systematic review. Shoulder Elbow. 2024;16(4):449–458. doi:10.1177/17585732231182374.
Clinical commentary and terms of use
Commentary
A specific case, a specific patient, a specific surgeon
We do not create radically different programmes solely because one patient received a plate and another a nail. What was fixed, how stable the fixation is and which tissues require protection matter more. Start shoulder movement early within safe limits and increase loading as healing progresses.
Do not copy the intensity of rehabilitation after isolated capsular release. Following a fracture, greater mobility must not come at the expense of maintaining fixation. Conversely, do not prolong immobilisation without an indication and reassessment.
Cooperation between surgeon and physiotherapist
The surgeon communicates the fracture pattern, fixation conditions, information about the tuberosities and tendons, and restrictions. The physiotherapist selects exercises, checks technique and assesses the response to the programme. Information should flow in both directions, including progress and proposed changes.
When information needed to agree variations is missing, the postoperative instructions remain the reference. Do not test the stability of fresh fixation with a forceful manoeuvre.